WANT TO MONETIZE YOUR BLOG?
There are a couple ways to go about it. You might join an affiliate program and get paid for recommending other people’s products and services to your readers. Or you might build a membership site packed full of useful, interesting content that’s only available to your subscribers.
As the title suggests, in this article we’re going to be looking at the second option.
Building a membership site from scratch requires a bit of legwork – and that’s before you’ve even started creating exclusive content for your would-be members. There are a lot of considerations. As a minimum, you need to:
- Manage your members (including account setup and customization)
- Restrict content to your subscribers
- Find some way of handling payments
And that’s on top of all the demands of building a “regular” website, like choosing the best theme and making it easy for users to navigate.
Fortunately, WordPress offers a bunch of plugins – some free, some paid-for – that do a lot of the hard work for you.
Choosing Your Membership Site Plugins
WordPress currently has close to 60,000 plugins available. Some of them offer lots of functionality; others just do one or two super-specific things. Some are expensive, some are completely free.
There’s no point hiding this: when it comes to building a membership site, the simplest option is definitely to go with an all-in-one solution. There are lots available, and they’ll handle every element of building and running your membership site. The only drawback is that they’re not cheap, with prices generally around $149 per year (and sometimes considerably more). That makes them pretty prohibitive if you’re just starting out.
Alternatively, you could do it yourself using a combination of simple plug-ins that handle all the basic elements you need to launch your membership site. Here’s how to do it:
1. CREATING NEW USER ROLES
As standard, WordPress offers you a limited number of user roles:
- Subscriber
- Contributor
- Author
- Editor
- Administrator
That’s all you’ll need to handle the back end of a regular WordPress site, but there’s no option for “Member” – essentially a front-end user who’s able to access premium areas of your site.
The Members plugin allows you to create extra roles:
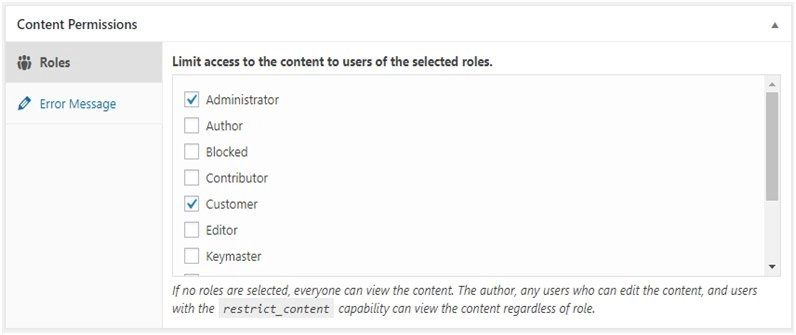
As you’ll notice from the above screenshot, it also enables you to set content permissions for those roles.
Depending on your membership model, you’ll either create a single role called something like “Member”, or multiple roles for different subscription tiers or packages.
2. Setting Up User Registration & Login
Clearly, if you’re going to run a membership site, you need to create some way for people to actually become members in the first place, and to access your membership area when they return to your site.
In other words, you need to set up registration and login functionality. A plugin called Profile Builder can help you do this.
You’ll have to pay for Profile Builder (prices start at $69 a year for use on a single website). But it’s worth the upfront expense, because it makes the whole process super simple.
All you need to do is create a new page on your site and add the following shortcode:
Then simply publish the page and Profile Builder will handle the rest of the registration and user management process (plus it’s GDPR-compliant).
So you’ve built your registration page; now you need to post the login form somewhere visible. To add it to one of your site’s widget areas, simply go to Appearance | Widgets within your WordPress menu and use the Profile Builder Login Widget.
3. PUBLISHING MEMBERS-ONLY CONTENT
This is the real meat and potatoes of your membership site. Without exclusive content, no one’s going to sign up in the first place.
The first step is creating an area of your site that’s only accessible to members.
Again, this is a pretty simple process – just add a new page using the Pages | Add New option within your WordPress menu. That page will be the hub of your membership area (you might want to add subpages as well in order to categorize the content you’re offering). The only thing to bear in mind here is that you’ll need to select the right options in the Content Permissions box, so only members can access it.
Next comes content creation. This is a huge subject in its own right, and if you already have a blog, you presumably already know how to do it.
However, one word of advice: you don’t necessarily need to create a ton of content upfront before launching your membership site. For instance, your membership model could be based around offering live webinars. When you first go live with your membership offer, you’ll be inviting people to take part in the first webinar.
That way, a small (or non-existent) content library doesn’t have to be a barrier to entry.
4. BUILDING A CUSTOM MEMBERSHIP MENU
Members need an easy way to navigate around your site and find the “good stuff” – that is, the content they’re paying to access. To do that, you’ll want to add a membership section to your menu bar. There are two options here:
- Add a standard dropdown using the Appearance | Menus setting within WordPress
- Customize your menu so that it displays different links depending on the user’s membership status
Option two is really useful if you’re going to be operating different tiers of membership. For instance, you might have a “freemium” option that allows subscribers to view a limited amount of content, while paying members will have full access.
To create a customizable menu like this, use a tool like Nav Menu Roles.
You’ll create it like normal, selecting all of your membership pages and adding them to the menu. But the extra functionality of Nav Menu Roles allows you to assign membership-based access levels:
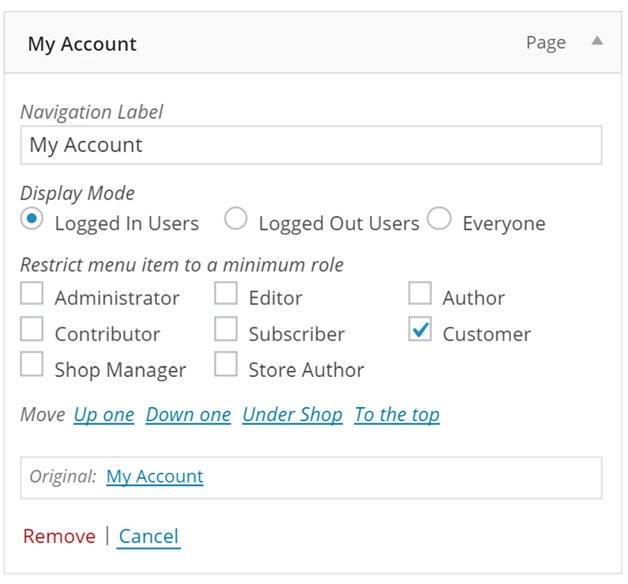
It’s important to note that WordPress treats menu items and pages as wholly separate. So Nav Menu Roles doesn’t actually restrict access to content – it’s solely for displaying or hiding items in the navigation menu. That’s why you also need to follow the previous steps in this guide to actually make your content exclusively available to members.
5. MONETIZING YOUR MEMBERSHIP SITE
Finally, the reason you’re doing all of this in the first place: to make some cash!
There are a few different plugins that allow you to collect recurring payments from members.
One of the most popular and easy to use is WP Simple Pay, which allows you to set up recurring payments using the Stripe platform, with the ability to customize price plans, setup fees (if relevant) and charge limits (i.e. the number of times a payment will be taken before being cancelled):
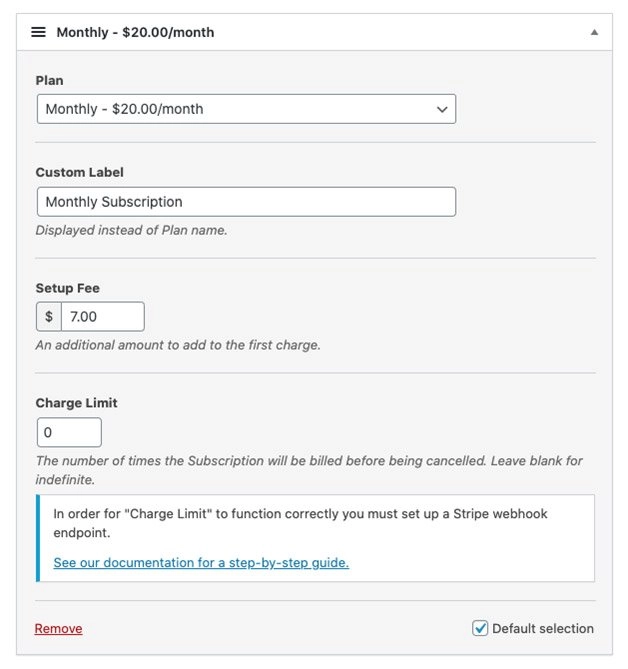
There’s just one catch with WP Simple Pay: it’s not free, with prices starting at $99 per year. At that level, you might as well opt for an all-in-one membership plug-in that incorporates payments.
Alternatively, WP PayPal allows you to bill recurring payments via PayPal free of charge. And it couldn’t be easier to use – the plugin uses shortcodes to generate dynamic buttons that enable the PayPal checkout process. The “subscription” option is enabled with the following shortcode:
[wp_paypal button=”subscribe” name=”My product” a3=”1.00″ p3=”1″ t3=”M” src=”1″]
Conclusion
Sure, there are a lot of things to consider when you’re building a membership site.
If you go down the DIY route, it’s naturally going to take you a little longer than if you shell out for an all-in-one solution.
However, it’s far from impossible. Choose the right plugins and you can build a membership site with all the functionality you need. Get the marketing right (and create good enough content) and you’re well-placed to start making some real money from your website.