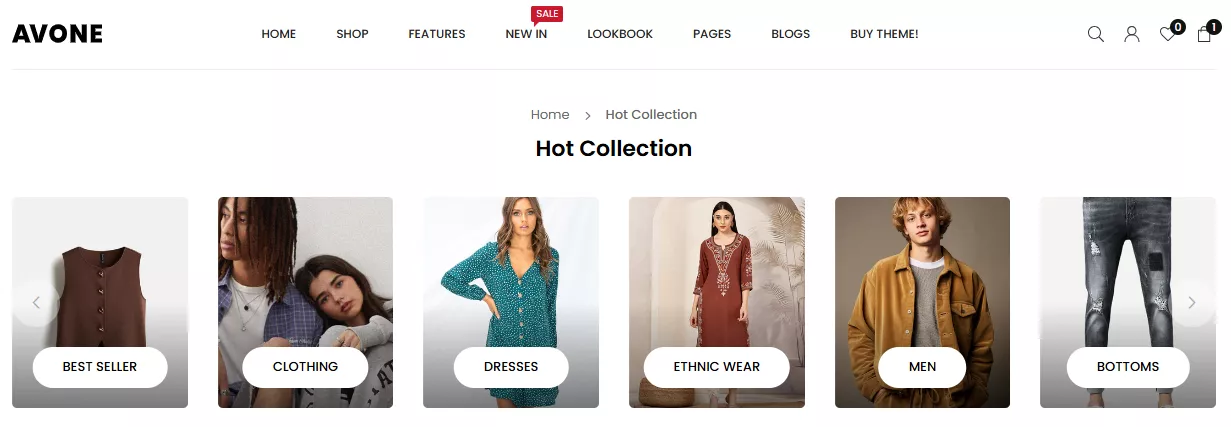
Avone premium Shopify theme stands out for several compelling reasons. First and foremost, its sleek and modern design is highly customizable, allowing you to create a unique brand identity that resonates with your target audience.
Key advantage of the Avone premium Shopify theme is its user-friendly interface. Users of varying technical skill levels will find it easy to navigate and implement desired changes without extensive coding knowledge. This accessibility allows you to focus more on building your brand rather than getting bogged down in technical details.
You may request complimentary theme installation. After making a purchase, please create a support ticket, provide your theme purchase code, and request the theme installation.
In today’s mobile-first world, Avone ensures that your store looks stunning on all devices, from desktops to smartphones, which can lead to increased customer engagement and sales.
Avone is optimized for performance, ensuring fast loading times which are critical for retaining visitors and improving overall user satisfaction.
The developers behind the Avone theme consistently release updates that not only fix bugs but also introduce new features and enhancements based on user feedback.
You gain access to reliable customer support as well as extensive documentation that can assist you in resolving any issues quickly.
Many users praise the flexibility and design of the Avone theme in forums and reviews, providing assurance of its quality through testimonials.
In summary, the Avone premium Shopify theme is an excellent choice due to its combination of aesthetic appeal, performance benefits, ease of use, compatibility with essential tools, robust support options, and scalability potential—all critical factors in establishing a successful online retail presence.
No Worry! Click below to create a free store and pay just $1 for the first three months.

Installation is easy and quick. We recommended you to read Shopify Manual to have clear idea about all the aspects of theme customization.
INFO! If you don't want to spend your time installing the theme and store set up, Feel free to contact for our paid store setup serivce.
You can send an email direct on info@adornthemes.com. We will reach out to you very soon.
Don't have store yet? You can send an email on info@adornthemes.com.
We will create Development store for you with unlimited trial time. You can Transfer ownership when store is ready to launch.
Step 1. Download theme package from Themeforest. https://themeforest.net/downloads [ Please make sure you have already logged in to ThemeForest. - https://themeforest.net/ ]
Step 2. Extract/Unzip all files from downloaded package. Find “avone-install-vx.x.x.zip” file. This is theme default demo zip file. Please install this file on your shopify store.
Step 3. Logging into your Shopify store and Navigate to Themes → Click “Add theme” → Upload zip file. Click here

Step 4. Click on Publish button to publish new theme
Step 1. Follow above step 1 to step 3
Step 2. Now go to the "Demo Preset - 6.0" folder that you downloaded from themeforest.net.

Simply copy all the data from the mention files inside the preset folder. Then, paste this data into the same files of your theme on your store.
index.json
settings_data.json
header-group.json
footer-group.json
Follow the steps below to complete the process.
Step 3. Inside the Preset folder, you will find folders for all available skins. Open the skin folder you would like to install.
Click here to view all available home skins/demos.
Within the selected skin folder, you will see four files as mention above
|
|
Step 4. Navigate to the Avone theme that you recently uploaded. Click dot icon and then click on Edit Code.

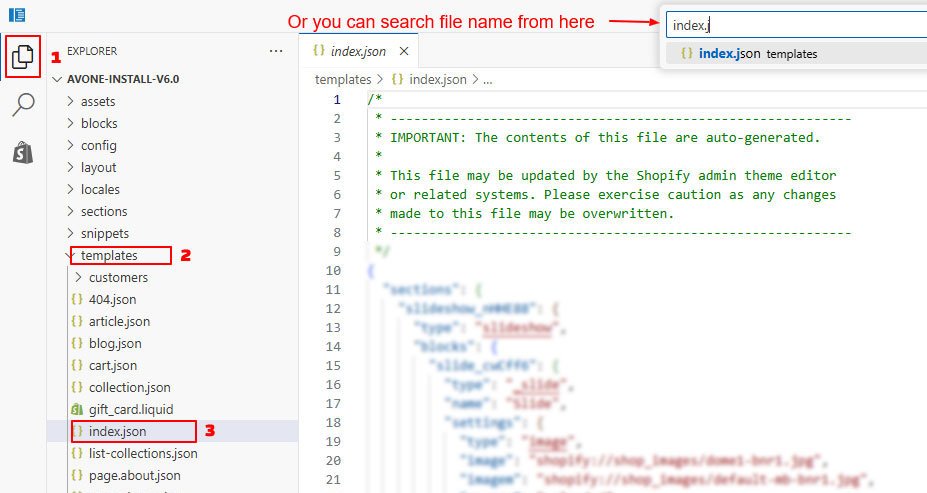
Step 5. Find Templates folder and open index.json file.
Step 6. Select and remove all data from this file. Now paste copied preset data. ( index.json file data you copied in Step 3) And Click Save.
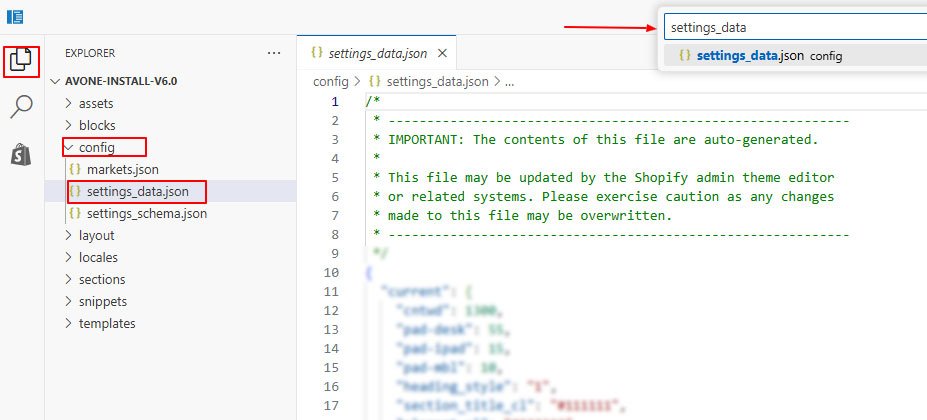
Step 7. Find Config folder and open settings_data.json file.
Step 8. Select and remove all data from this file. Now paste copied preset data. ( settings_data.json file data you copied in Step 3) And Click Save.
Step 9 : Follow the same steps for the header-group.json and footer-group.json files.
Go to your store files, find these two files, replace their existing data with the preset folder data (see Step 3) and save.
Step 10. By Default your uploaded theme is unpublished. Another theme is active on your store. You can publish new theme when you are done with theme configuration and setup.
Step 11. Click on Publish button to publish new theme
Customize your store search, filtering, and product recommendations, so you can enhance your products’ relevance and sell more.
Craft stunning web pages without code. More advanced customization to convert your visitors.
PageFly caters to everyone, from first-time store owners to fast-growing merchants and expert agencies.
Complete, easy referral & affiliate program app, trusted by top brands & experts for a revenue boost.
Discover UpPromote's powerful influencer marketing & referral program, winning the hearts & brands' trust through real testimonials
Please follow below required settings on your store.
From your store Admin → Click Settings → Locate Customer accounts
Do as below and click Save

From your store Admin → Click Settings → Locate Shipping and delivery
Please configure your shipping rates by following this article by shopify
From your store Admin → Click Settings → Locate General → Store defaults
Click on three dot icon → Change currency formatting
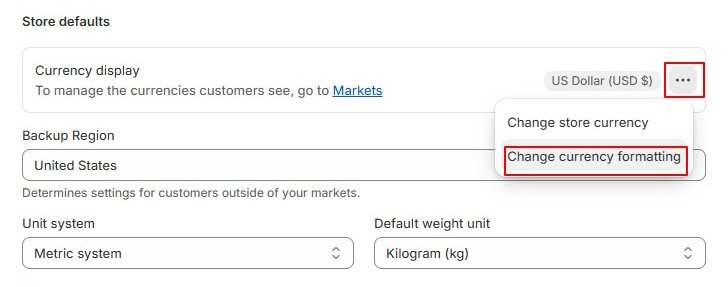
Update these fields
HTML with currency to
HTML without currency to
From your store admin → Click Content → Menus →
Steps

Preview

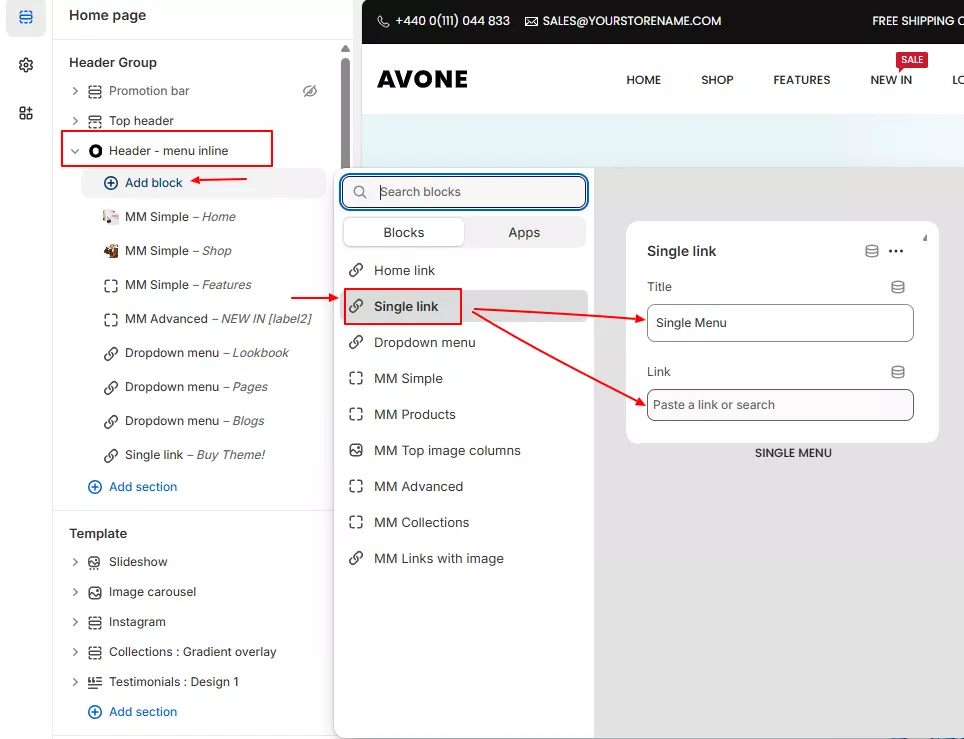
In the theme editor → Click Header → Add block→ Click Single Link
Set Link Name, Select Menu Link and click Save. Repeat this steps for all menu items you want to display.
Preview dropdown menu

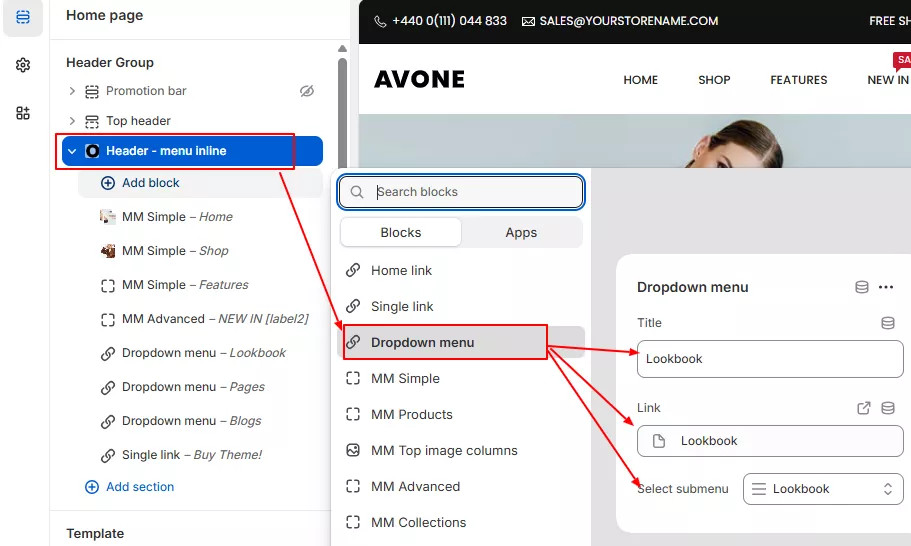
Step 1 : Create dropdown menu. Screenshot attached below. Click here to know in detail.

Step 2 :
In the theme editor → Click Header → Add block→ Click Dropdown Menu
Set Link Name, Menu Link and Select Dropdown Menu
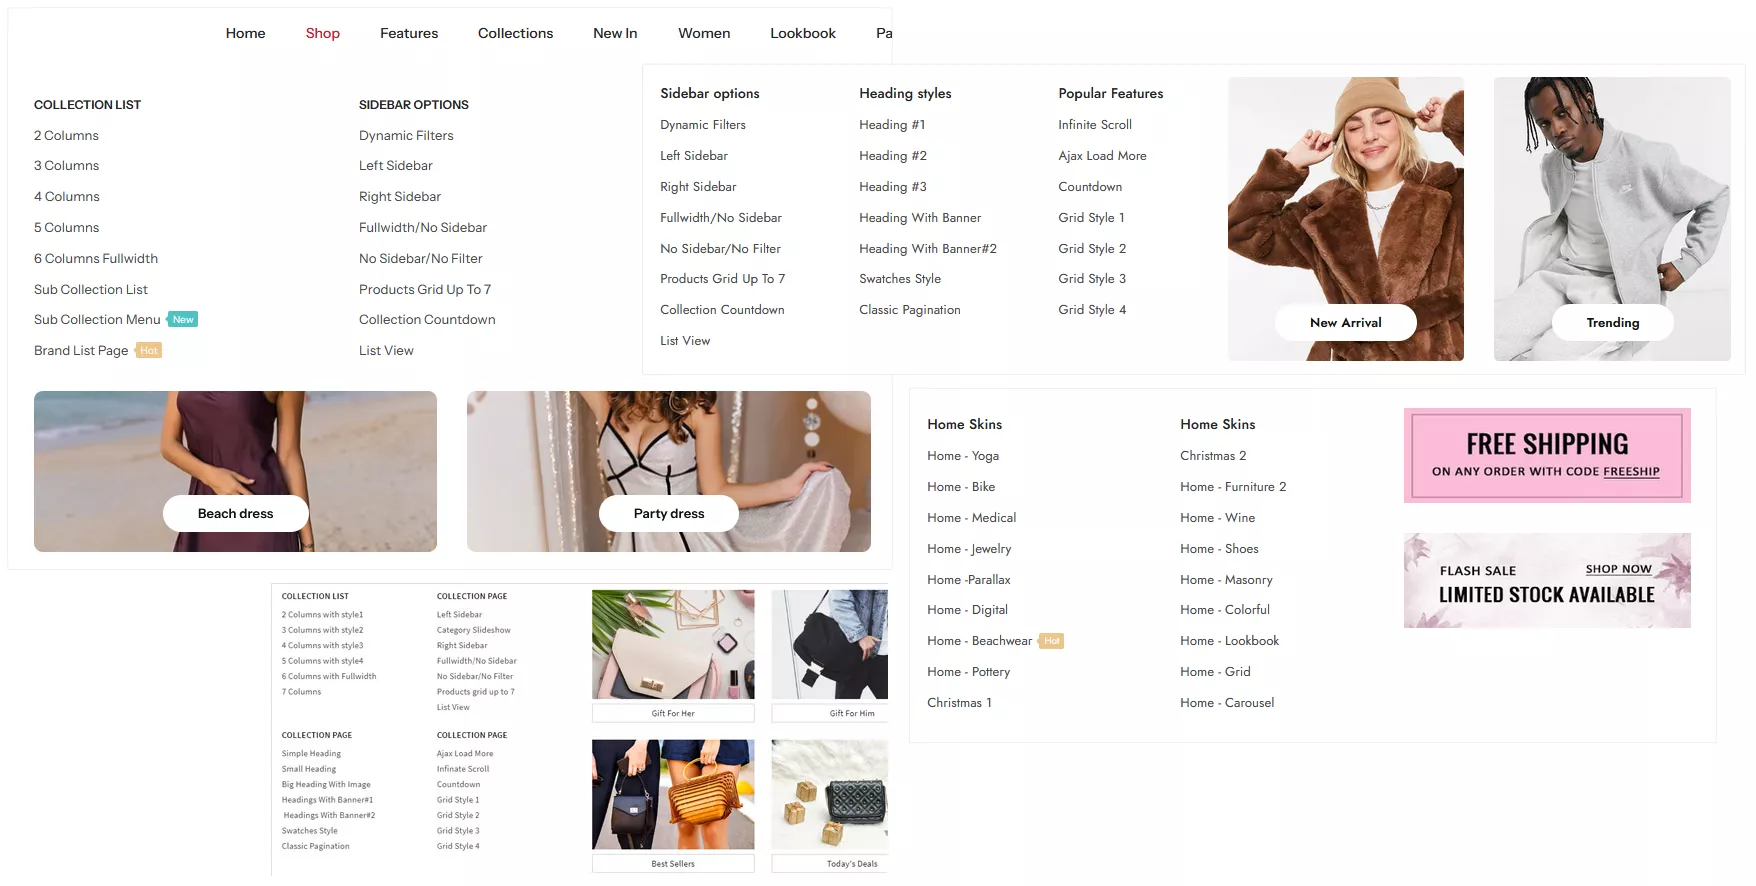
Step 1 :
From your store admin → Click Content → Menus → Click Add menu
Add Menu items with Sub Menu Items As display below ( below screenshot is only for reference )

Step 2 :
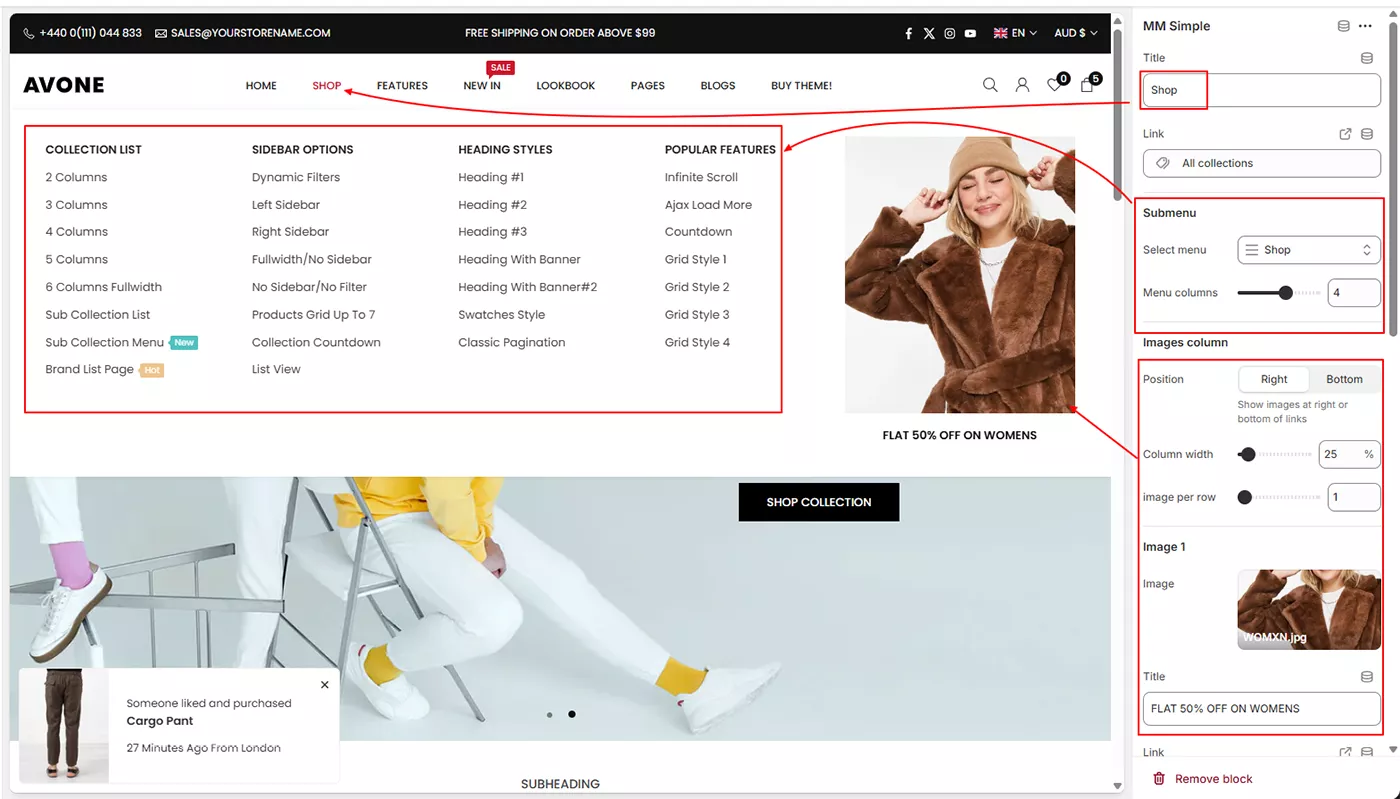
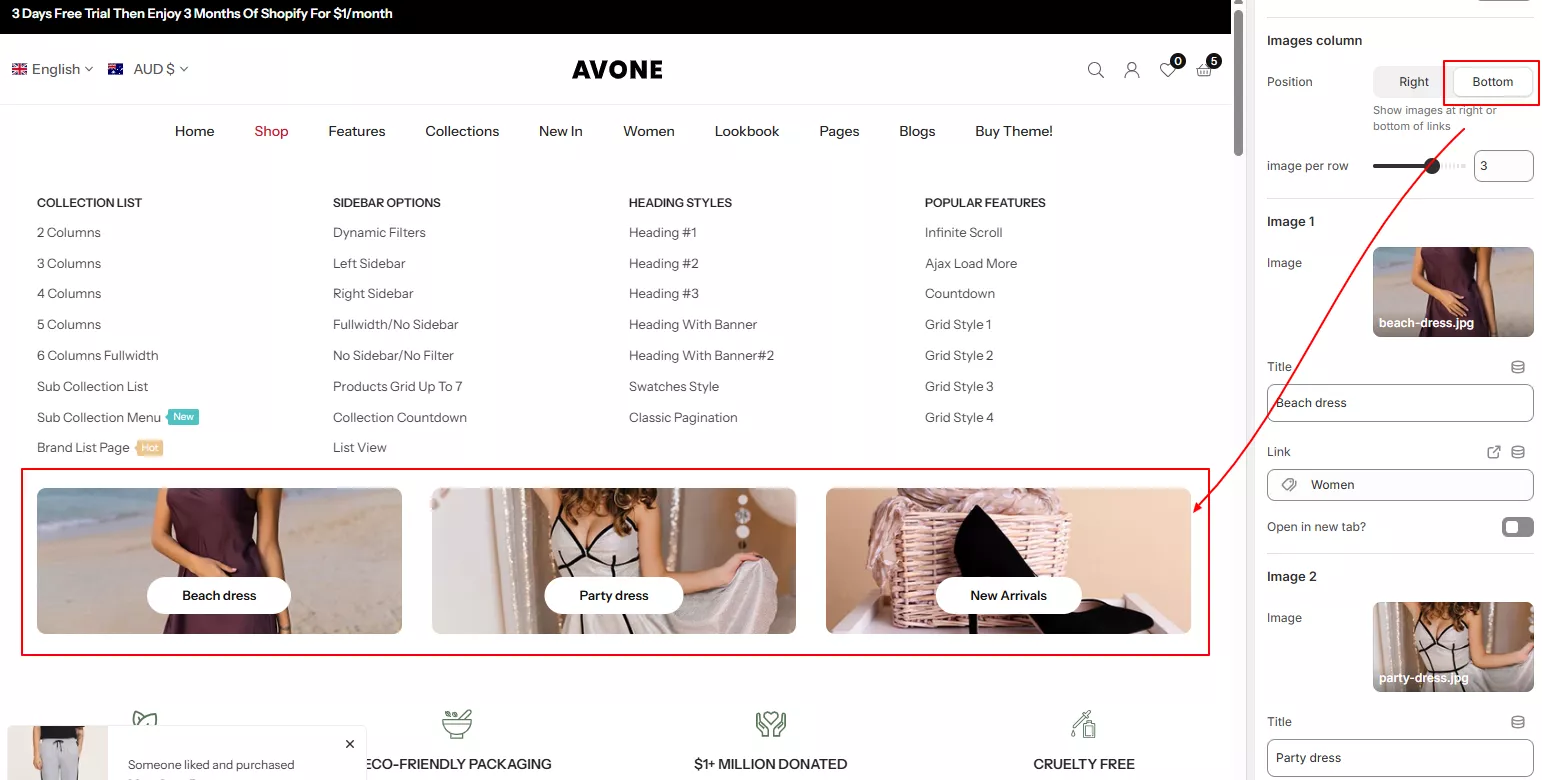
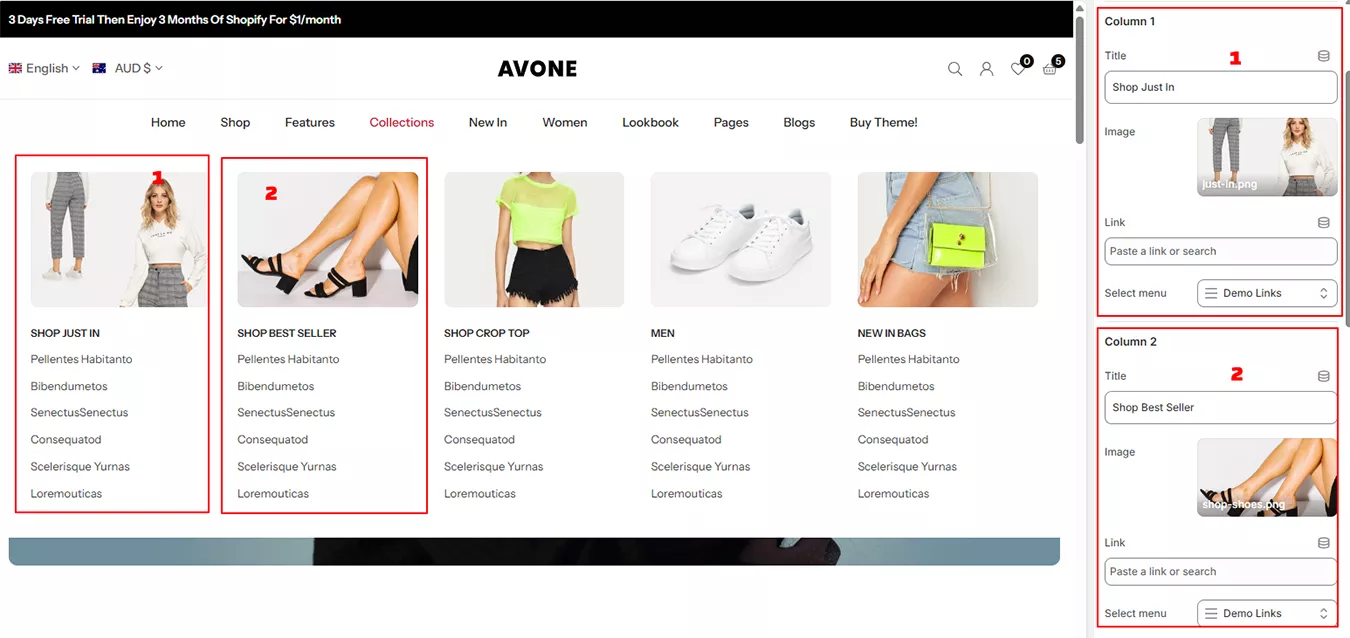
In the theme editor → Click Header → Add block→ Click MM Simple
Add Link Name, Menu Link, Select Menu, Select Columns, Set Banner Images(Optional).
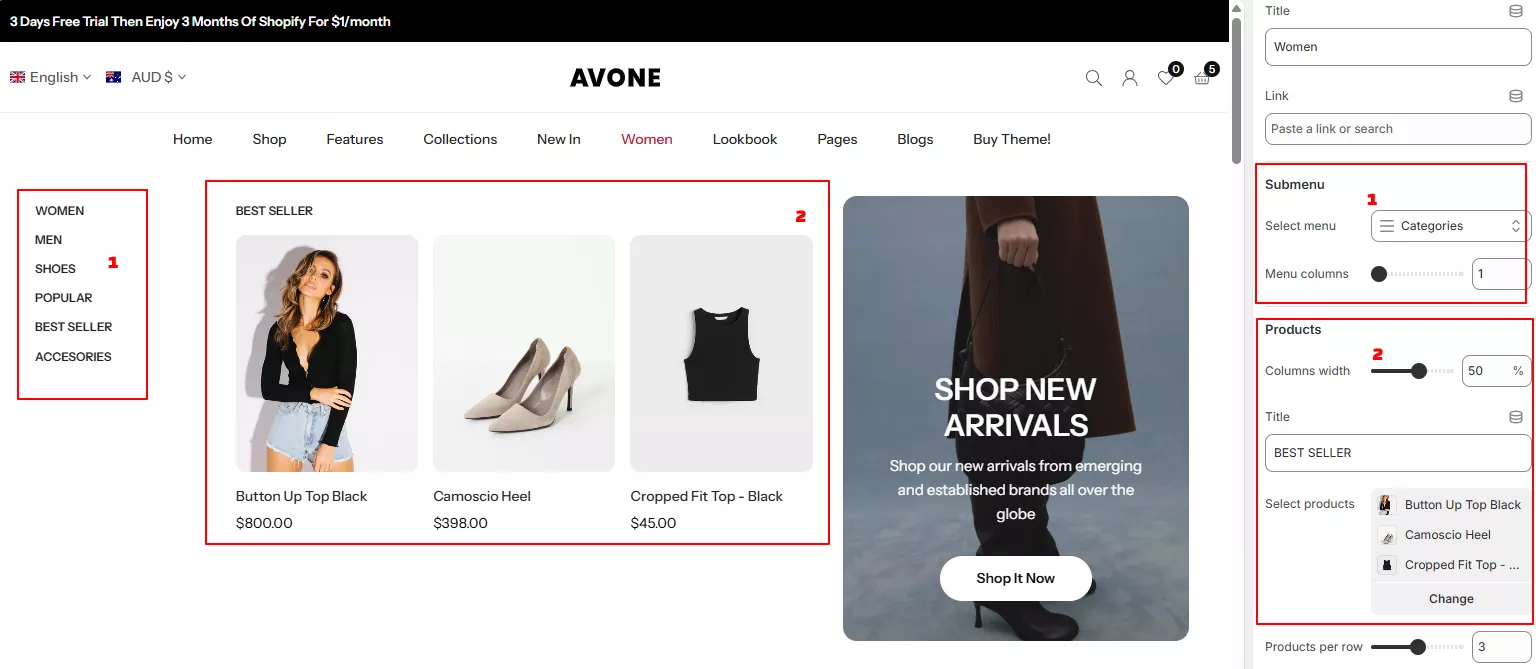
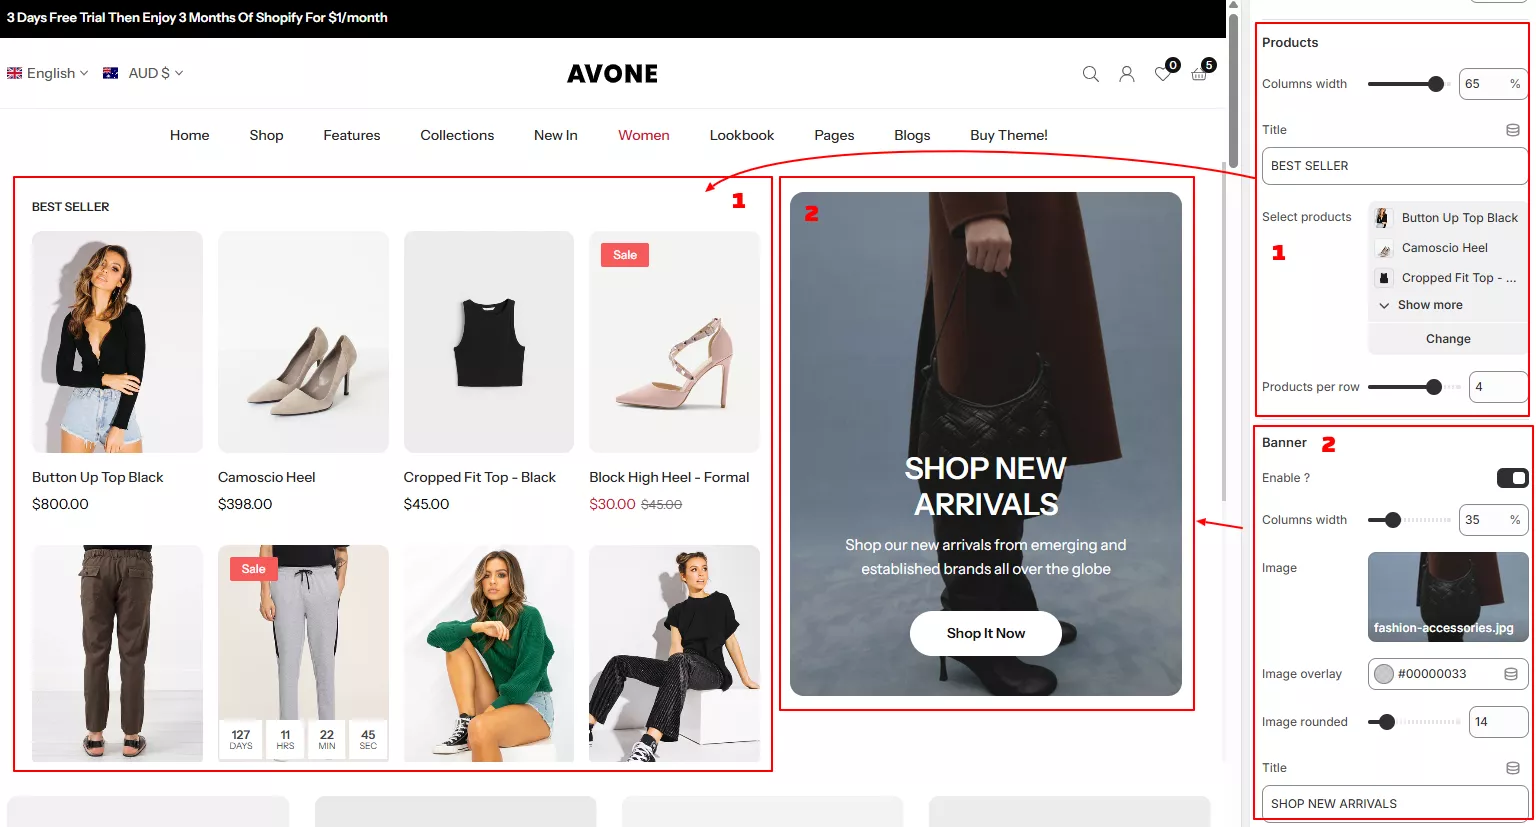
In the theme editor → Click Header → Add block→ Click MM Products

Step 1:
From your store admin → Click Content → Menus → Click Add menu
Add menu with sub menu items. To use this megamenu, please create different menus for each columns.
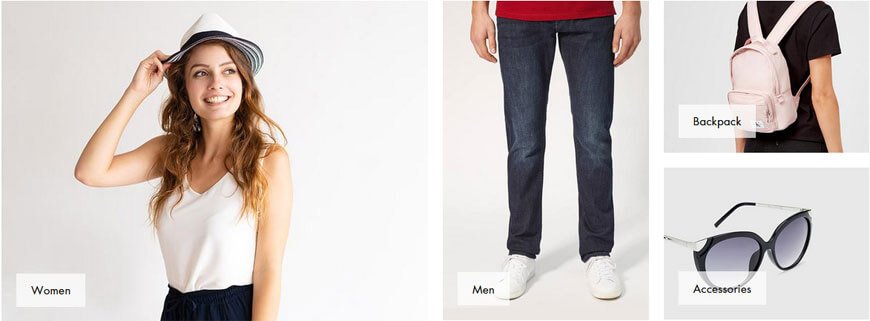
I.e. If you want to display 4 columns to Display Women, Men, Kids, and Accessories collection then create 4 different menus with sub menu links for each column.
Follow this article to read more in details : How to create Menu?
Step 2 :
In the theme editor → Click Header → Add block→ Click MM Top Image Columns
Set Link Name, Menu Link and for each column you want to display, Set title, image, image link and select menu

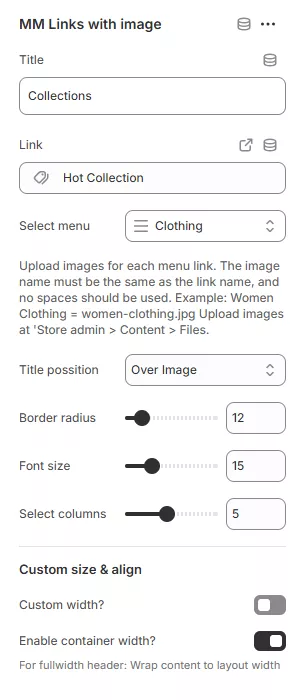
Step 1 :
From your store admin → Click Content → Menus → Click Add menu
Create simple Menu with menu items. as shown in below screenshot

Step 2 :
Upload images for each menu item with same name as menu item. i.e. For menu item Womens, upload womens.jpg file from your store admin → content → Files
Step 3 :
In the theme editor → Click Header → Add block→ Click MM Links with Image
Set Link Name, Menu Link, Select Menu and Select Columns
Step 1 :
From your store admin → Click Content → Menus → Click Add menu
Add menu with sub menu items as shown in below screenshot ( screenshot is for reference )

Step 2 :
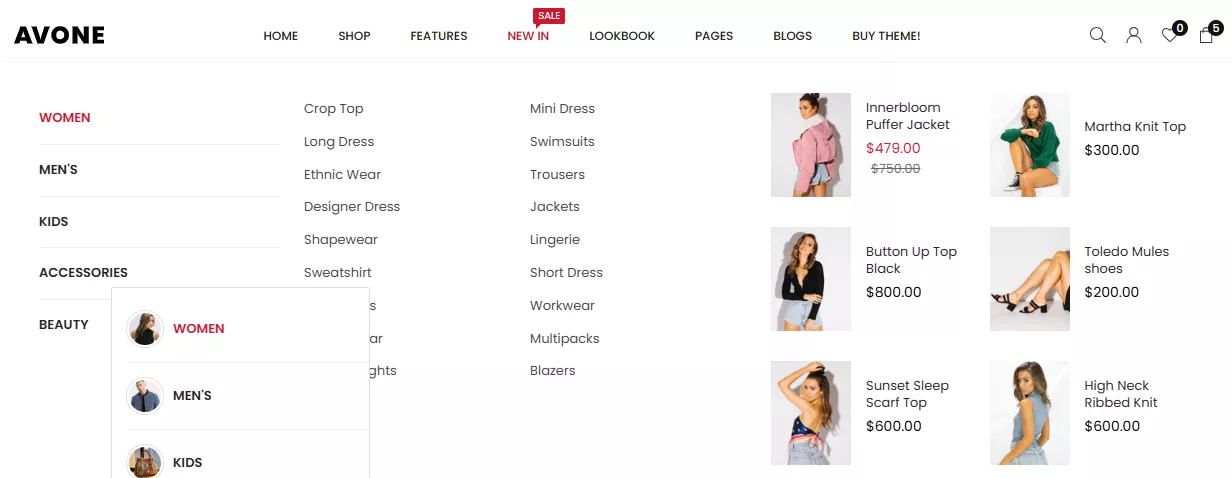
In the theme editor → Click Header → Add block→ Click Add MM Advanced
Add title, link, select submenu, set columns for sub menu links
Enable Show prducts? to display products on right side of menu for each main links.
Set products to show, products limit and column width
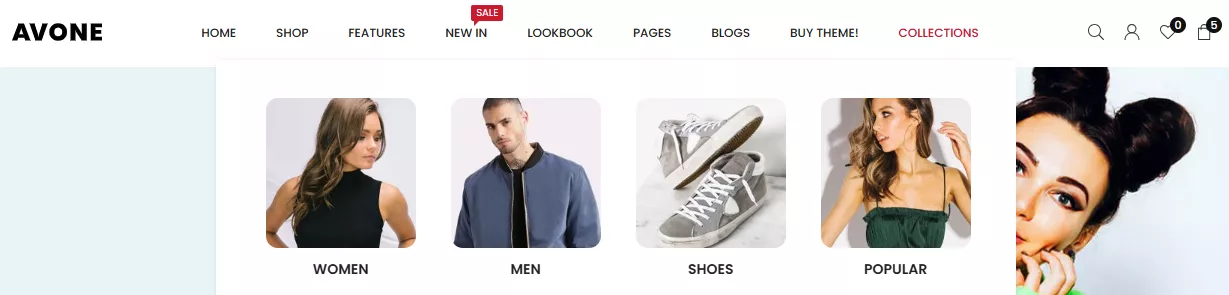
Step 1 :
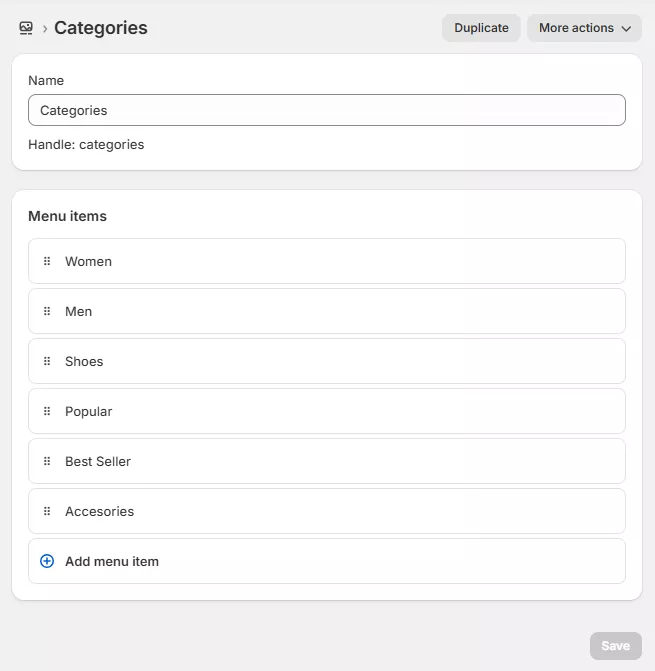
To display megamenu collections on your store, first create a menu from your shopify store adminFrom your store admin → Click Content → Menus → Click Add menu
Add Menu items. Select collection link for each menu item you create. ( screenshot is only for reference ).
Step 2 :
In the theme editor → Click Header → Add block→ Click Add MM Advanced
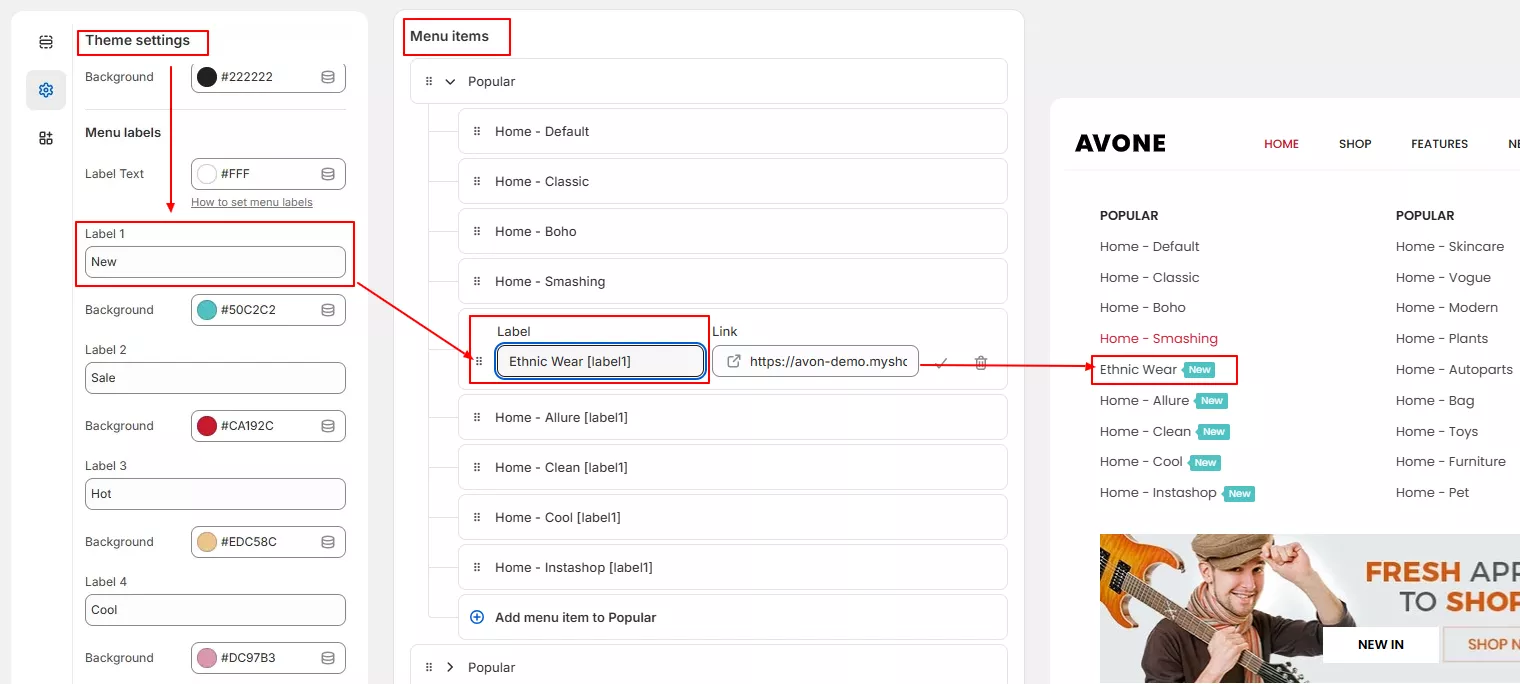
In the theme editor → Click Theme settings → Navigation → Scroll down to "Menu labels"
Set Manu Label 1 to Menu Label 5 as required

Set menu labels with main menu items, Go to header section and click menu item
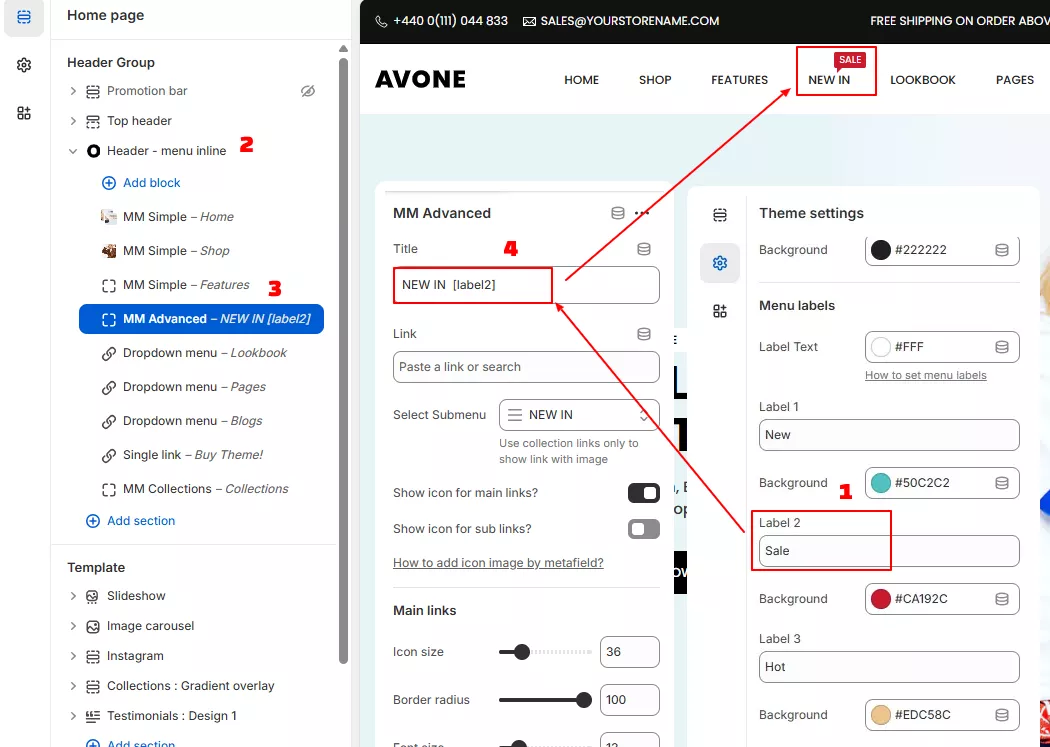
Set menu labels with sub menu items
From your store admin → Click Online Store → Click Content → Menus → Select Menu → Click on Menu items
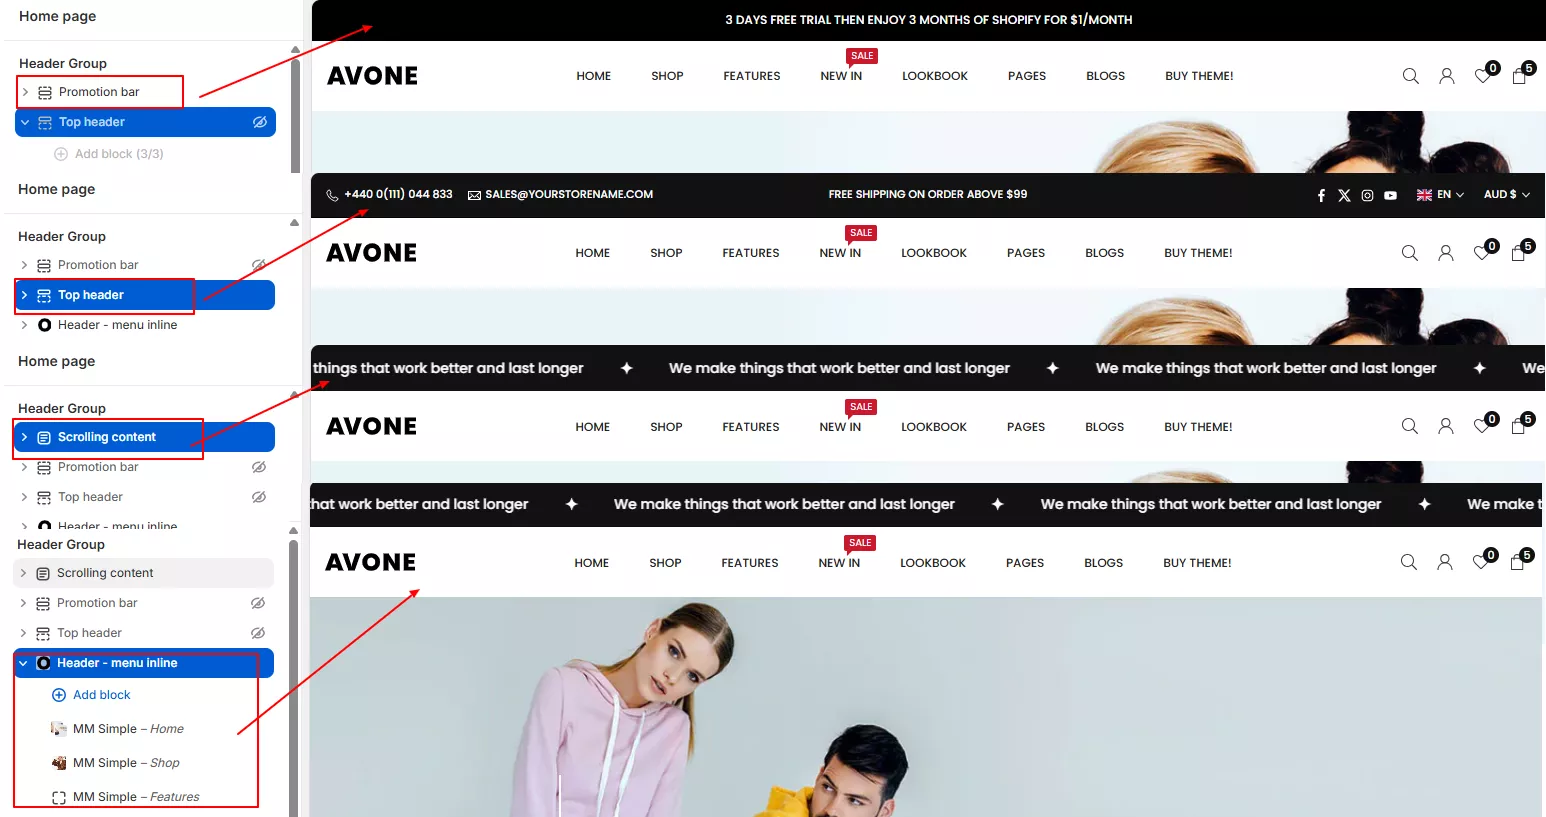
In the theme editor → Under Header Group → click on Add section
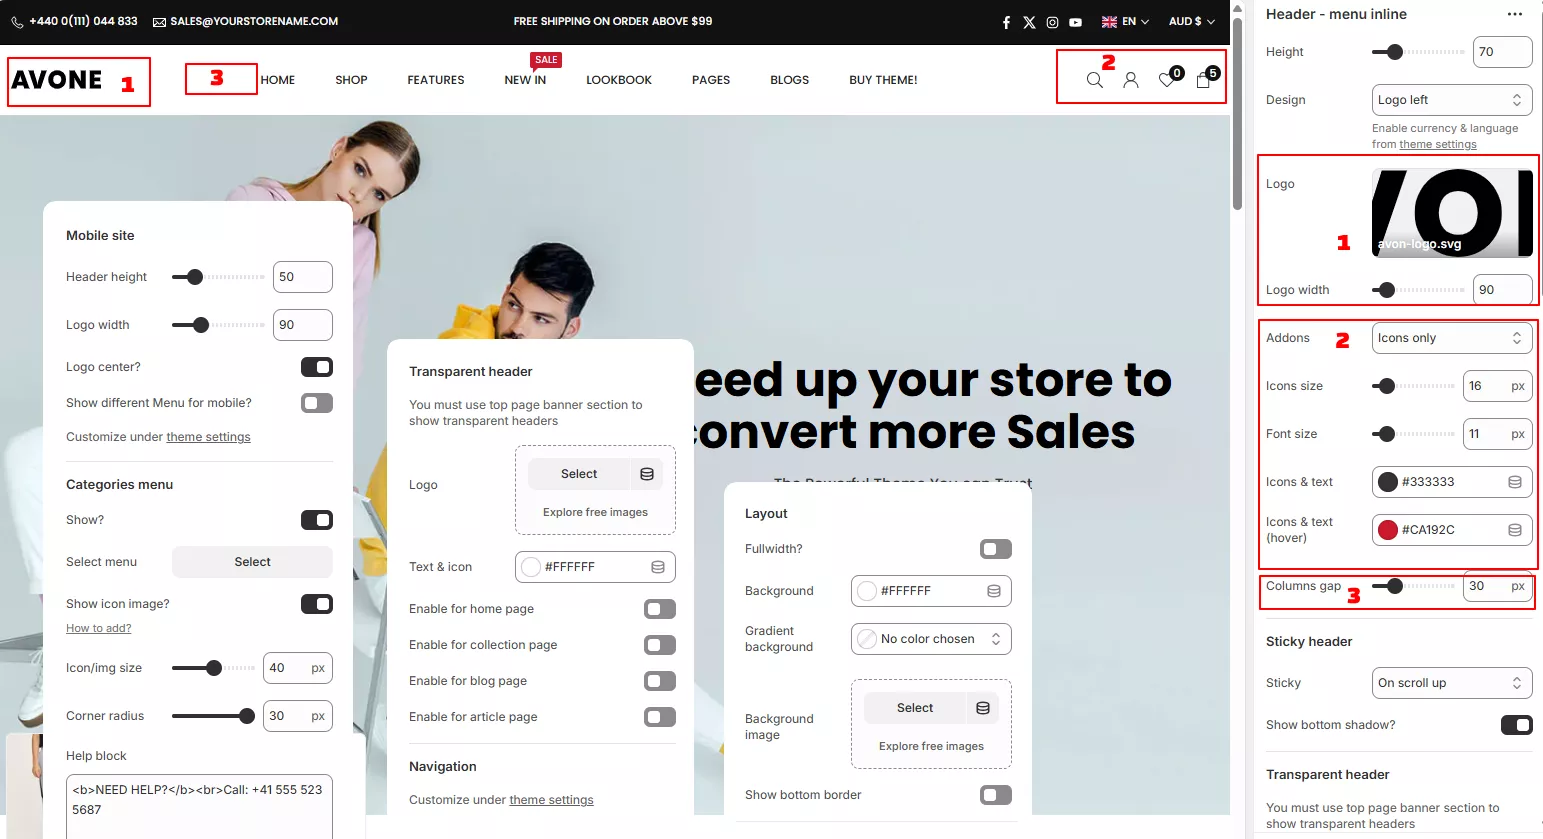
There are four main header styles available for your design: Inline Header, Big Search Header, Menu Bottom Header, and Hamburger Header.
Along with the main header, you can also enable a Top Header, display promotional text, and add other useful sections to promote offers or highlight important information.
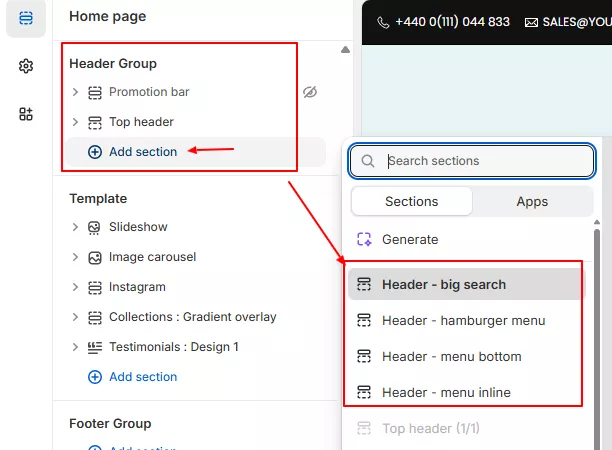
Start customising headers to suit your business needs. Header options are flexible.
You can easily achieve any header design from this header sections with all options available in the header.
Settings and Options
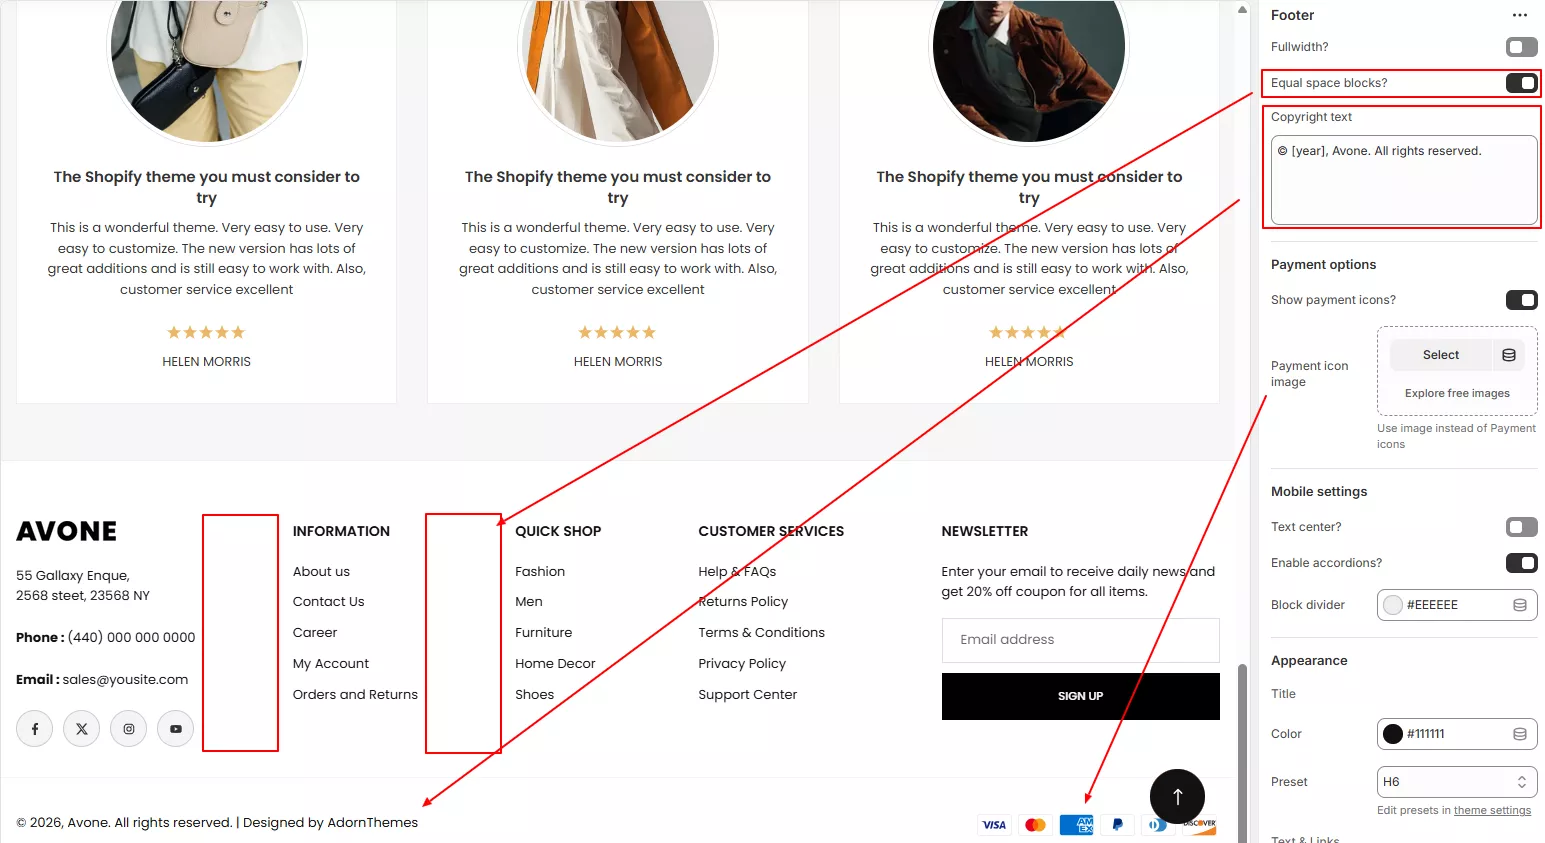
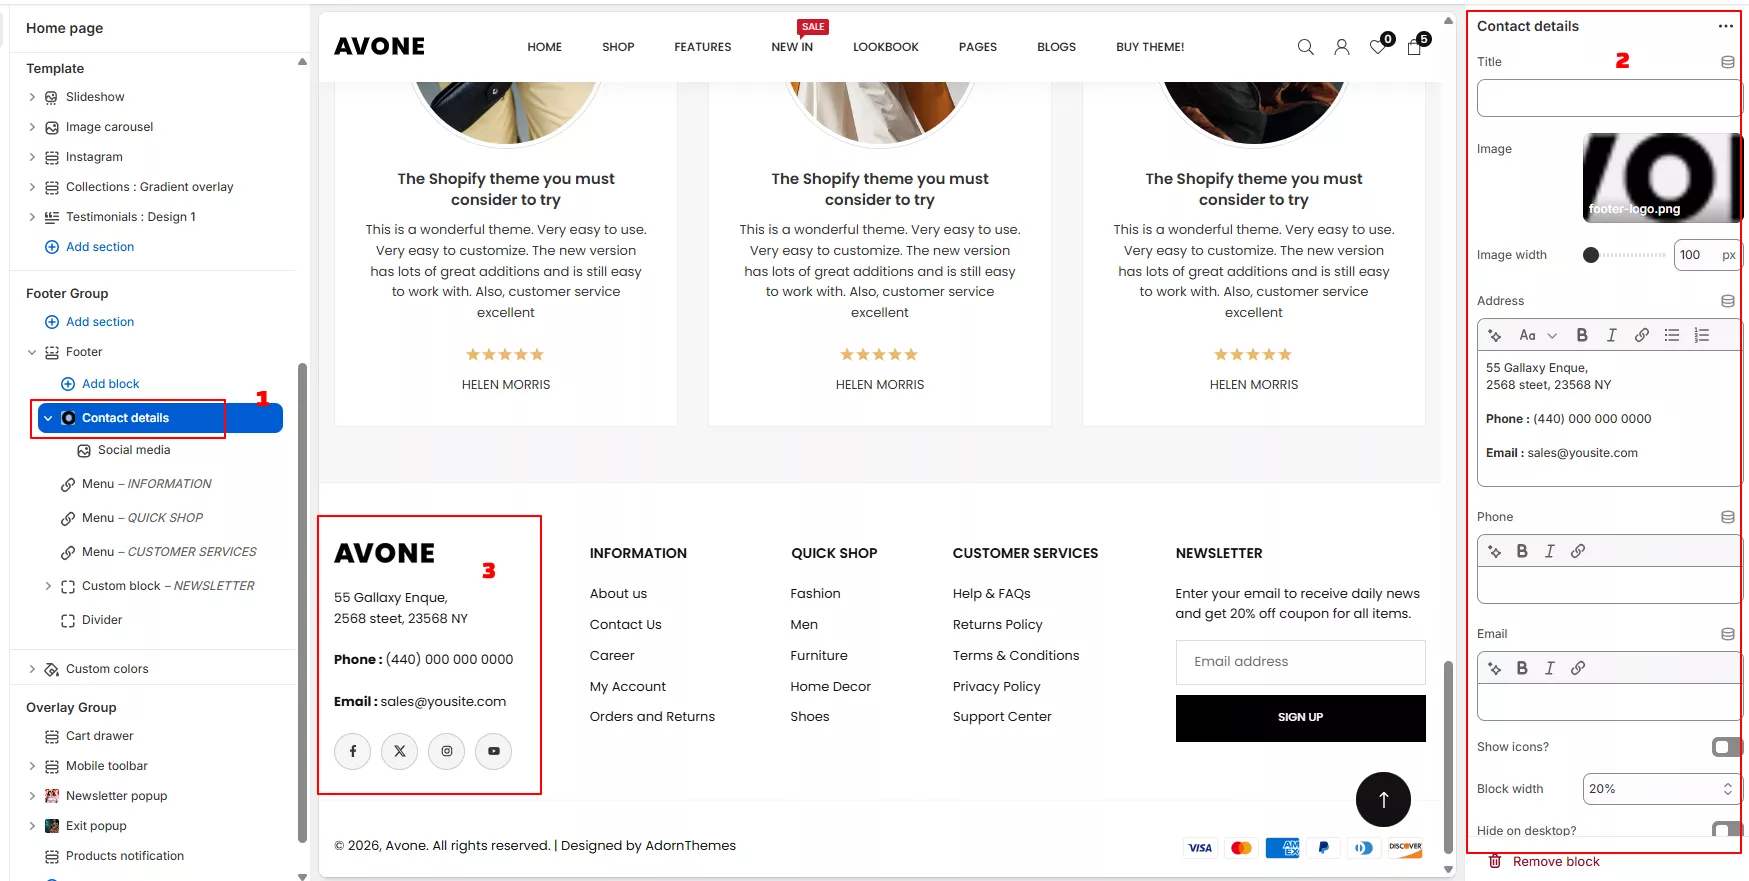
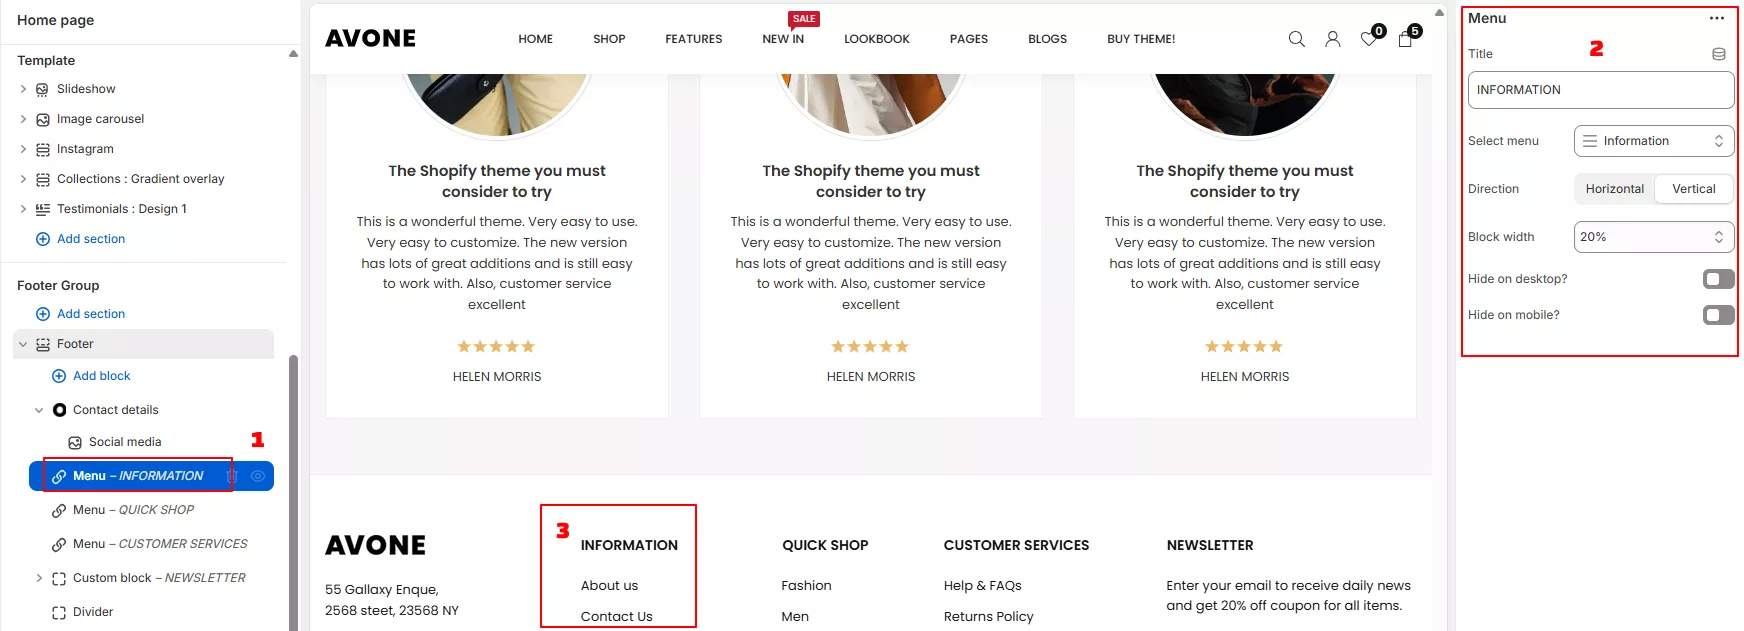
In the theme editor → Scroll down to bottom Footer Group → click Footer setion
Avone comes with very flexible footer options with blocks.
You can easily add or remove any blocks and change the store footer within a few seconds to achieve a desirable footer.
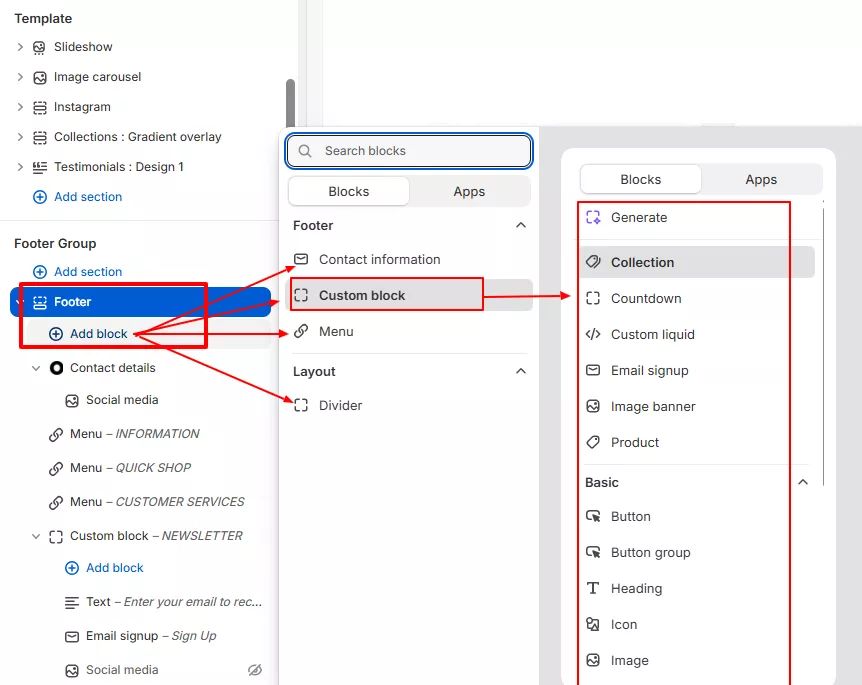
Settings and Options
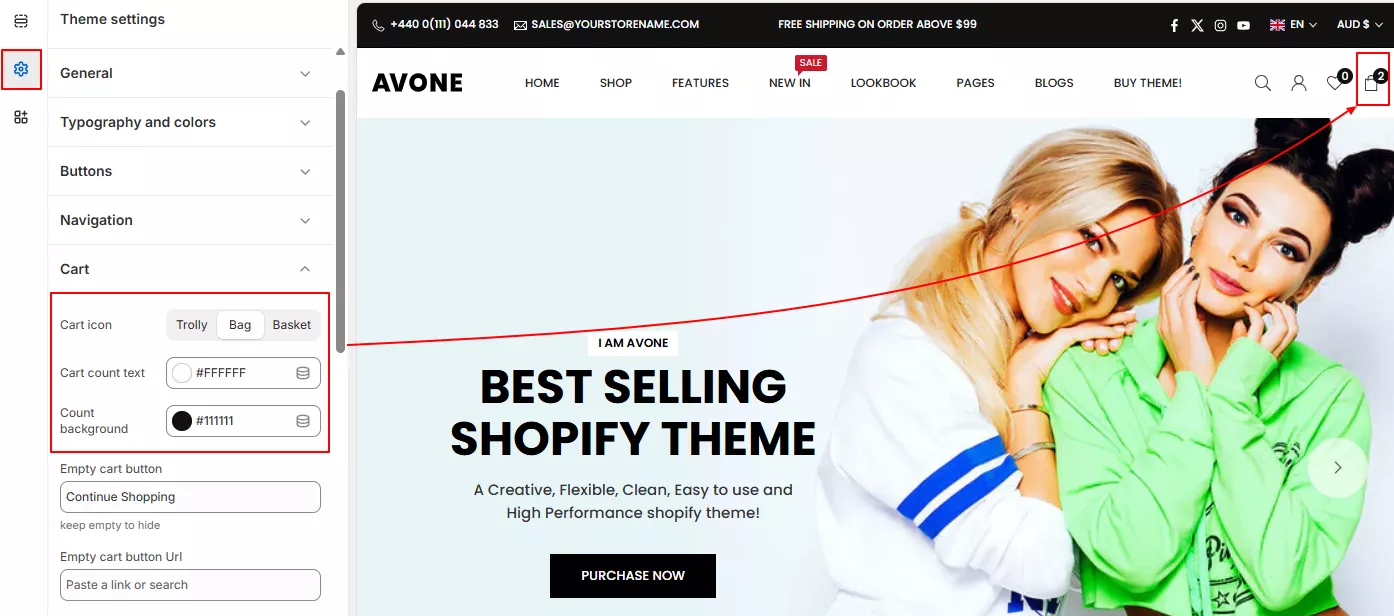
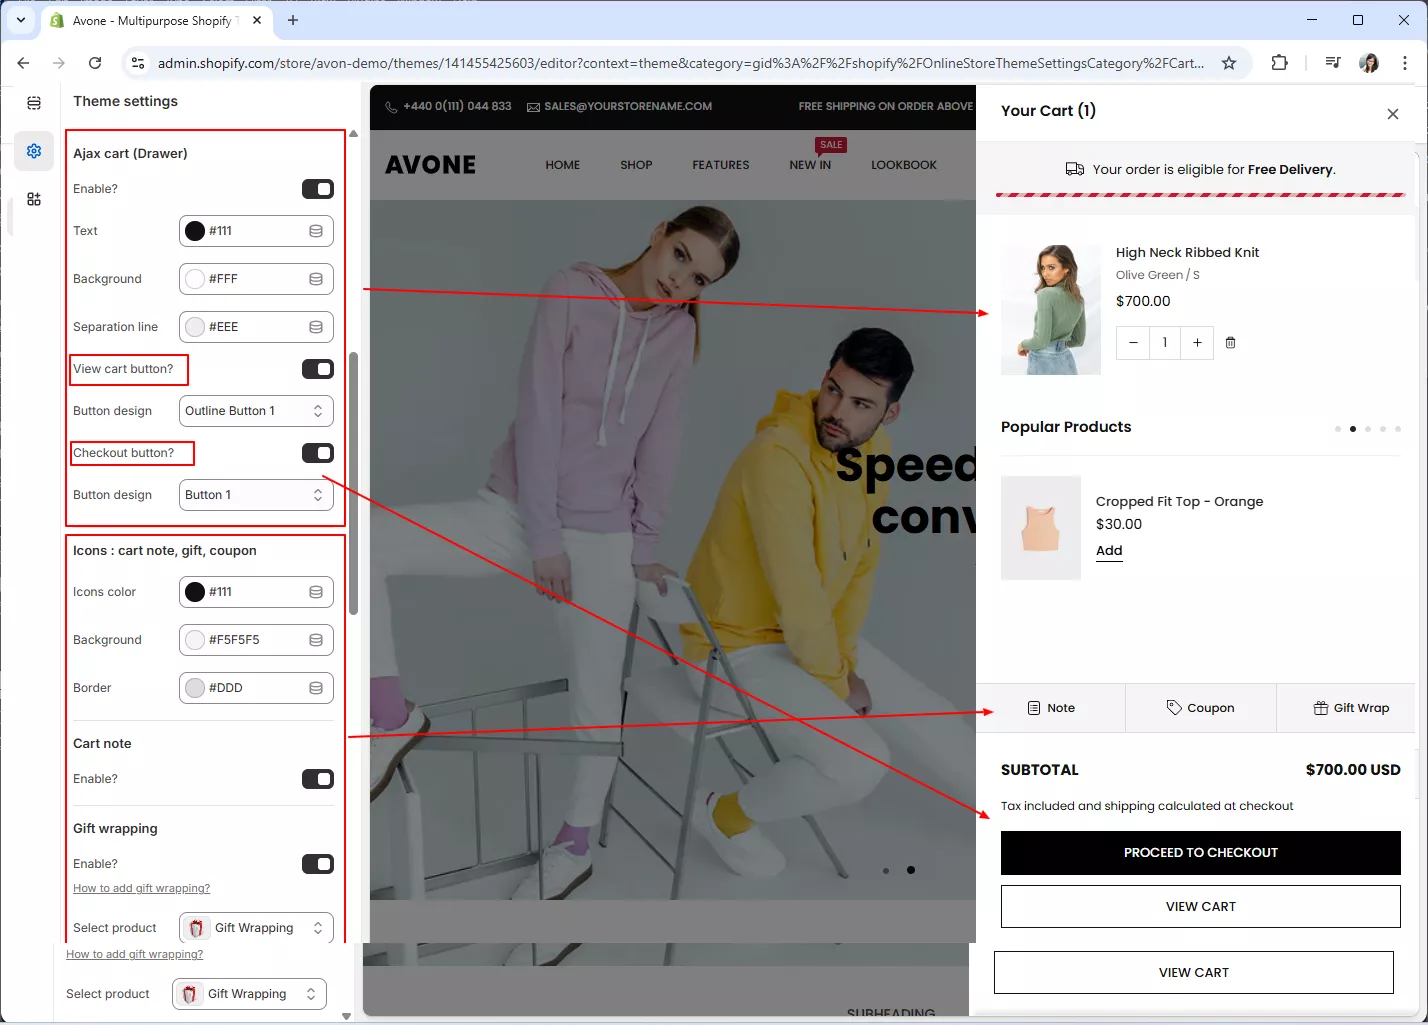
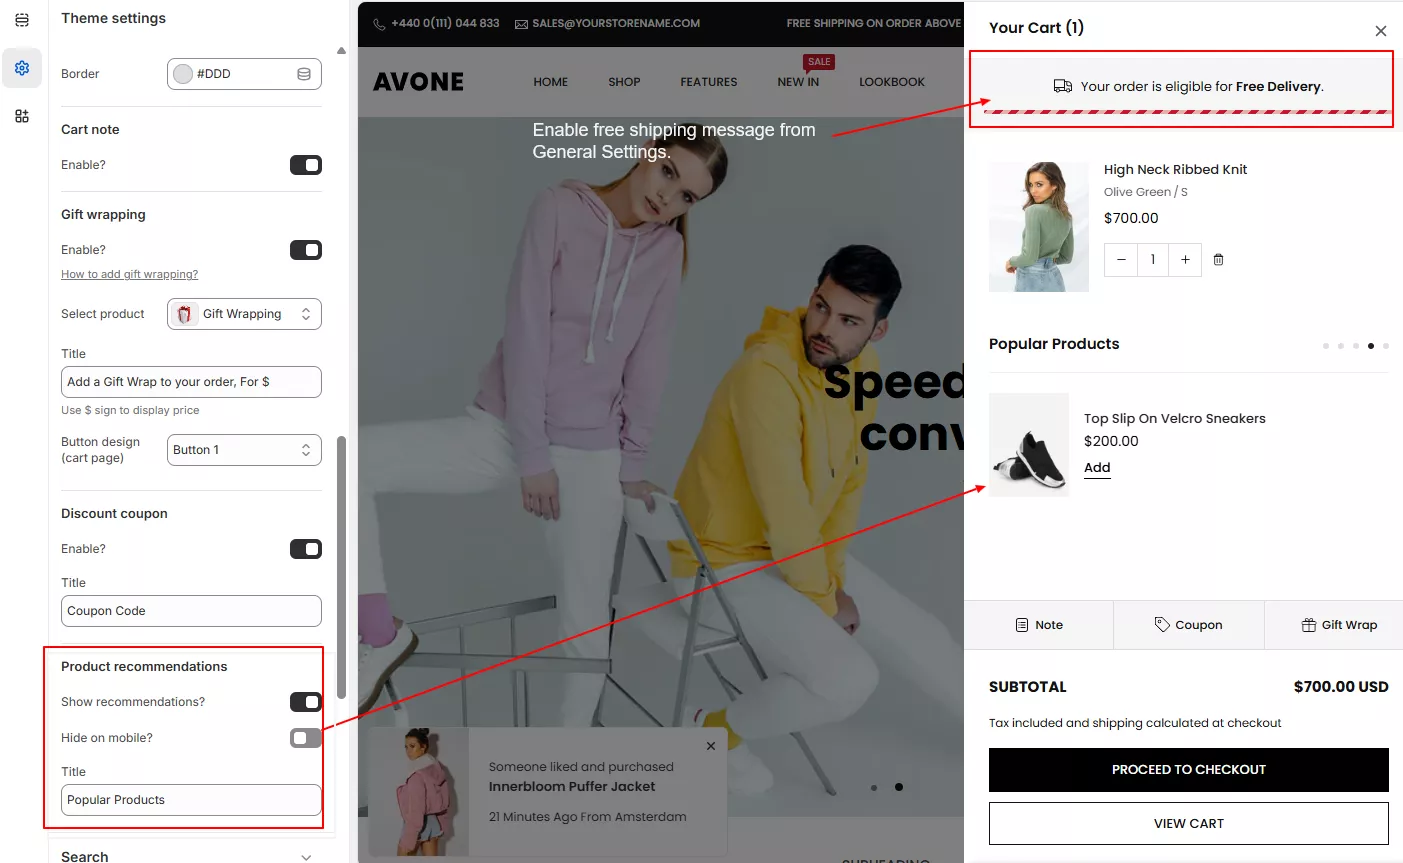
In the theme editor → Click "Theme settings" icon → Locate Cart
Please make the necessary settings as required for your store, which will be applied to the cart drawer and a few of them for the cart page.
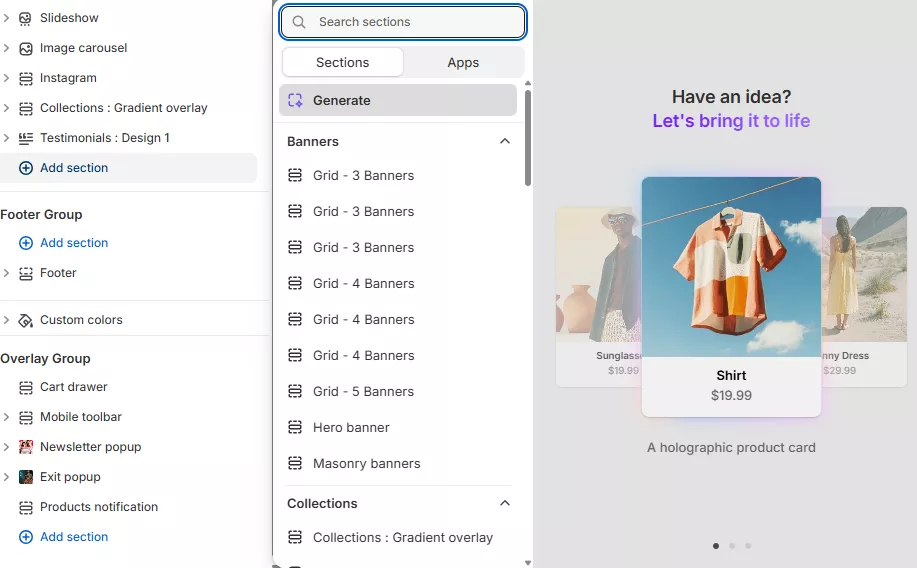
Sections allows user to easily add or move content on store homepage as well on inner pages with just a few clicks to create desired layouts.
You can preview your changes in real-time in either desktop or mobile view
There are 50+ Sections and 17+ Blocks availables to use. You can add, update, reorder and delete any sections any time as per your requirements.
From your shopify store admin → Click "Online Store" → Locate theme you want to customize →

    Click Edit theme button → Click "Add section" to add below sections
In the theme editor → Click "Add section" → Search section "Products Rows" and click to add


In the theme editor → Click "Add section" → Search section "Featured Product" and click to add
It helps you promote a particular product without showing a full collection.
With Avone v5.0, Featured product section is available with blocks that can be moved within a section to alter the layout of the section itself.
For blocks and its detail, Please check product page section.
Showcase best-selling or new arrival products
In the theme editor → Click "Add section" → Search section "Products : carousel" and click to add

Display a larger number of products in limited space
In the theme editor → Click "Add section" → Search section "Products : listing" and click to add.

Customers can switch between tabs to view products from different collections without leaving the page.
Reduce page length by grouping collections under tabs
In the theme editor → Click "Add section" → Search section "Products : tabs " and click to add 
Use this section when you want to highlight a special promotion alongside products
In the theme editor → Click "Add section" → Search section "Products : with banner " and click to add 
Use Shop the Look section to inspire customers with ready-made combinations.
This section works best when your products look better when styled together.
In the theme editor → Click "Add section" → Search section "Shop the look" and click to add 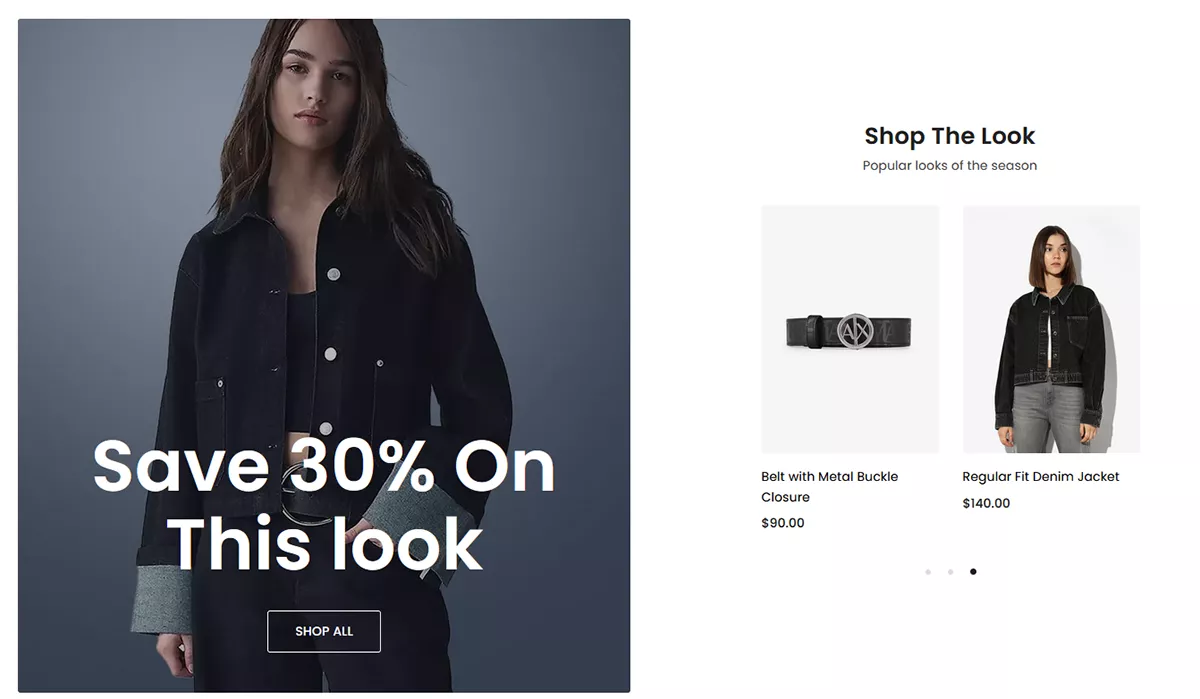
Display Instagram images on your store to showcase real-life product styling and inspire customers to recreate the same look.
This section helps encourage shoppers to explore and purchase the featured products they see in your social posts.
In the theme editor → Click "Add section" → Search section "Instagram shop" and click to add 
Use this section to showcase curated looks or styled product combinations.
It is ideal for seasonal collections, campaign launches, or when you want to inspire customers with lifestyle images and encourage them to shop the complete look.
In the theme editor → Click "Add section" → Search section "Lookbook shop" and click to add Click here to view more grid style
This section display products in action and allow customers to shop featured items directly from the video. Ideal for demos, tutorials and product highlights.
In the theme editor → Click "Add section" → Search section "Shoppable videos" and click to add 
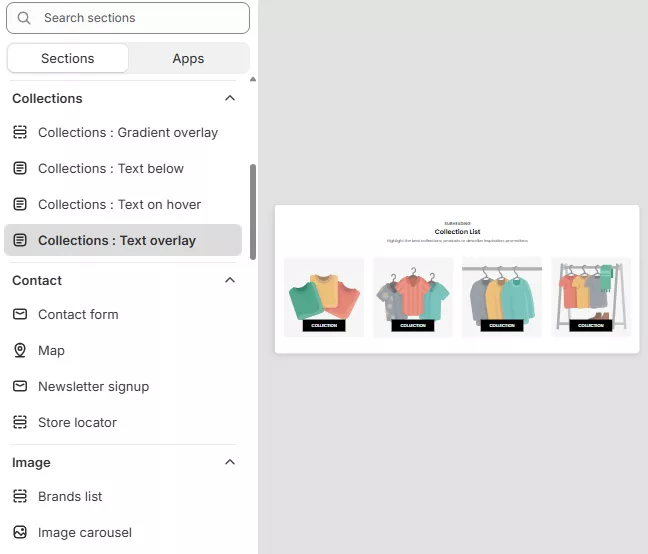
In the theme editor → Click "Add section" → Search section "Gradient overlay" and click to add 
In the theme editor → Click "Add section" → Search section "Text below" and click to add 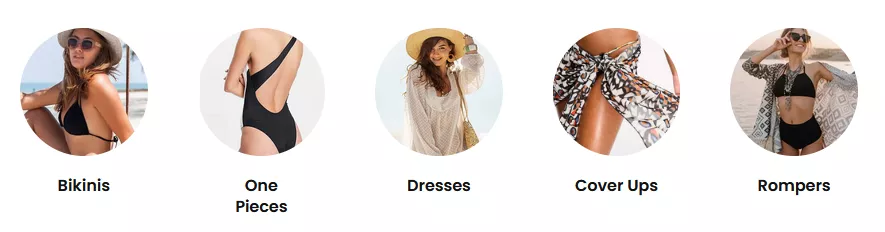
In the theme editor → Click "Add section" → Search section "Text on hover" and click to add 
In the theme editor → Click "Add section" → Search section "Text overlay" and click to add 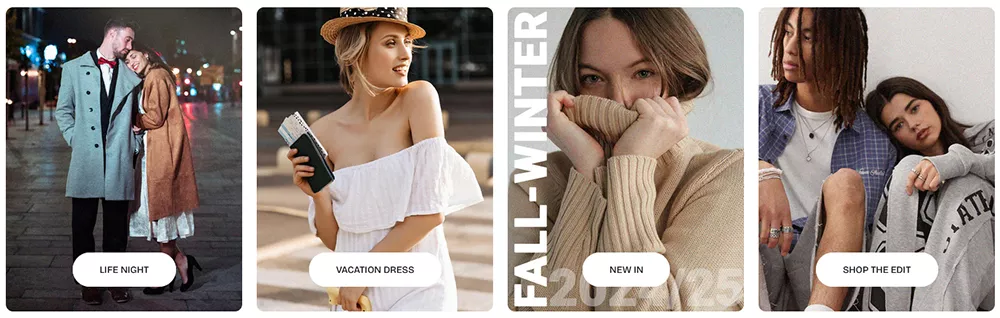
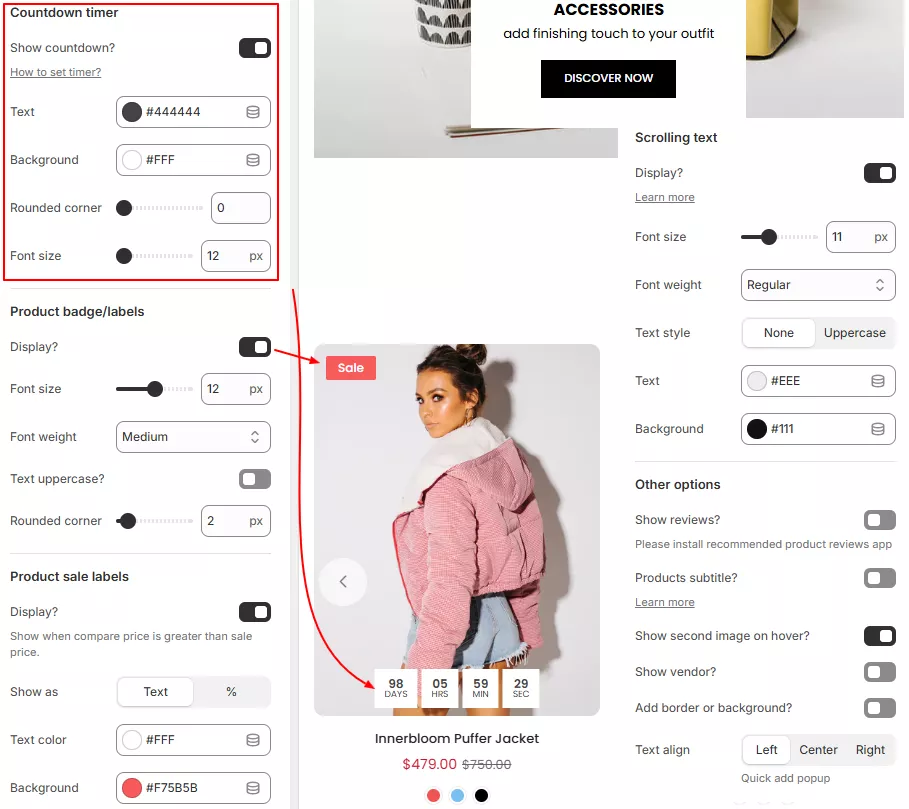
Countdown Timer section helps create urgency and boost conversions by showing a limited-time offer
or upcoming event countdown on your store.
In the theme editor → Click "Add section" → Search section "Countdown timer" and click to add 
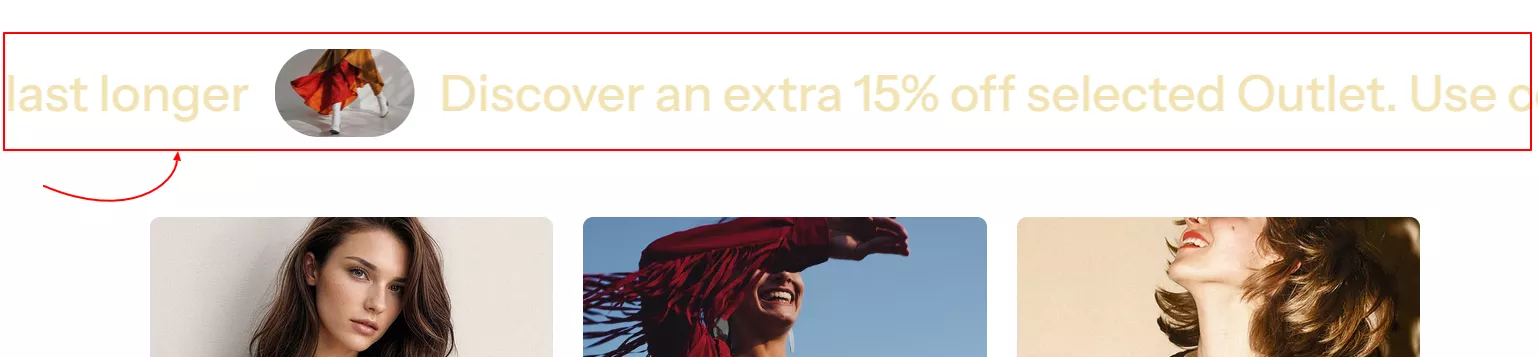
In the theme editor → Click "Add section" → Search section "Offer bar" and click to add Display store promotion text, collection information or store information

In the theme editor → Click "Add section" → Search section "Offer bar : columns" and click to add Display store promotion text, collection information or store information

Section highlight important information, promotional content, brand story, or announcements.
In the theme editor → Click "Add section" → Search section "Rich Text Block" and click to add Display continuously moving content with images or icons in a horizontal scrolling layout.
Section highlight brand features, services, offers or promotional messages in an engaging scrolling format.
In the theme editor → Click "Add section" → Search section "Scrolling content" and click to add 
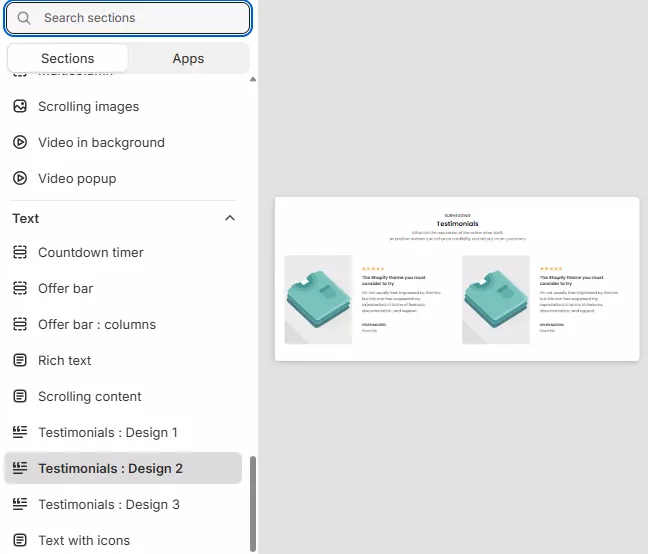
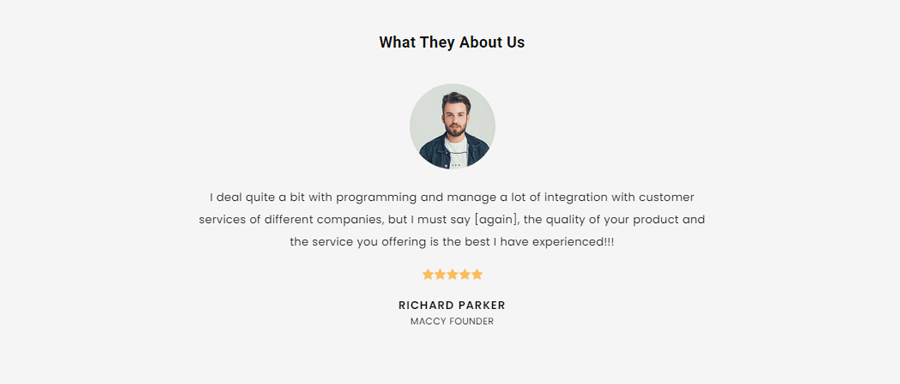
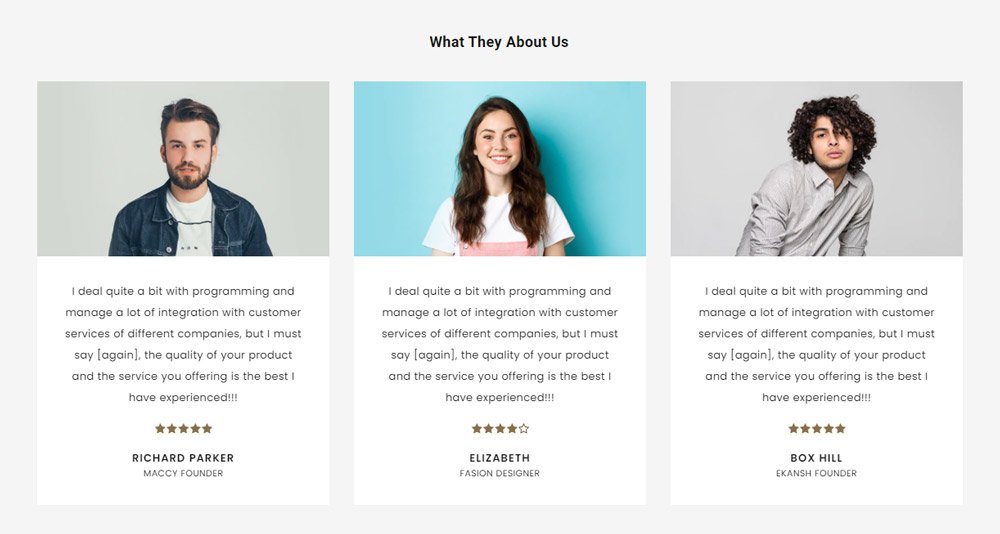
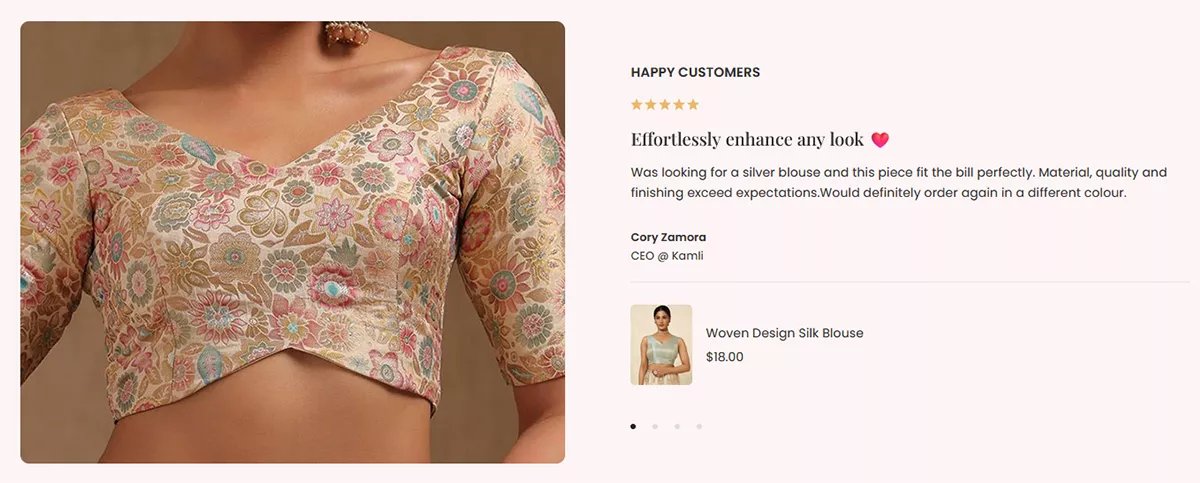
Display customer reviews and feedback to build trust and social proof.
In the theme editor → Click "Add section" → Search section "Testimonials" and click to add 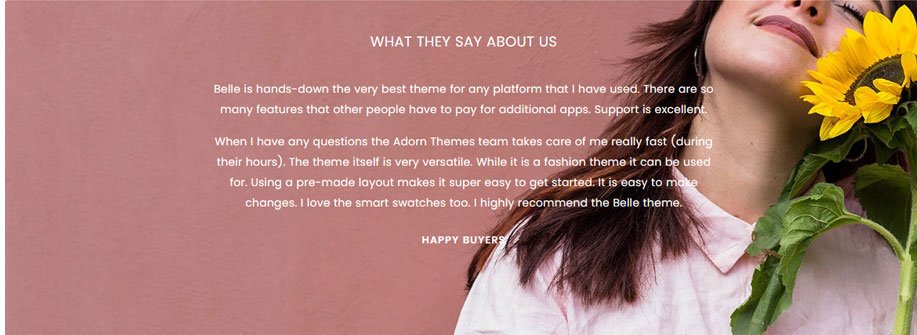

Text with Icons section mainly used to Showcase store benefits, Highlight product features, Display service guarantees, Build customer trust quickly
In the theme editor → Click "Add section" → Search section "Text with icons" and click to add 
Slideshow section allows you to display multiple banner slides with images, text, and buttons.
It is mainly used as a hero section to highlight promotions, new arrivals, or important announcements on top of the home page
In the theme editor → Click "Add section" → Search section "Slideshow" and click to add 
Section display two images with one content column in a stylish split layout.
In the theme editor → Click "Add section" → Search section "Slideshow split" and click to add 

In the theme editor → Click "Add section" → Search section "Brands list" and click to add ![]()
Display multiple images in a sliding layout. Used to showcase an Instagram-style feed or lifestyle images.
In the theme editor → Click "Add section" → Search section "Image carousel" and click to add 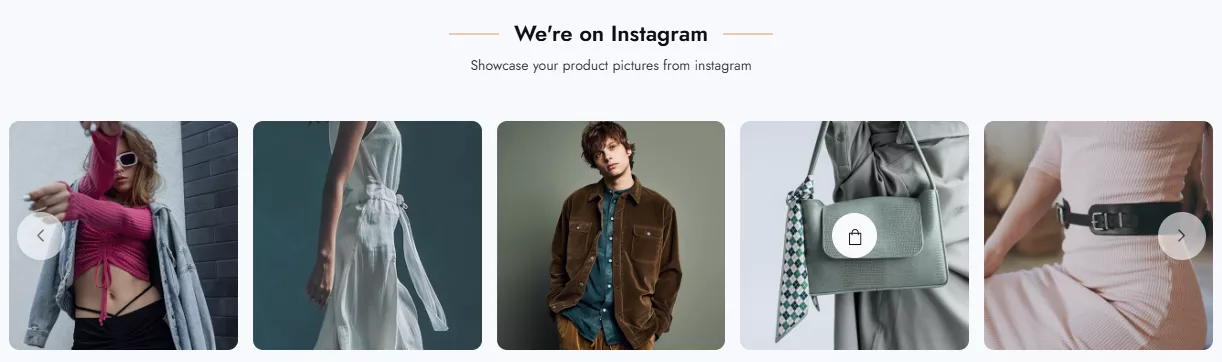
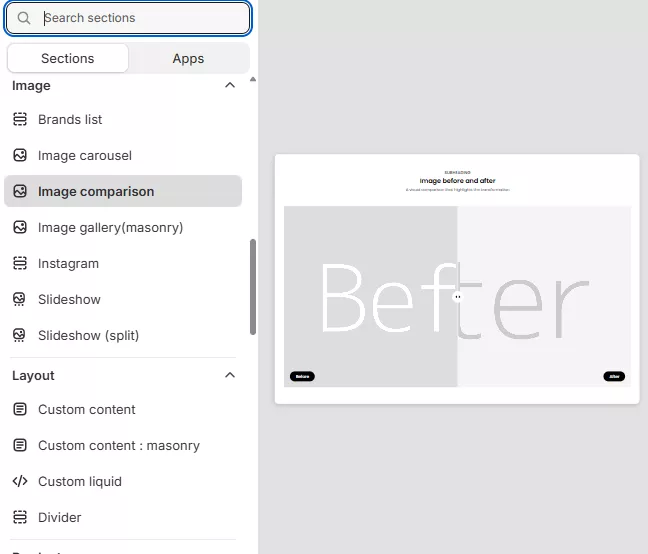
Image Comparison section allows you to display two images with a draggable slider to visually compare them
This section is useful for demonstrating product results, transformations, or differences.
In the theme editor → Click "Add section" → Search section "Image comparison" and click to add 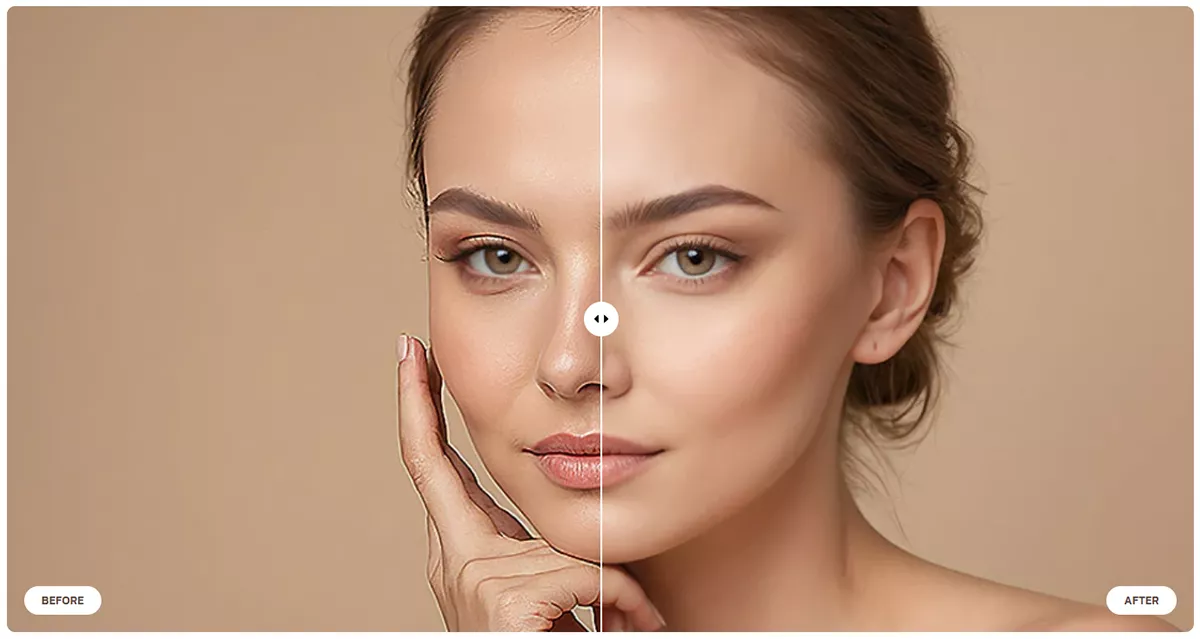
This section helps showcase collections, lifestyle photography, promotions, or lookbooks in a visually attractive way.
In the theme editor → Click "Add section" → Search section "Image gallery" and click to add 
Image masonry section displays images in a dynamic masonry (Pinterest-style) layout where images appear in different heights but align perfectly in columns.
This section is commonly used to showcase an Instagram feed
In the theme editor → Click "Add section" → Search section "Image masonry" and click to add 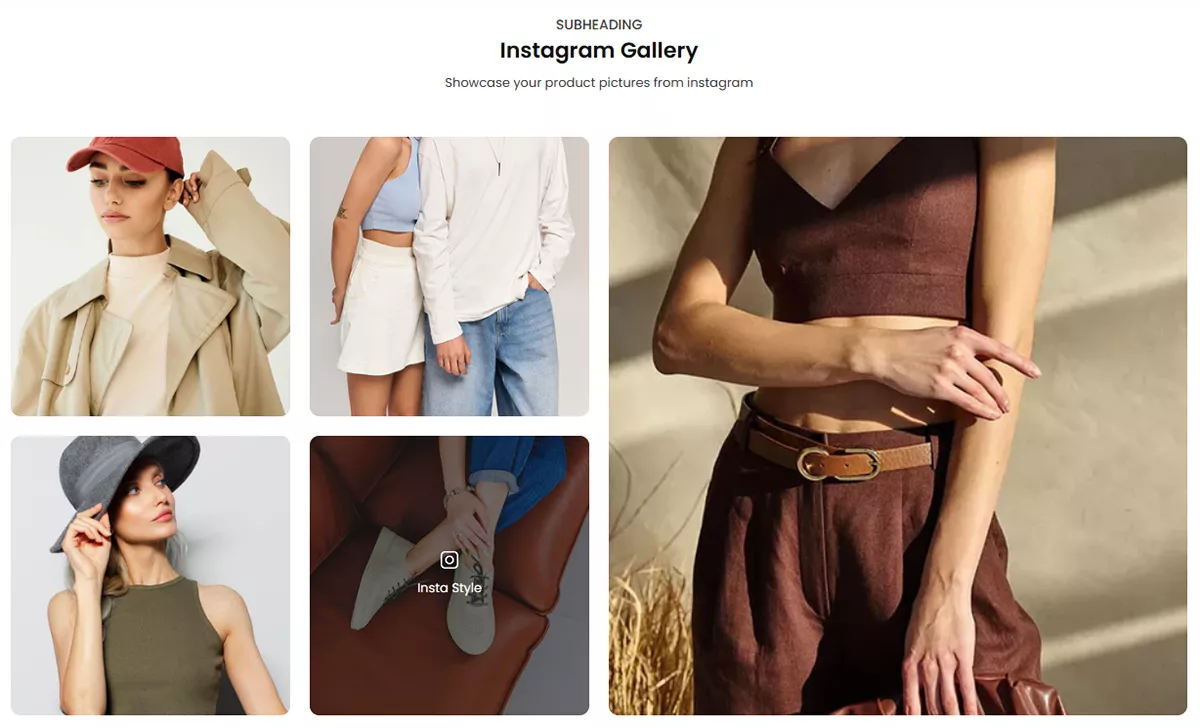
In the theme editor → Click "Add section" → Search section "Blog posts" and click to add 
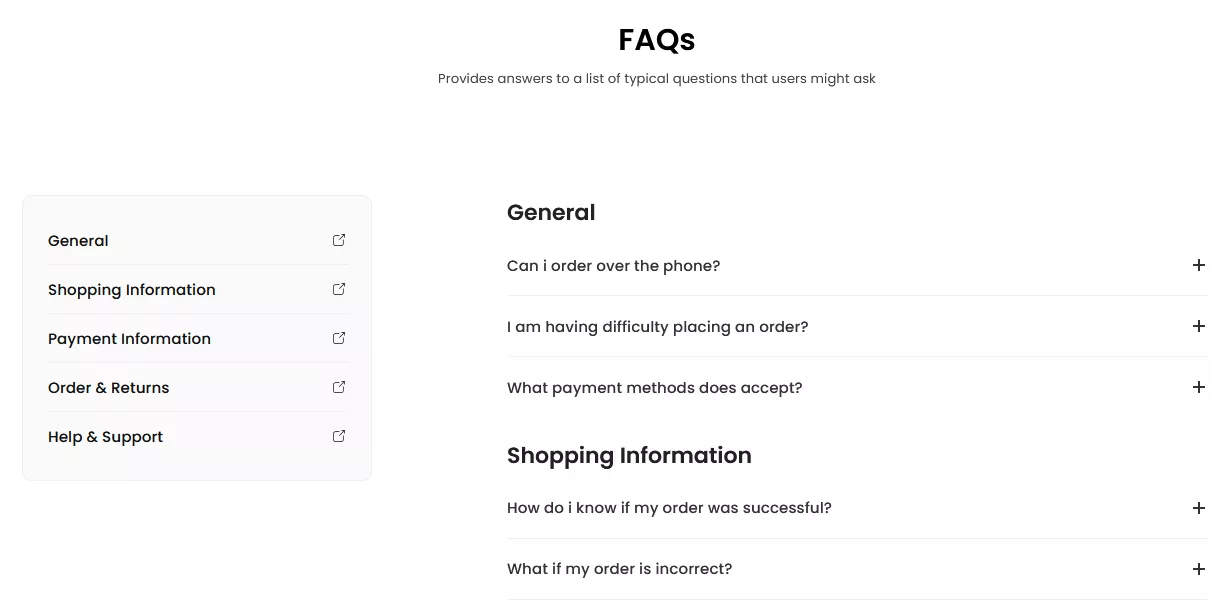
In the theme editor → Click "Add section" → Search section "FAQs" and click to add 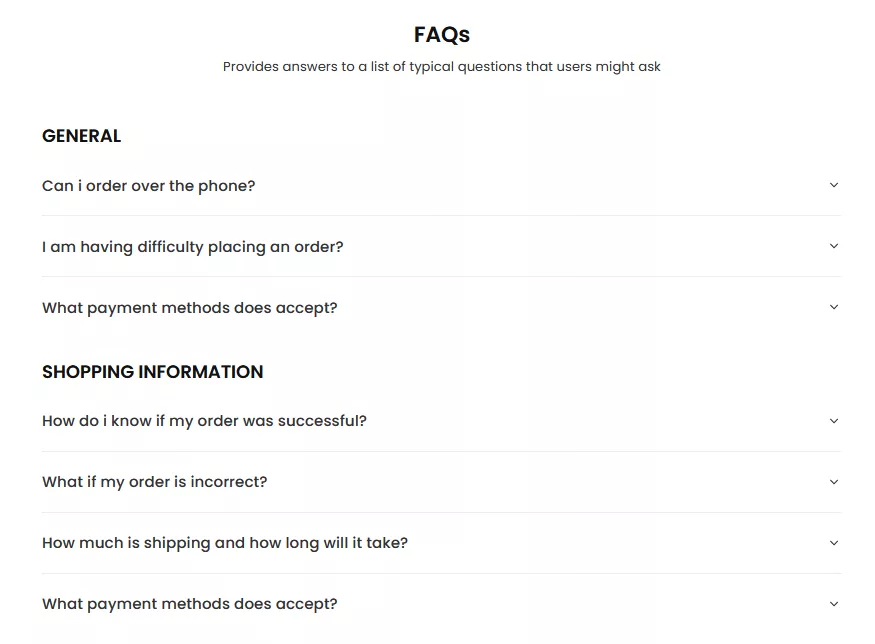
In the theme editor → Click "Add section" → Search section "Featured banner" and click to add 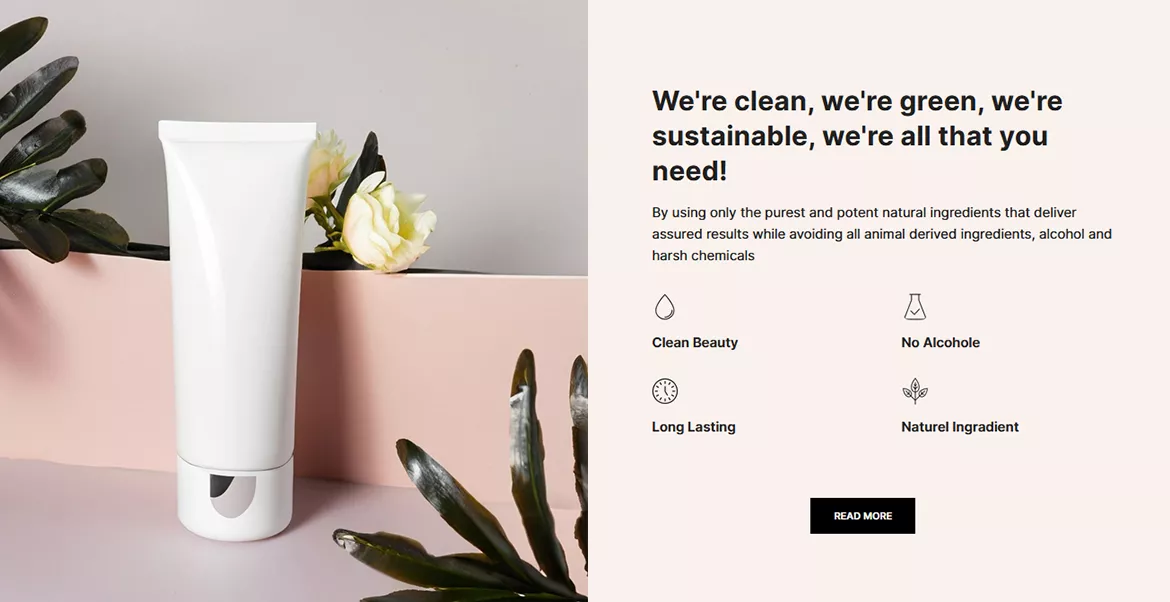
In the theme editor → Click "Add section" → Search section "Image with text" and click to add 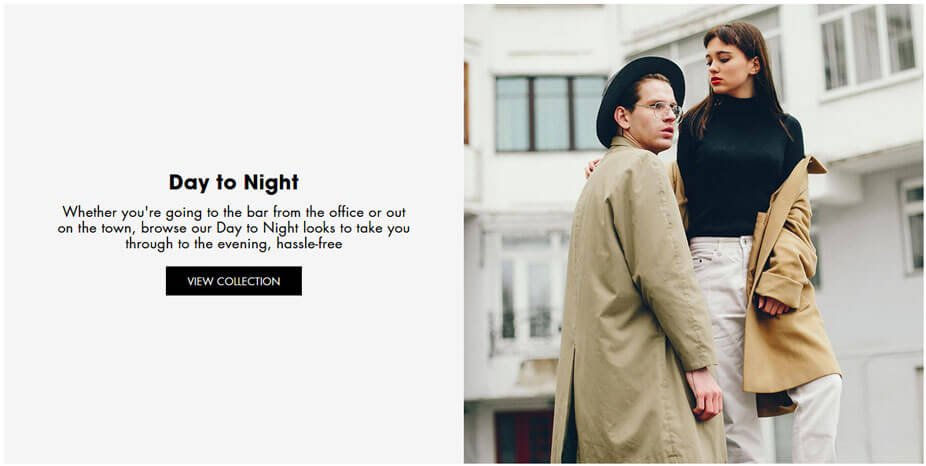
Displays multiple overlapping images with a content area that includes heading, text, and button and more blocks.
This creates a modern, stylish, and visually engaging layout.
In the theme editor → Click "Add section" → Search section "Layered images with text" and click to add 
In the theme editor → Click "Add section" → Search section "Multicolumn" and click to add 
Tell a brand story with motion effect. Section displays an images that scrolls vertically alongside text content.
In the theme editor → Click "Add section" → Search section "Scrolling image" and click to add 
In the theme editor → Click "Add section" → Search section "Video" and click to add 
In the theme editor → Click "Add section" → Search section "Video in background" and click to add 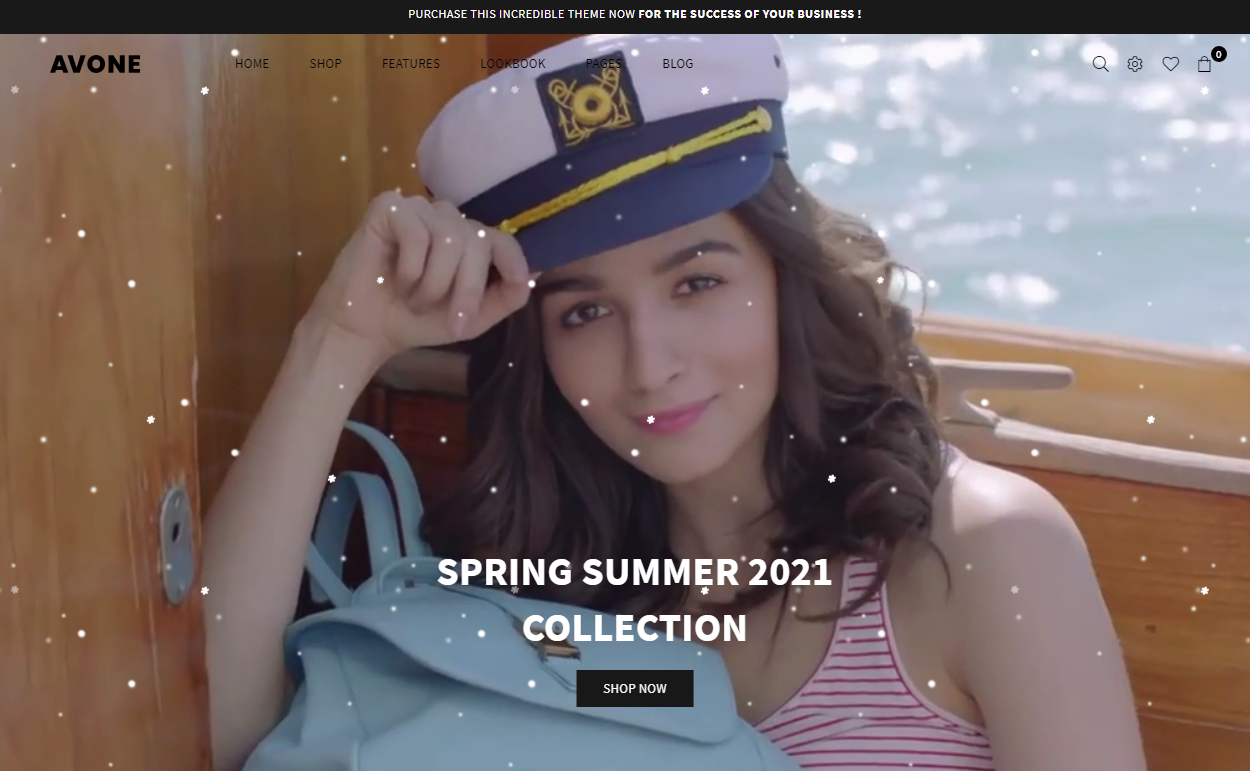
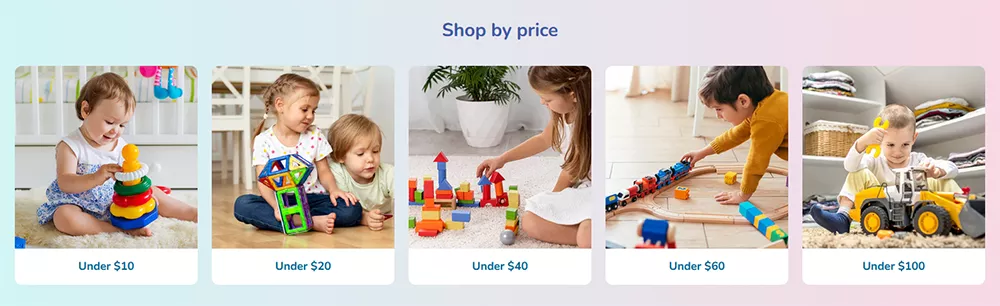
Alternative to masonry banner. Grid Banners section displays multiple banners arranged in a predefined grid layout.
Each banner include an image, heading, text, and link.
In the theme editor → Click "Add section" → Search section "Grid Banners" and click to add There are seven different style available to show grid banners. Click here to view all grid style.
In the theme editor → Click "Add section" → Search section "Hero banner" and click to add The Hero Section is available with multiple layout styles and content positions to match your brand design.
You can easily customize : Content position (left, center, right), Text alignment, Background image or color, Button style, placement and more
This flexibility allows you to create an eye-catching first impression and highlight important promotions, collections, or announcements effectively.
With supported theme blocks, you can add various types of blocks inside the hero banner — not only text. This allows you to create more dynamic and engaging layouts.

In the theme editor → Click "Add section" → click "Masonry banners" The Masonry Banner section displays multiple banners in a stylish, uneven grid layout. It helps create a modern and eye-catching design on your homepage
Each banner can include: Image, Heading, Subheading, Button, Link to collection, product, or custom URL Click here to view more styles
Custom Content section allows you to create flexible layouts by adding different types of content blocks in one section.
This section is designed to give you maximum control over content arrangement without custom coding.
In the theme editor → Click "Add section" → Search section "Custom content" and click to add 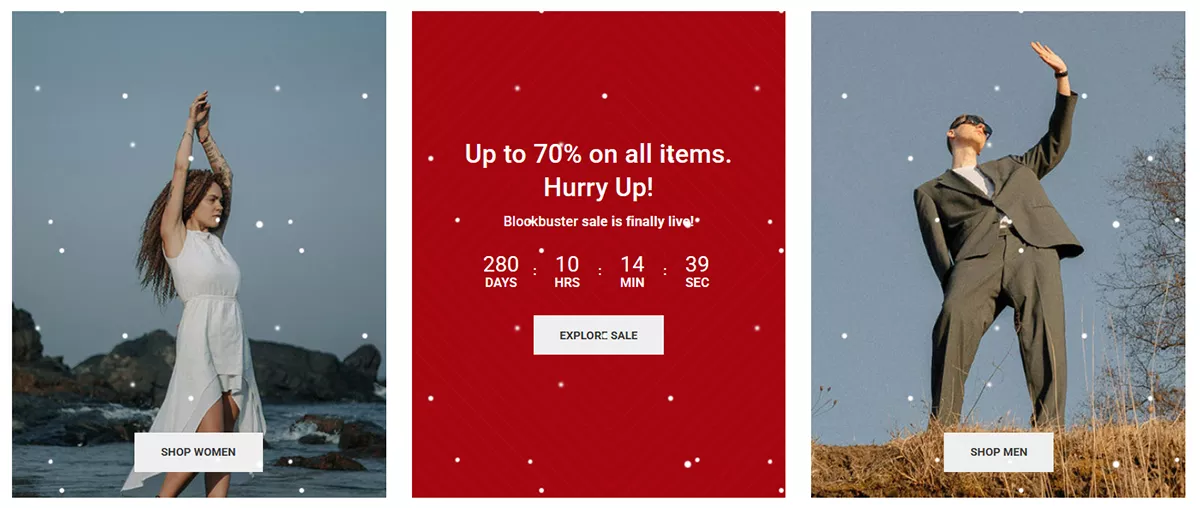
In the theme editor → Click "Add section" → Search section "Custom content : masonry" and click to add 
In the theme editor → Click "Add section" → Search section "Contact form" and click to add 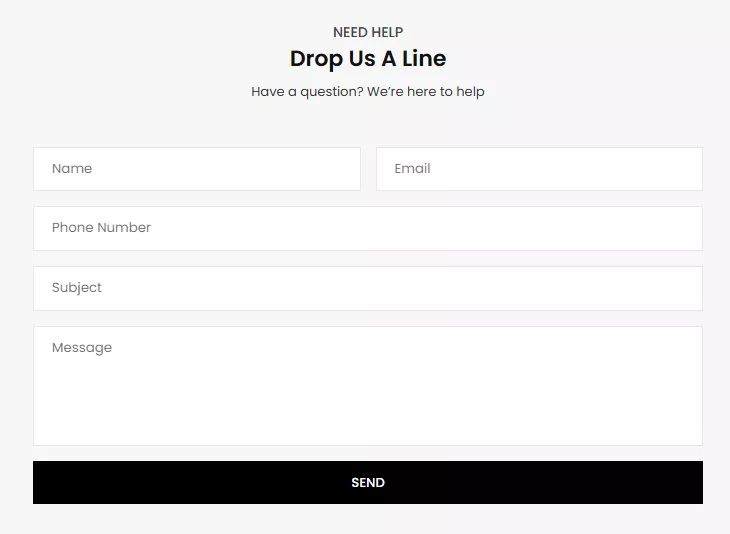
In the theme editor → Click "Add section" → Search section "Map" and click to add 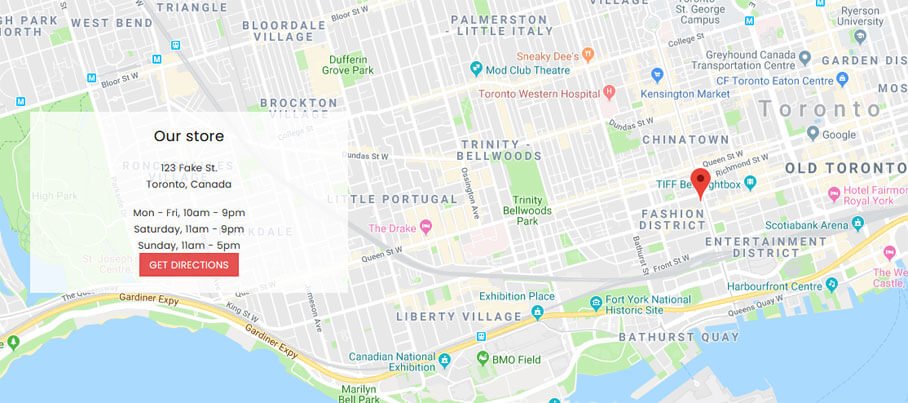
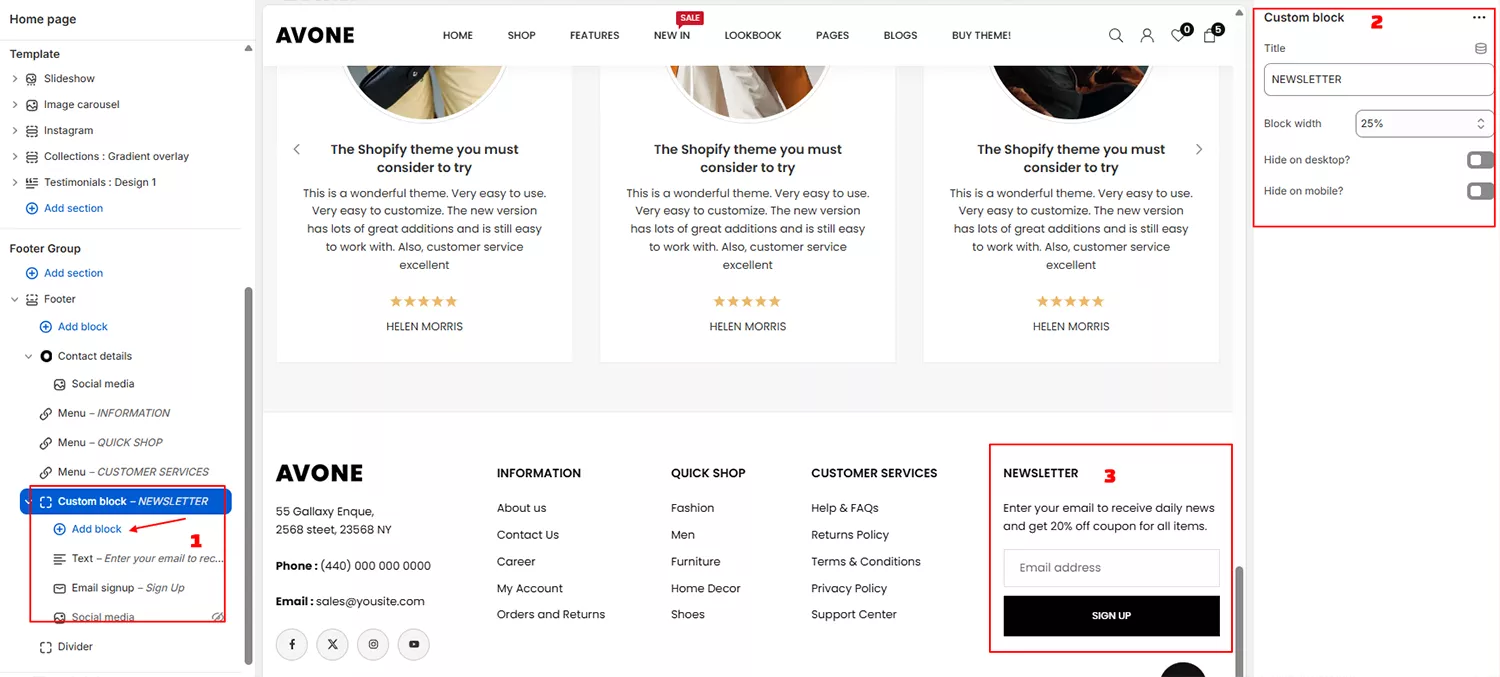
In the theme editor → Click "Add section" → Search section "Newsletter" and click to add 

Store Locator section allows you to display your physical store locations along with address details and an interactive map.
In the theme editor → Click "Add section" → Search section "Store locator" and click to add 
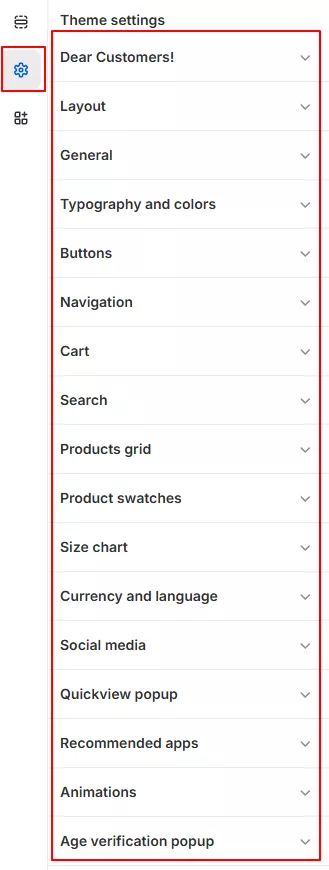
In the theme editor → Click "Theme settings" icon→ All global theme settings listed here
In the theme editor → Click "Theme settings" → Locate "Layout Style" 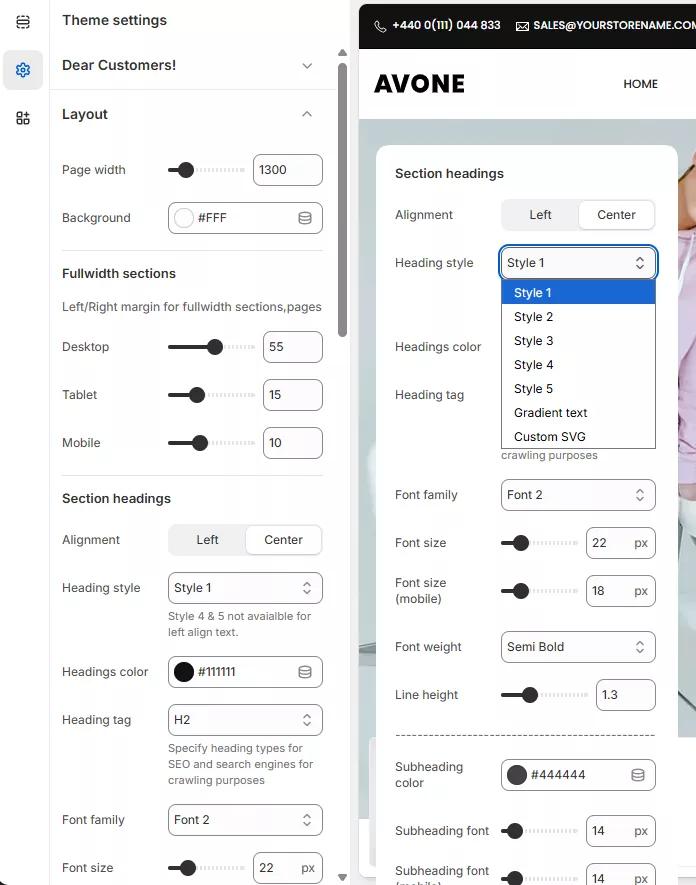
In the theme editor → Click "Theme settings" → Locate "General" 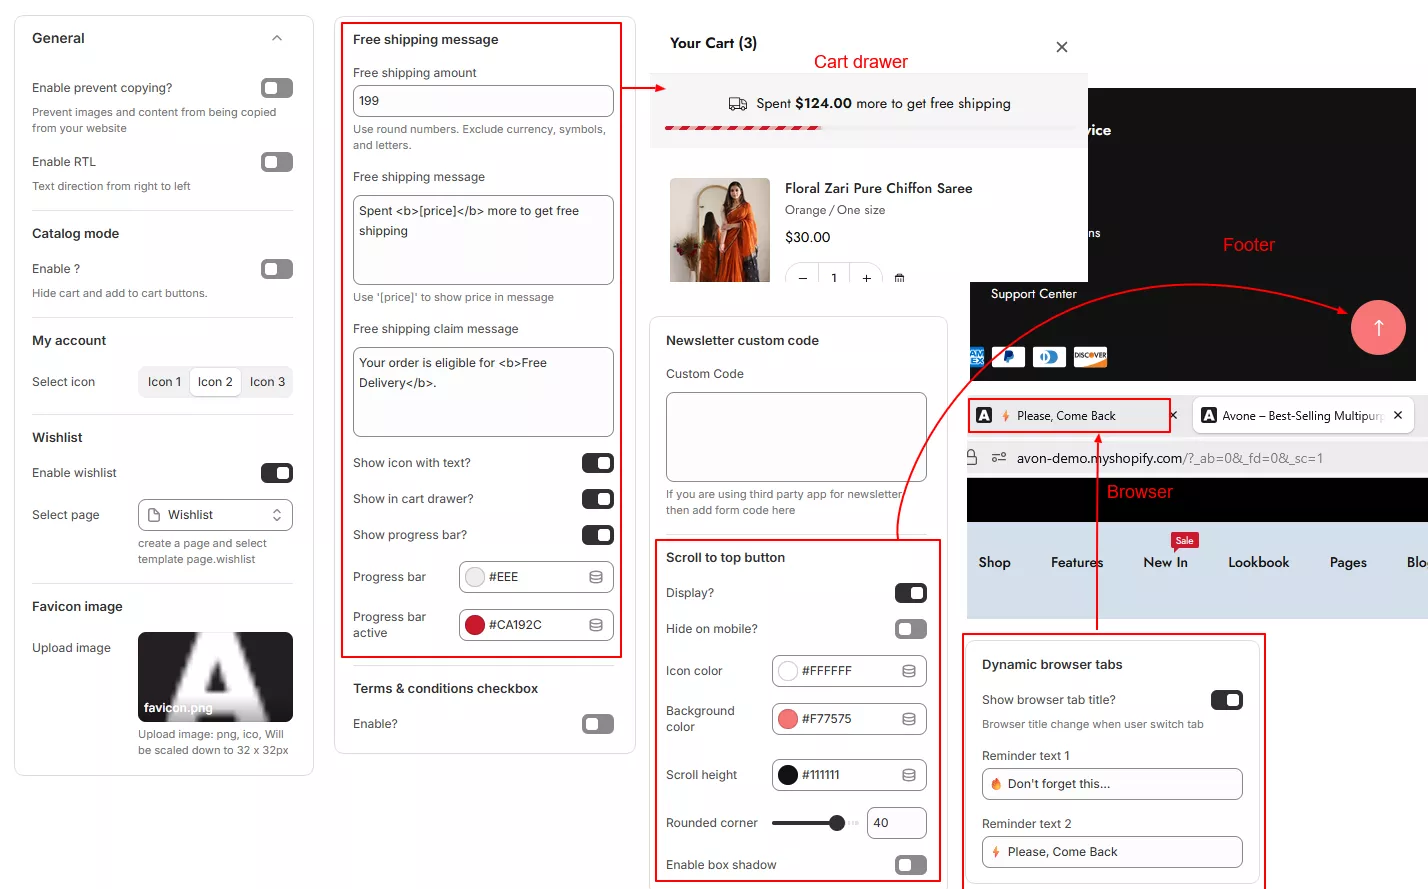
In the theme editor → Click "Theme settings" → Locate "Typography and colors" In the theme editor → Click "Theme settings" → Locate "Search" 
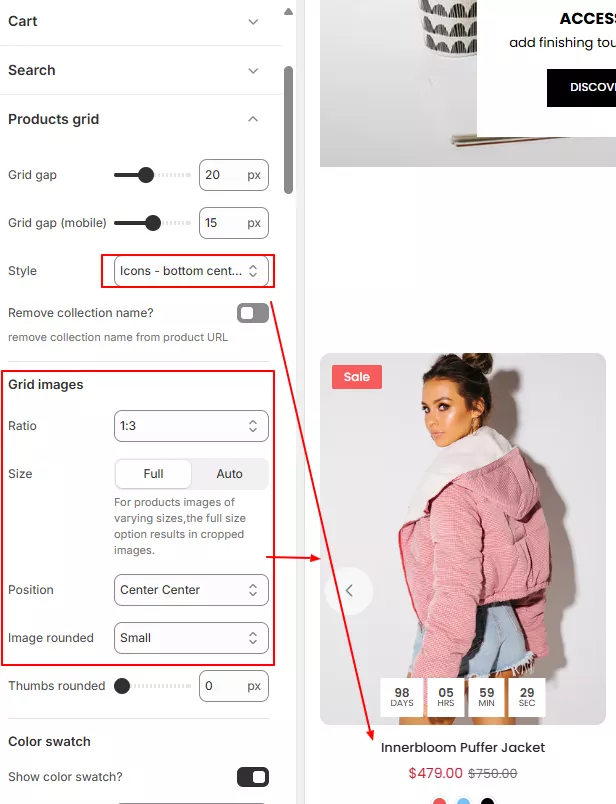
In the theme editor → Click "Theme settings" → Locate "Products grid" This is global product grids's settings. These settings will be overwrite by individual section's grid settings
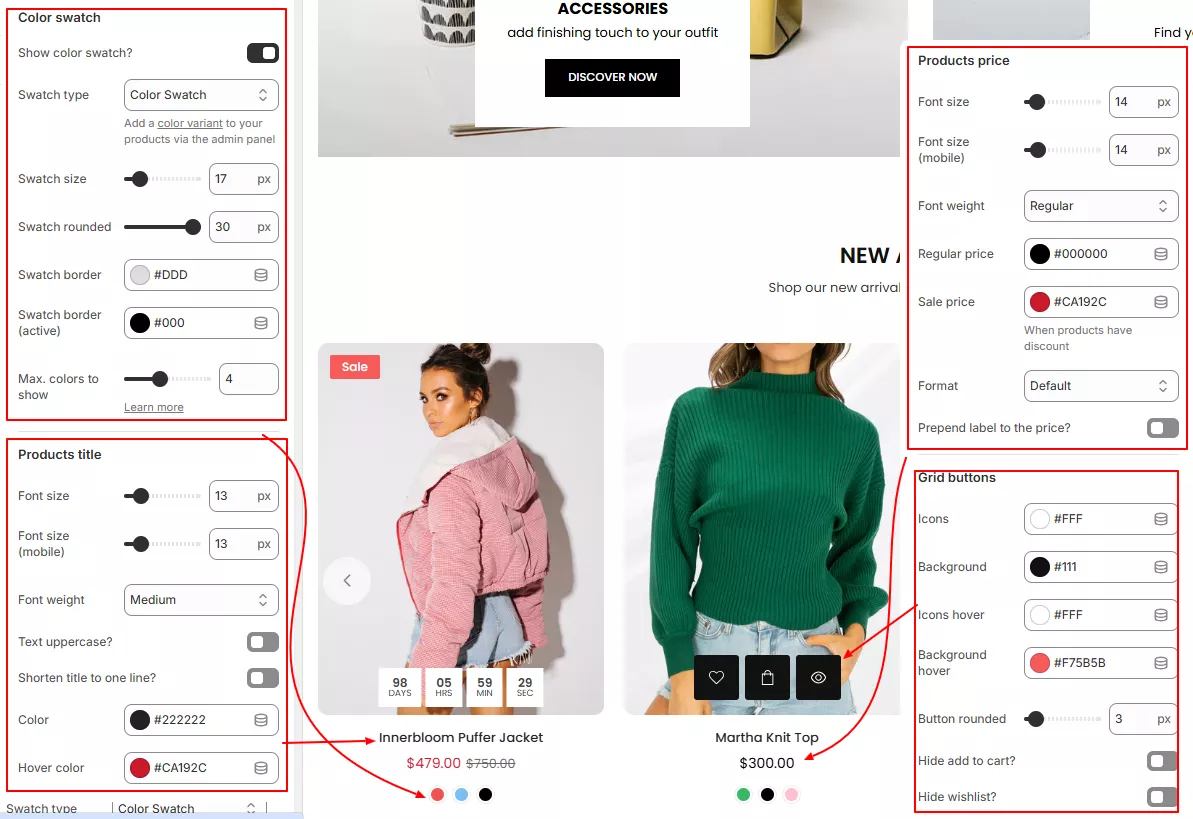
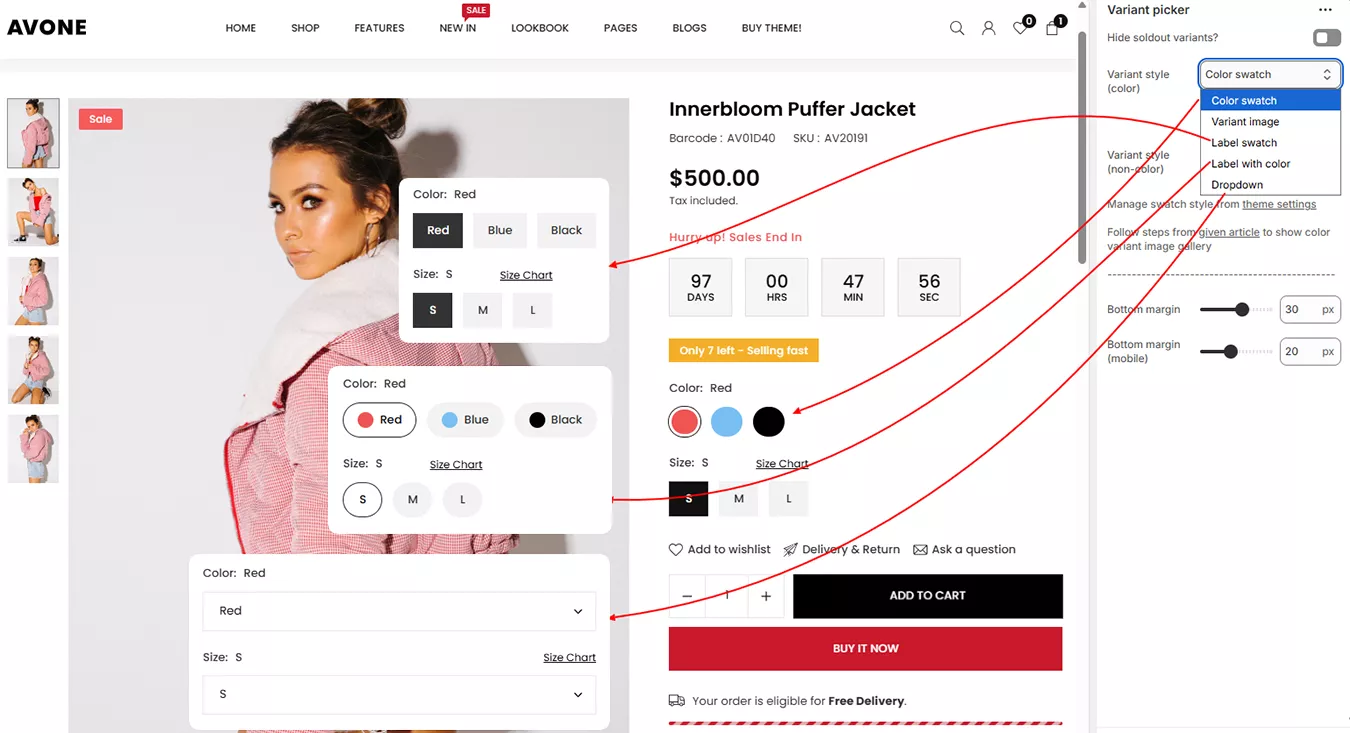
In the theme editor → Click "Theme settings" → Locate "Product swatches" 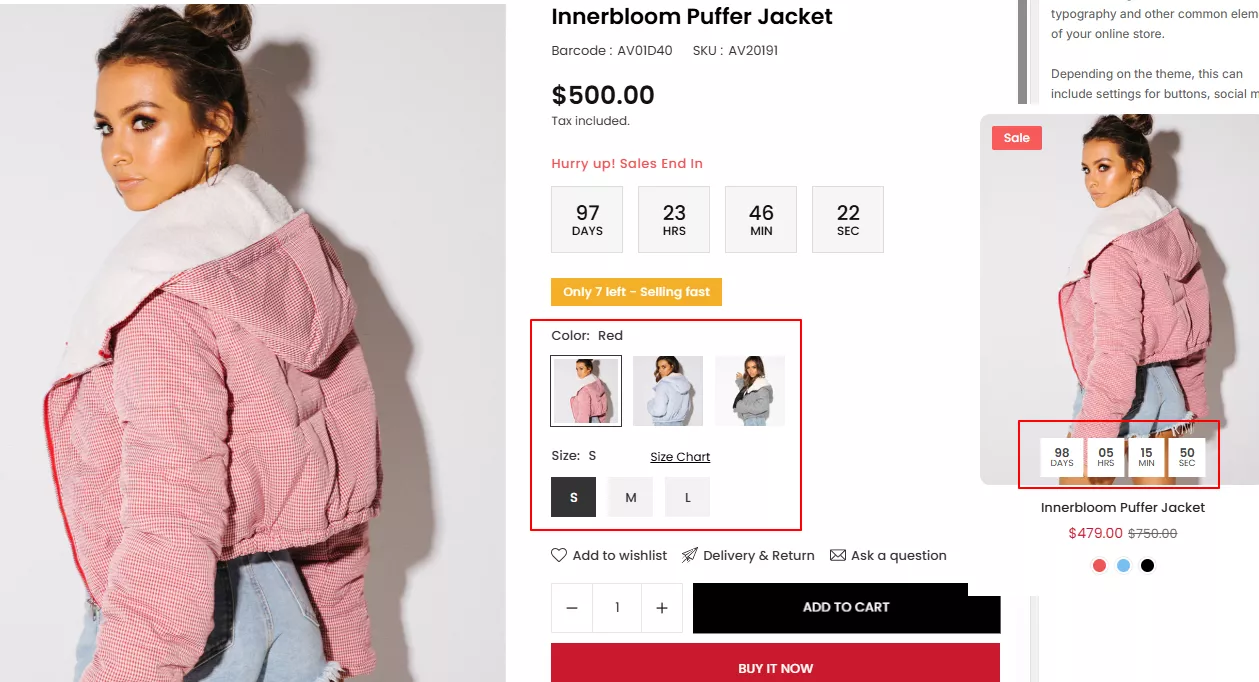
In the theme editor → Select "Products → Default product" from top dropdown menu→ Locate "Size chart" 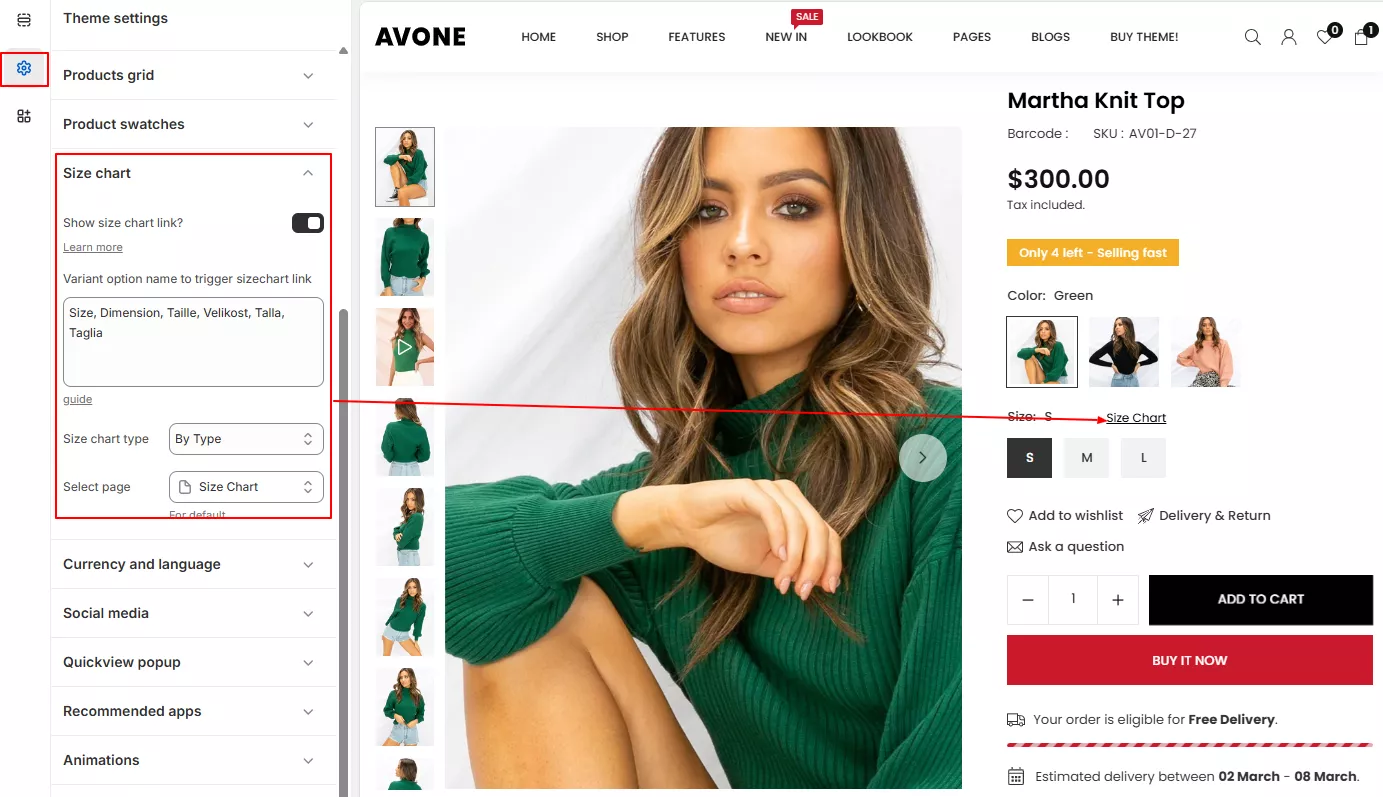
In the theme editor → Click "Theme settings" → Locate "Currency & Language" 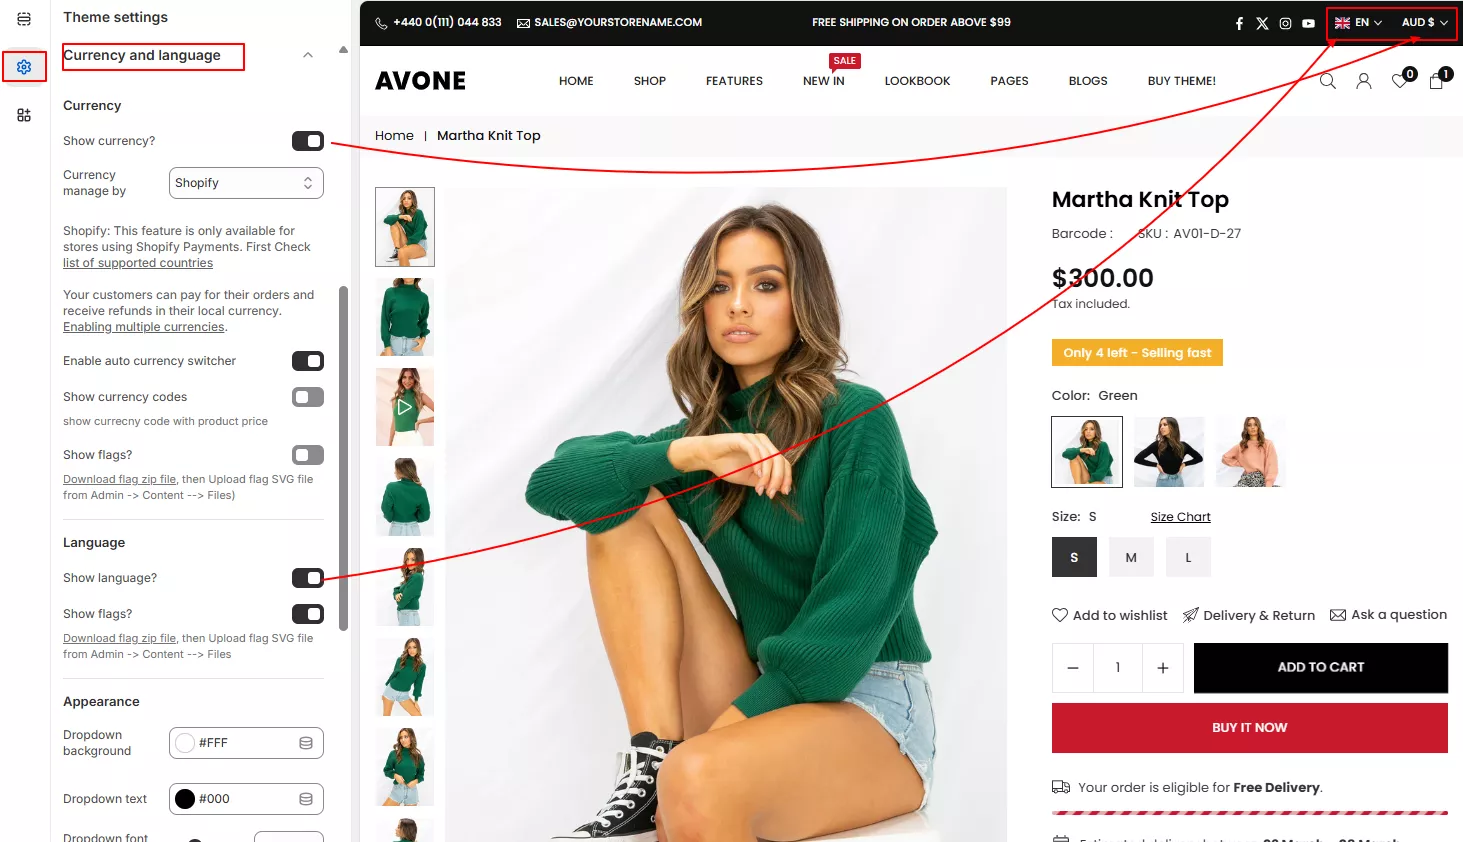
Enable currency conversion :
Select to show the currencies on store
Format :
There are 2 options: Without Currency, Ex: $10 and With Currency, $10 CAD
Supported currencies:
Add the currencies, seperated by the space.
Default currency:
Enter the currency you want to set the default for your store
In the theme editor → Click "Theme settings" → Locate "Animaton" In the theme editor → Click "Theme settings" → Locate "Age verification popup" You can do settings for Banner , Logo , Main Content Area , Order Summary , Typography and Colors of Checkout Page

In the theme editor → Select "Collections → Default collection" from top dropdown menu → Click Collection page (section on right sidebar)
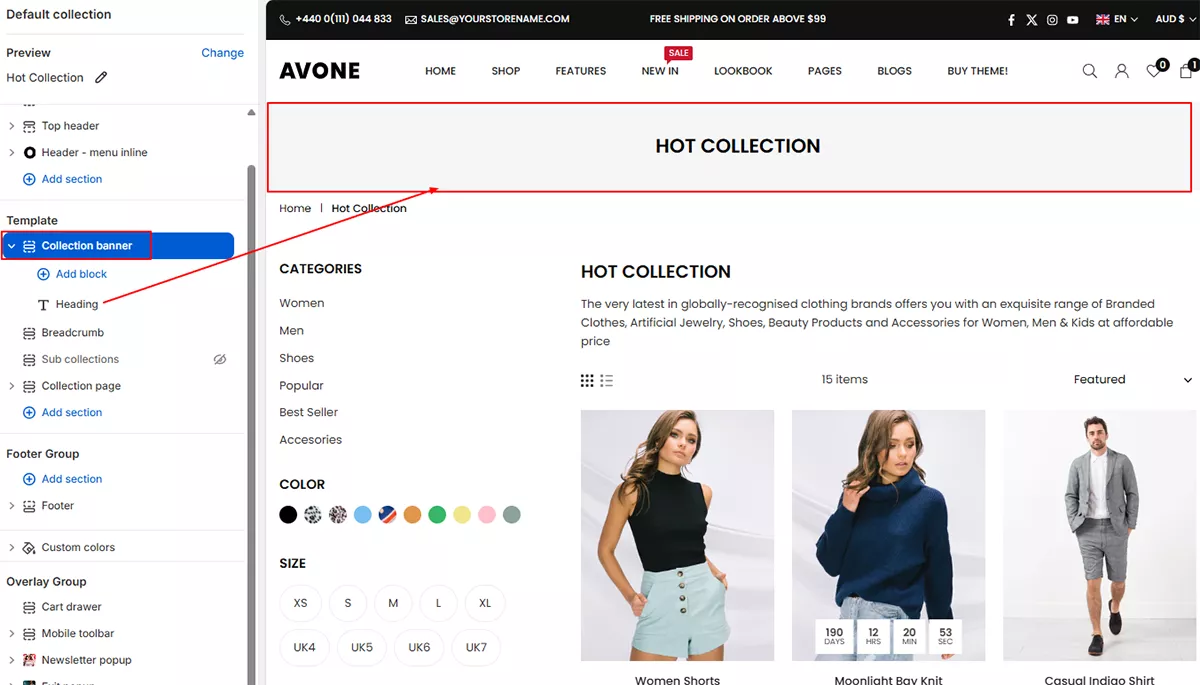
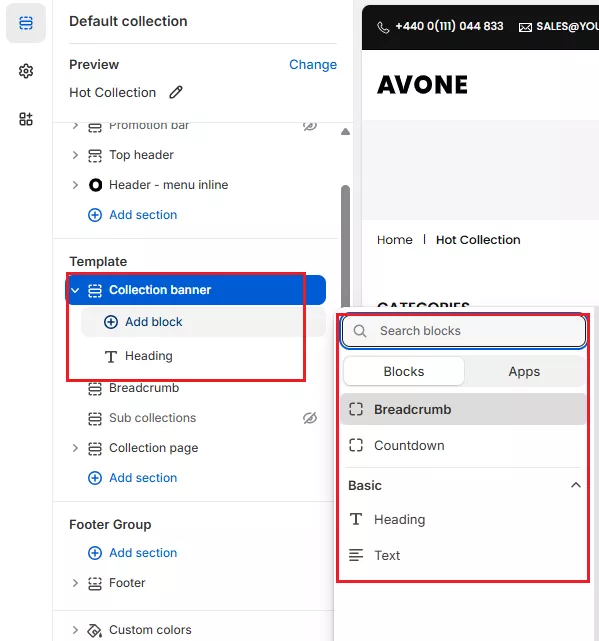
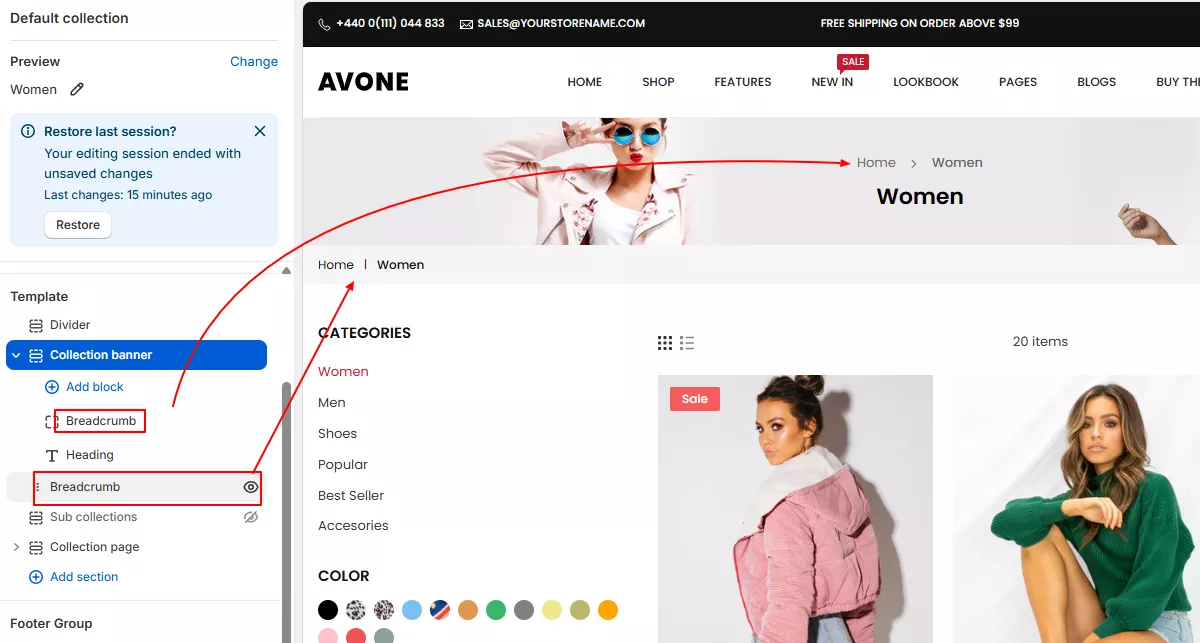
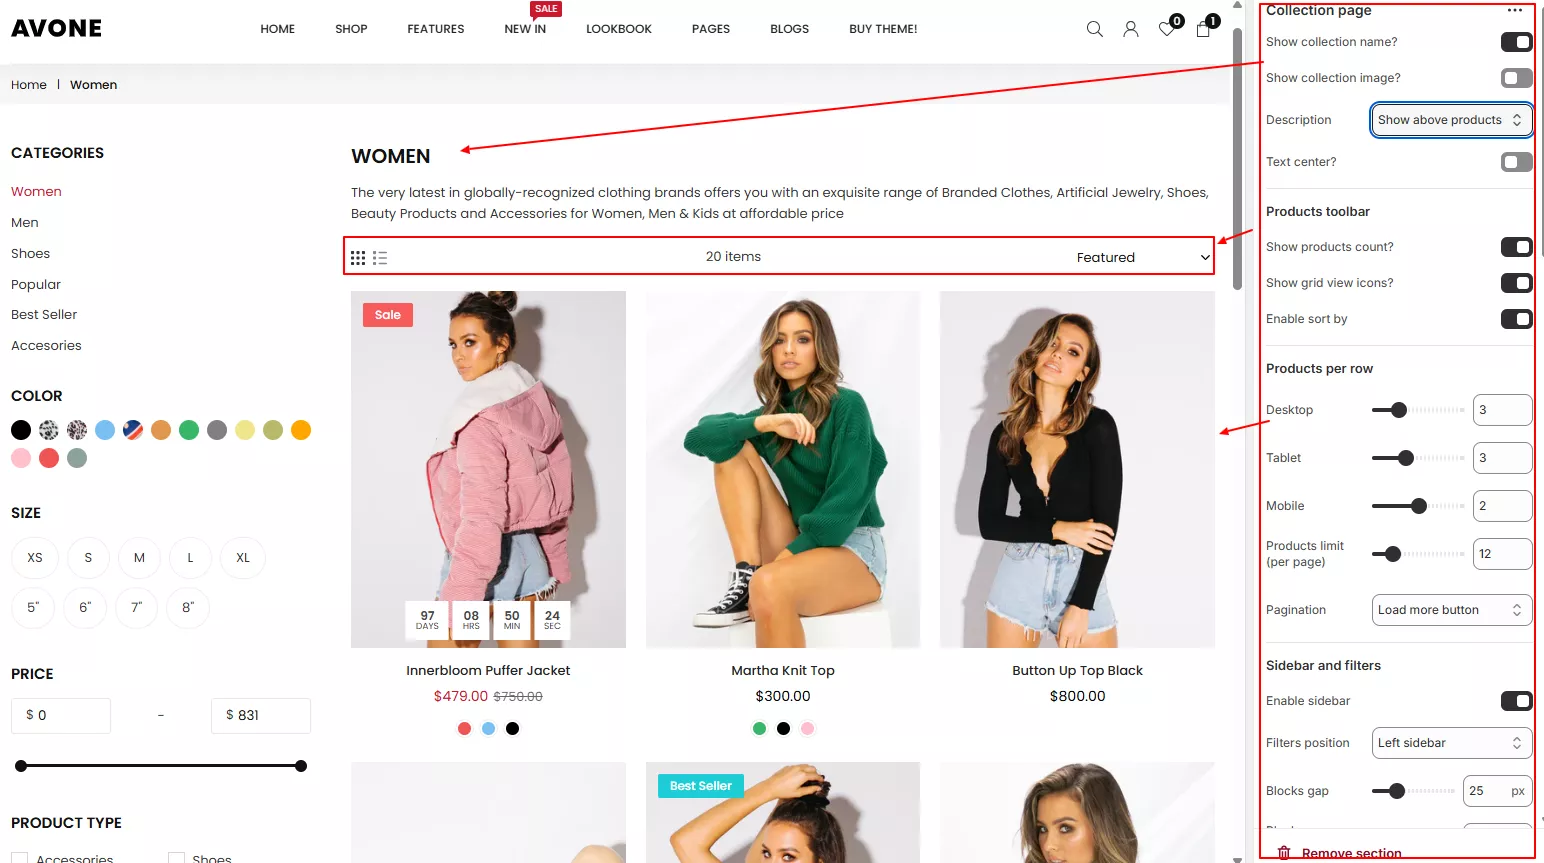
Avone has total 9 blocks to add in sidebar as attached below. You can arrange the position of blocks through drag and drops and click on each block to manage block content
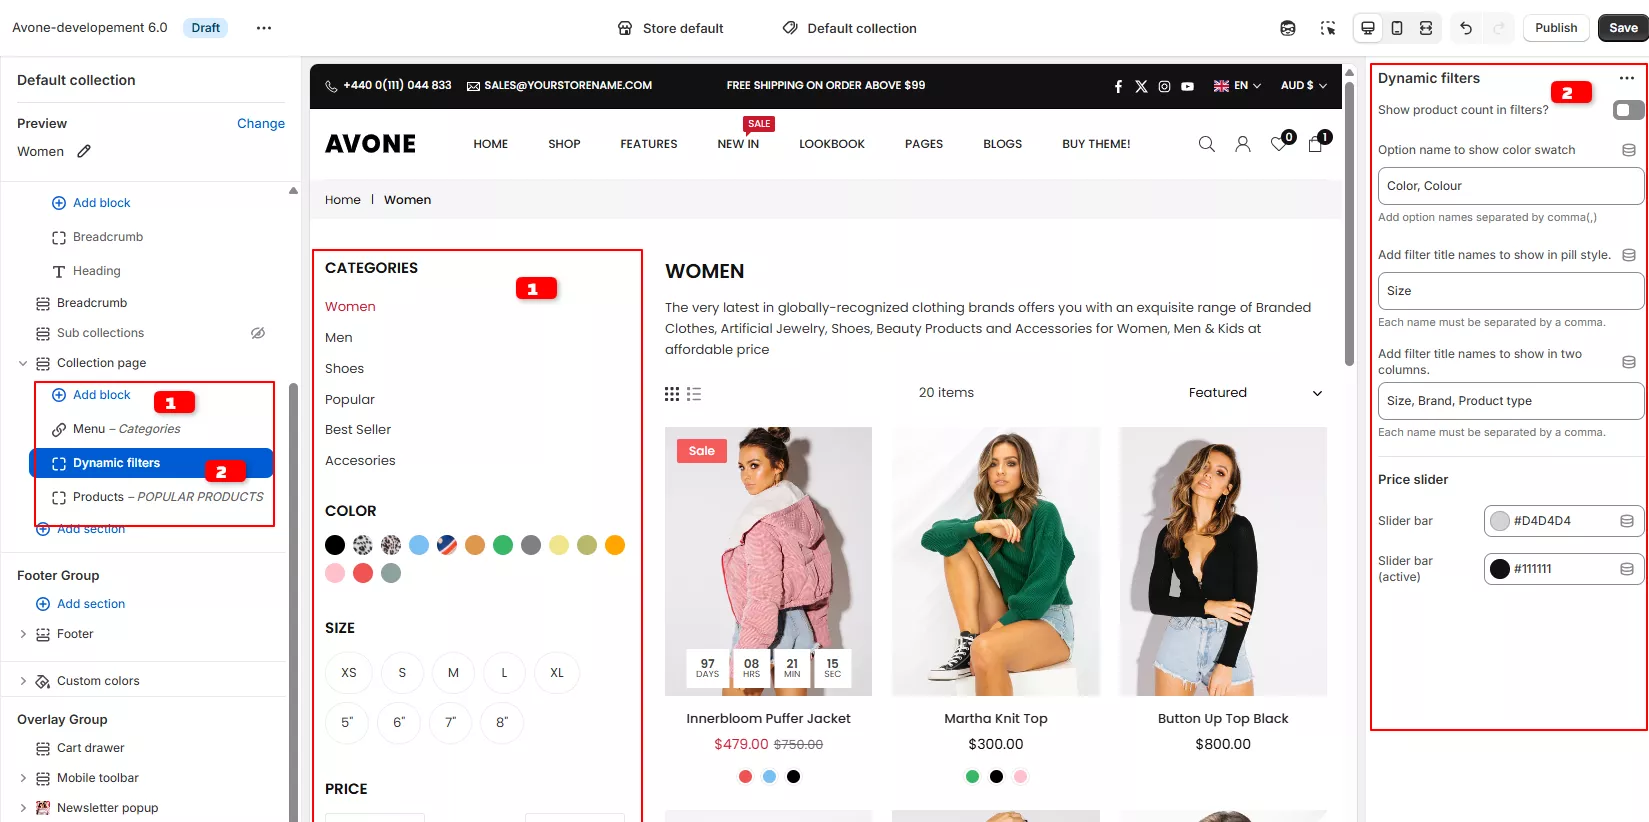
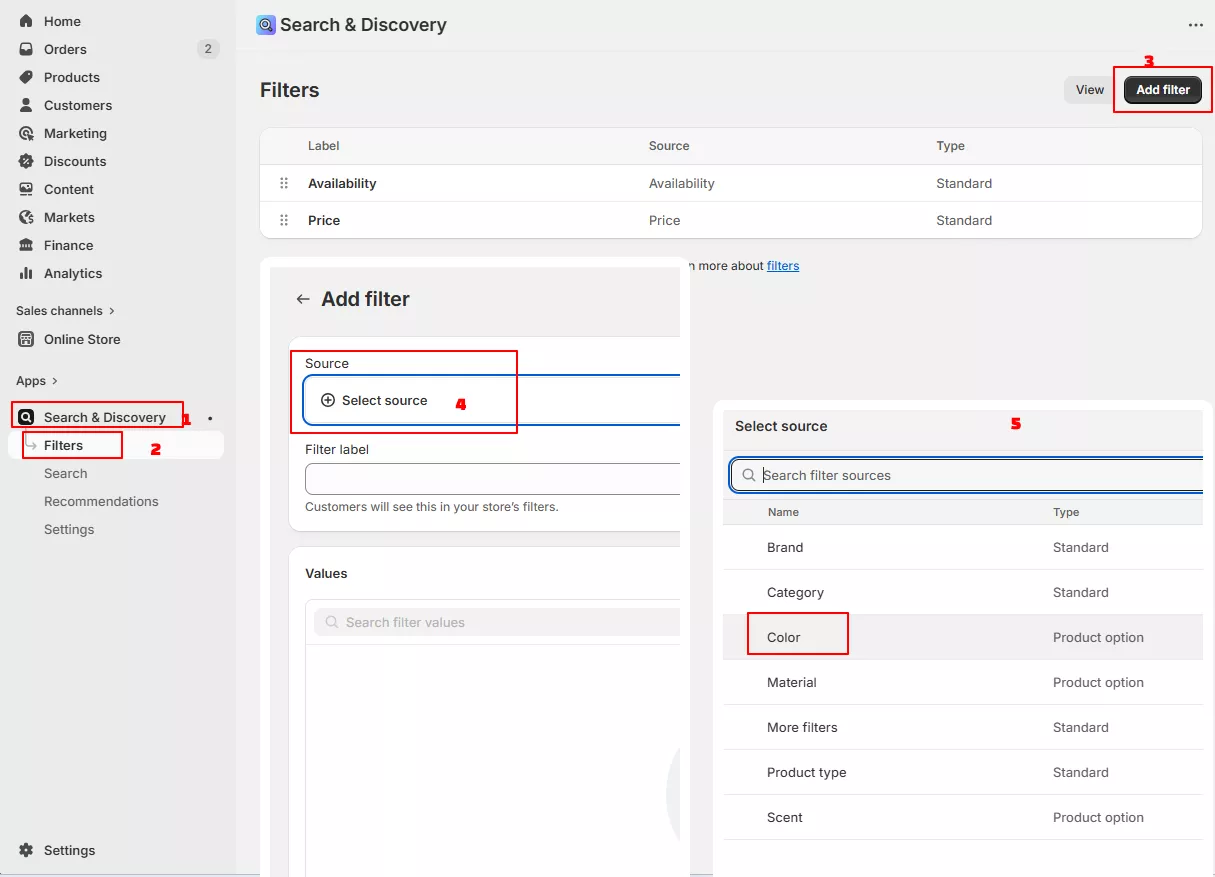
Dynamic filters are supported with online store 2.0 theme. When Collection filtering is enabled, the filter options appear on collection page and search result page.
Customers can filter their products by availability, product types, product vendors and Variant options(colors,size,height..)to find the products that interest them the most.
In dynamic filters, you do not need to go through that lengthy and time-consuming process of filter setup.
To Enable products filter on your store, follow below steps
|
|
There are 4 style you can display products filter. Display in Left Sidebar, Right Sidebar, Horizontal, Left Drawer
From theme editor(Edit theme) –> Open the drop-down menu at the top of the page –> Collections –> Default collection
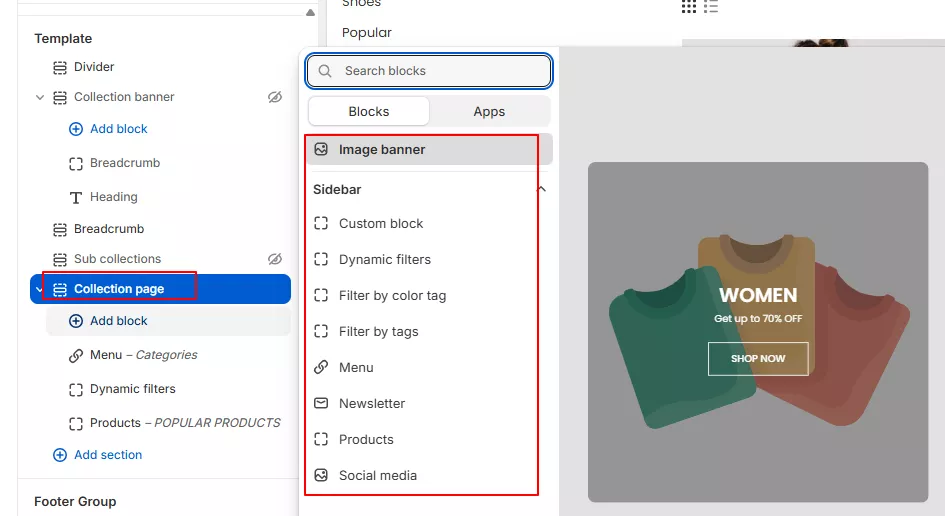
Click on Collection Pages section → Click "Add block" → Add Dynamic filters
Click on Dynamic filters block and you will see products filter options on right sidebar.
Product Filtering is built using tags of shopify. Tags are case sensitive. So if you have enter tags in small letter in sidebar assign same tags in small to product also.
In your store you can see Product filtering on top of left sidebar of collection page (As Product Filters)
There are unlimited filters available for your products using tag based filters.
Step 1 :
From Theme editor(Edit theme)→ Scroll down to "Custom Colors" section
Add all custom colors to be used for product filters. i.e. Sage, Olive Green, Camel etc...
Step 2 :
From Theme editor(Edit theme) –> Open the drop-down menu at the top of the page –> Collections –> Default collection
Click Collection page from sidebar

Add Filter by section title and Filter tags. Select Swatch Size and Swatch Style from dropdown.

From your store admin → Click "Products" → Click any product → Scroll down to "Tags" block.
In Tags sections, Start adding same tags that you enter in sidebar text block. (You need to assing Only product relavant tags. Tags are different for each products.)


Add Filter By Title and Filter tags

From your store admin → Click "Products" → Click any product → Scroll down to "Tags" block.
In Tags sections, Start adding same tag that you enter in sidebar text block. (You need to assing Only product relavant tags. Tags are different for each products.)


With the Avone 6.0 version, product pages now support blocks inside blocks, giving you greater flexibility and control over your design.
You can easily add different blocks to the product page and use the drag-and-drop feature to rearrange them as needed.
The main sections you can interact with and customize on the Product page are listed below:
Step 1:
In the theme editor(Edit theme)→ Select "Products → Default product" from top dropdown menu→ Locate "Product page" 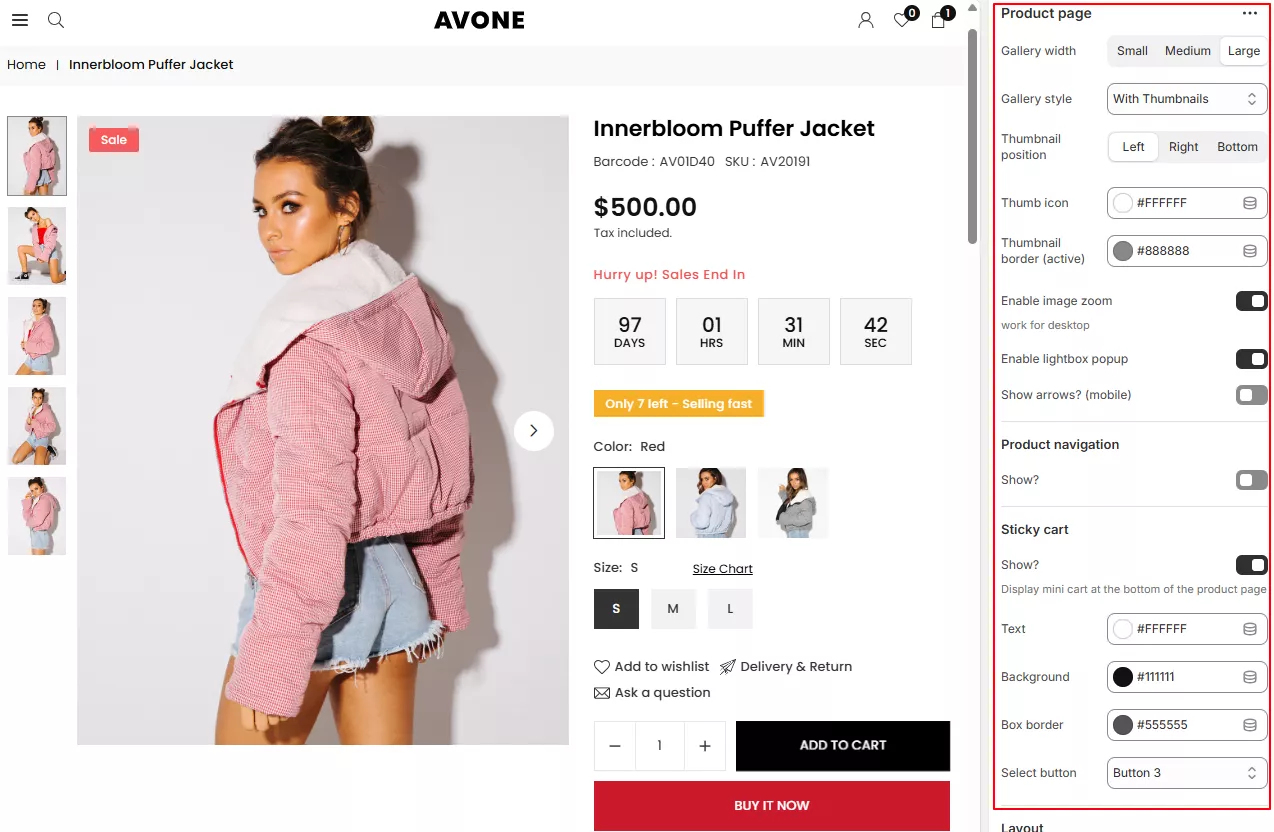
Click on Add block to add a new block.
To edit an existing block, simply click on the block you want to modify.
You can also drag and drop blocks to rearrange them as needed.
All blocks are easy to use, and wherever additional guidance is required, a shared guide link is provided directly within the respective block for quick and easy access.

We advise reading and familiarizing yourself with the Shopify Variants. It is an extremely well written and easy to understand.
There are many styles to display product swatches
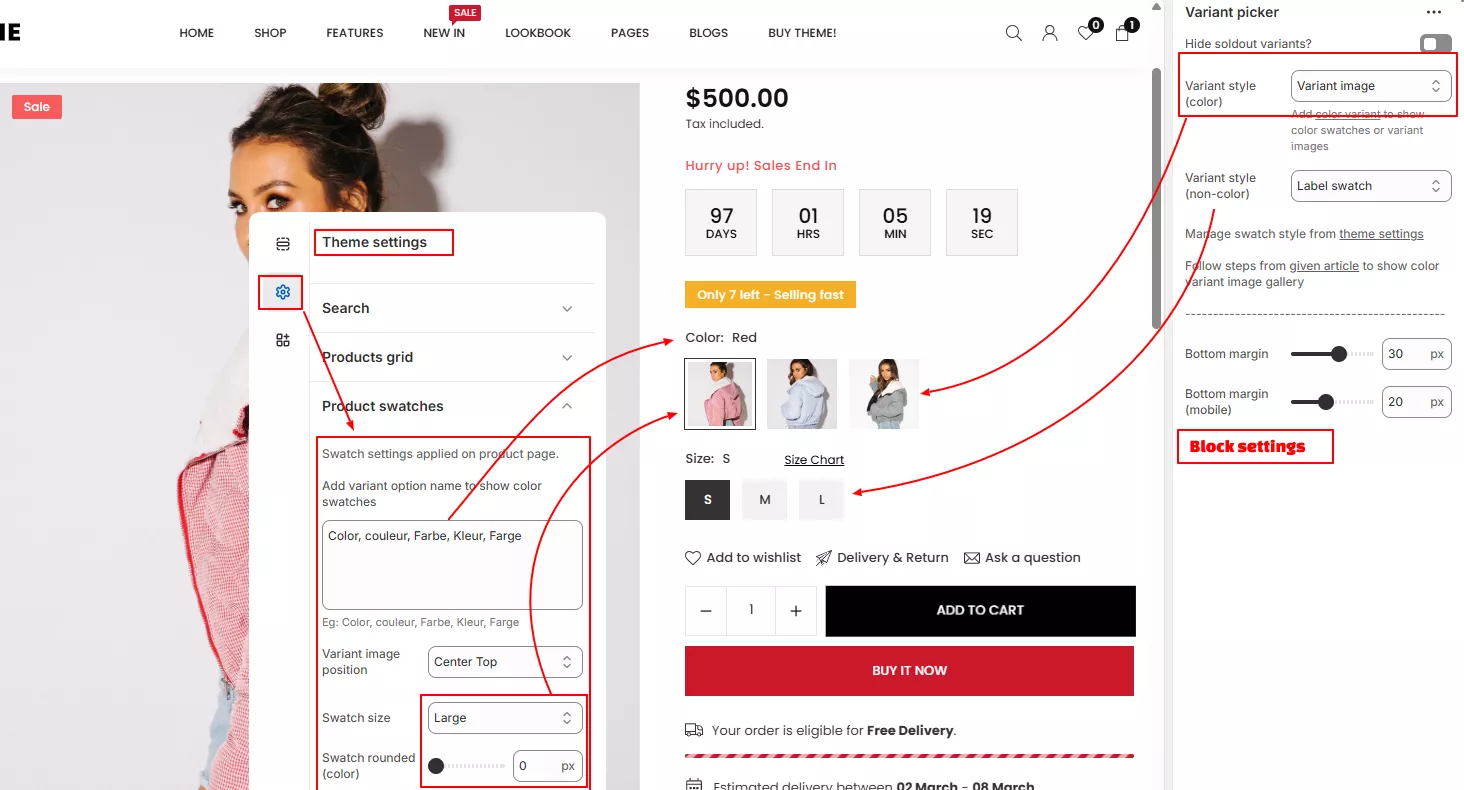
From your shopify store admin→ Click Products → Select any product you want to edit →
Now scroll down to Variants box and click on + Add options

Step 2 (Optional) :
When you select Color Swatch style to display product swatches and products have 2 color to display as product swatch then add color images from Custom Color Sections.
From Theme editor(Edit theme)→ Scroll down to Custom Colors section → Add Color

Product Pre-Order allows you to sale your items even if products are out of stock on your store.
Step 1 :
From your Shopify admin, click Products and select product you want to manage for pre order
Select "Continue selling when out of stock" and click save
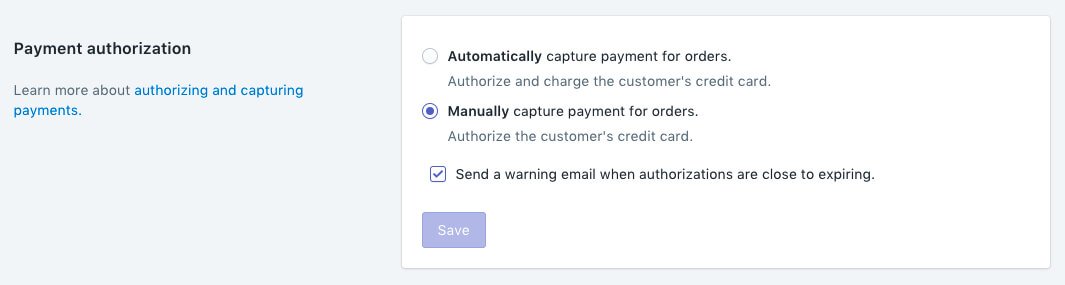
Step 2 :
From your Shopify admin → Click Settings → Payments.
Find Payment capture Click on Manage button → Select "Manually capture payment for orders." and click save.
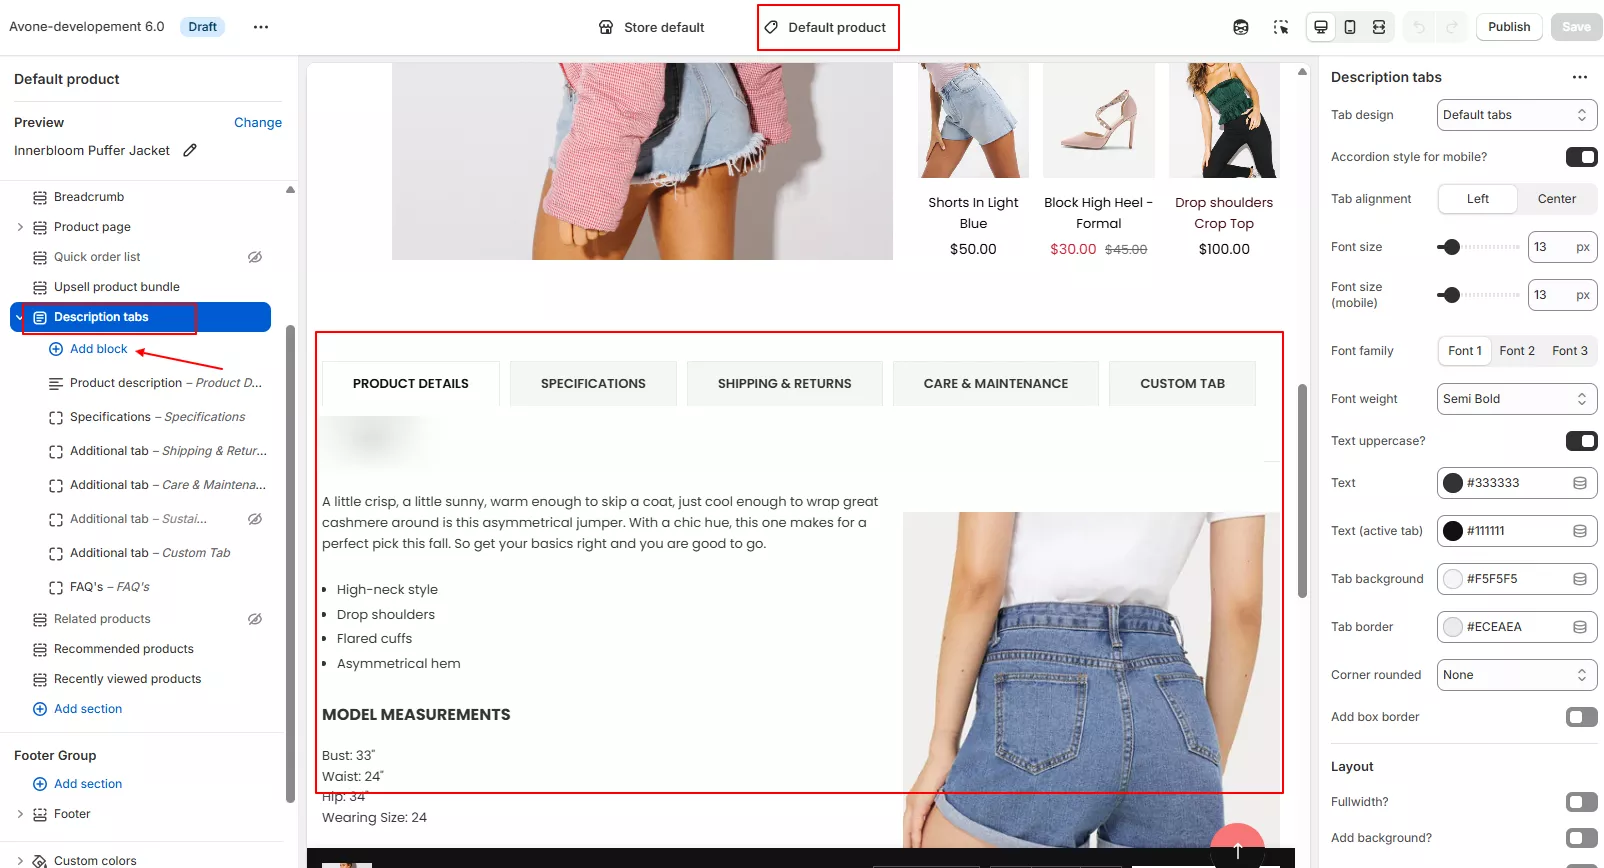
From theme editor(Edit theme) –> Open the drop-down menu at the top of the page –> Products –> Default product –> Click Description tabs
|
|
From Theme editor(Edit theme) –> Open the drop-down menu at the top of the page –> Products –> Default product
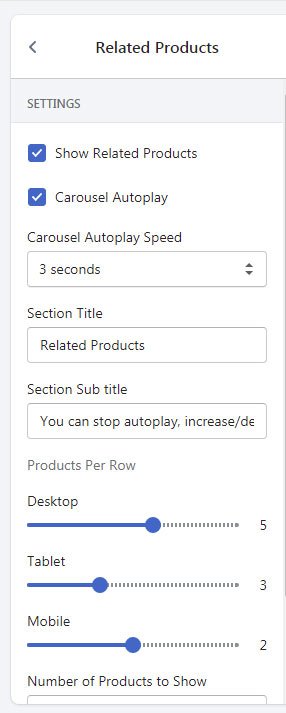
Click on Related products section from left sidebar
From Theme editor(Edit theme) –> Open the drop-down menu at the top of the page –> Products –> Default product
Click on Recommended Products section from left sidebar

From Theme editor(Edit theme) –> Click Edit theme button –> Open the drop-down menu at the top of the page –> Products –> Default product
Click on Recently Viewed Products section from left sidebar

We have created the premade template below using sections. Templates always show from the publish theme.
While you are working with Avone theme and creating pages, you need to publish Avone theme for a moment to select Avone theme templates.

From your store admin → Click Online Store→ Pages→ Click Add page:
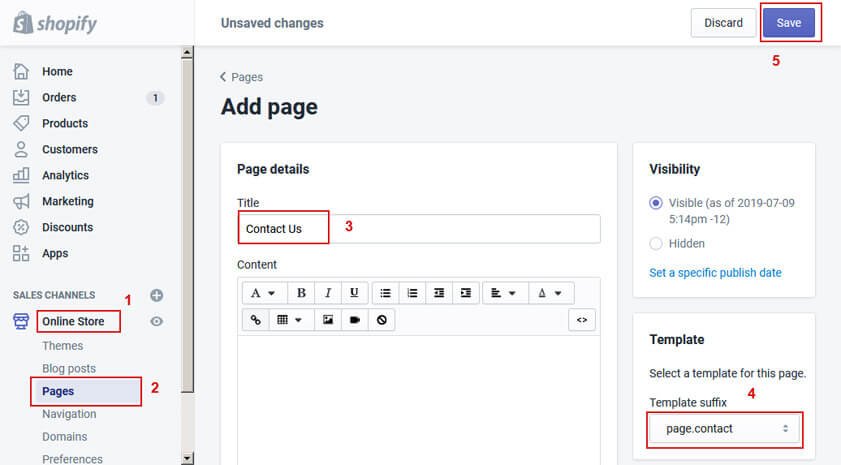
Add contact page detail from Contact page Section
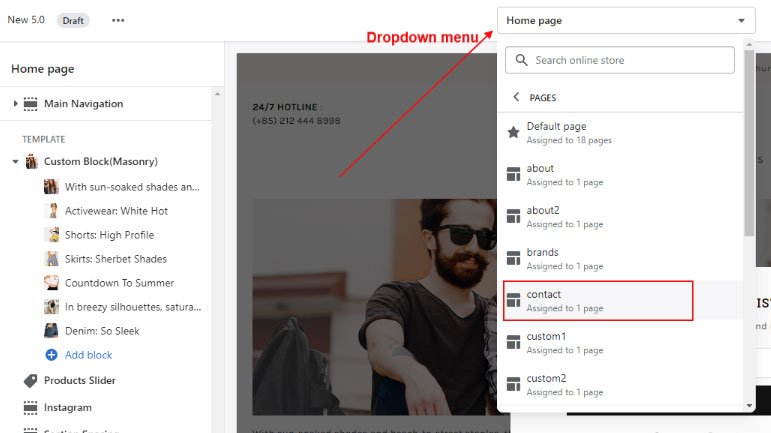
In the theme editor → Select Contact Page from top dropdown menu
Click Contact Page section and customize look from sidebar.
To add/edit contact field, please follow below guide:
Adding fields to the Liquid Contact FormStep 1:
From your store admin → Click Online Store→ Pages→ Click Add page:
Set page Title and choose Theme template about and save
Step 2:
In the theme editor → Select About Page from top dropdown menu
Set Page banner from Page section OR Add/edit/remove/hide blocks or sections
Step 1:
From your store admin → Click Online Store→ Pages→ Click Add page:
Set page Title and choose Theme template faq and save
Step 2:
In the theme editor → Select FAQ Page from top dropdown menu
Set Page banner from Page section and Add/edit/remove/hide blocks or sections
Step 1:
From your store admin → Click Online Store→ Pages→ Click Add page:
Set page Title and choose Theme template wishlist and save
Step 2:
In the theme editor → Theme Settings → General
Make you sure "Enable WishList" option is enabled and Select WishList page.
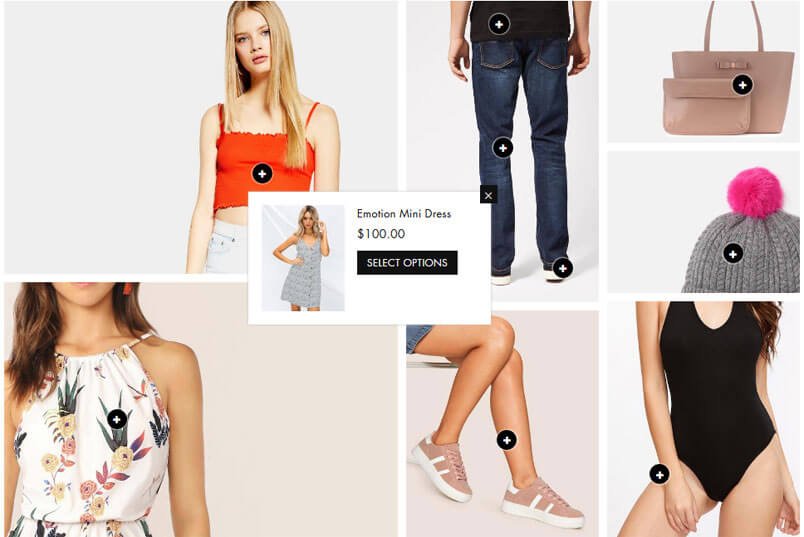
Lookbook Photo Gallery is an awesome marketing tool and new way to showcase your products in a different style. You can add shoppable tag or link the products on images so that customers can shop directly from the Gallery. This creates a beautiful shopping hotspot for your customers to find out more details about featured products and add them directly to their cart
Step 1:
From your store admin → Click Online Store→ Pages→ Click Add page:
Set page Title and choose Theme template lookbook and save
Step 2:
Add lookbook pictures from :
In the theme editor → Select Lookbook Page from top dropdown menu
Set Page banner from Page section and Add/edit/remove/hide blocks or sections
Step 1 :
How to create a blog and write an article ?
Step 2 :
In the theme editor → Select Blogs → Default blog (from top dropdown menu)
From Blog Pages section, Add sidebar bloks, set page banner, set page layout and manage page elements desing
In the theme editor → scroll down to Overlay Group ( right below footer group)All the settings and options in the Overlay Group sections are self-explanatory and easy to understand.
You can manage the following features from the Overlay Group section:This section helps you control promotional and interactive popups across your store.
In the theme editor → scroll down to Overlay Group → Click Exit popup sectionExit popup appears when a visitor is about to leave your store.
🎯 Purpose of an Exit Popup
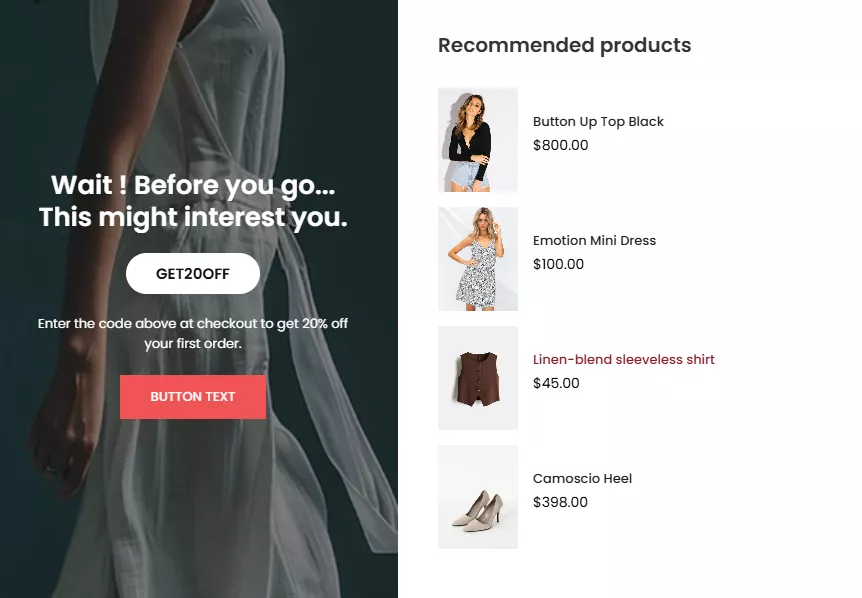
In the theme editor → scroll down to Overlay Group → Click Newsletter popup section The Newsletter Popup is used to collect customer email addresses and grow your subscriber list.
It helps convert store visitors into potential customers by offering incentives such as discounts, special offers, or exclusive updates.
By capturing emails, you can send promotional campaigns, product updates, and announcements to increase customer engagement and boost sales.
Newsletter Popup Preview

In the theme editor → scroll down to Overlay Group → Click Products notification section
A small popup appear on the store that notifies visitors about product updates, such as recent purchases, low stock, new arrivals,
or back-in-stock items. It helps create urgency, build trust, and encourage faster purchase decisions..

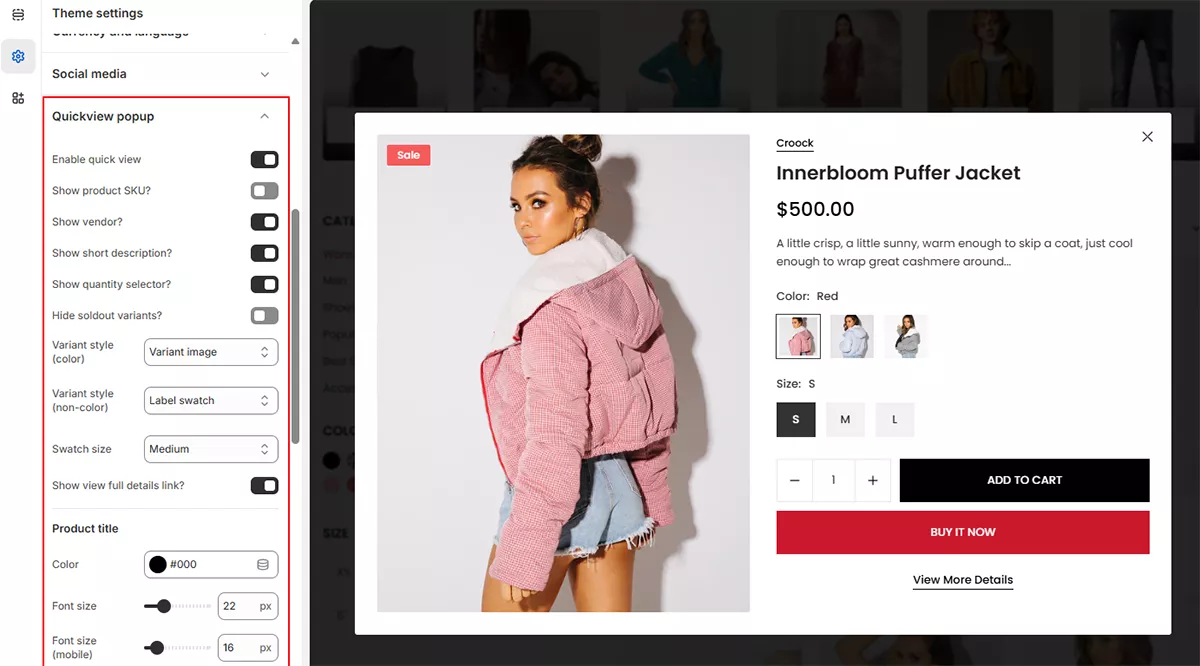
In the theme editor → Click "Theme settings" → Locate "Quickview Quickview popup appears when a user clicks a “Quick View” button on a products grid.
Instead of taking the user to the full product page, the popup displays essential product information immediately, allowing for a faster shopping experience.
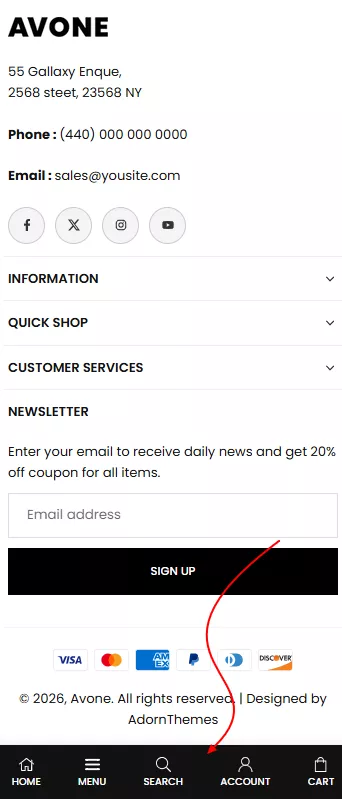
In the theme editor → scroll down to Overlay Group → Click Mobile toolbar section
A mobile toolbar is fixed navigation menu that appears on the bottom of a Shopify store when customers browse on a phone.
It makes navigation easier by keeping important links like Home, Shop, Search, Cart, Account — always within reach.
From your store admin → Click Online Store → Locate Theme you want to edit and click on Edit defaul theme content
From the list of themes, click on the button with three dots for the theme you are working on. Click on Edit theme default content.
Here's a quick way to change some of the more commonly text or you can use other language
Note: All images are just used for Demo Purpose Only. They are not part of the theme and NOT included in the final purchase files.


Social Media
Social sharing options :
Select to show social sharing on store
Social accounts :
Enter url social accounts which you want to show on store else leave blank